Snowflake CDC With Streams and a Better CDC Method
In this blog we will examine what Change Data Capture in Snowflake is all about, the mechanisms that make up Snowflake CDC, including its native features such as Snowflake Streams and Snowpipe Streaming, and the limitations of each. We will also see how BryteFlow as a third-party CDC tool, enables loading of data with log-based Change Data Capture to Snowflake – all without writing a single line of code.
Quick Links
- What is Snowflake?
- What is Change Data Capture (CDC)?
- Snowflake CDC: An Overview
- Snowflake CDC with Snowflake Streams
- Snowflake Snowpipe Streaming for Change Data Capture (CDC)
- Snowflake CDC with BryteFlow
What is Snowflake?
Snowflake is a Cloud-native SaaS (Software as a Service) platform that enables users to share data and connect to insights quickly, easily, and securely. Whether it is data warehousing, data lakes, data science, data engineering, or building applications, the Snowflake platform makes data accessible and available fast, with path-breaking features like scalable compute, massively parallel processing (MPP), separation of storage and compute, third-party tool support, consumption-based pricing and a presence across all major Clouds including AWS, Azure and GCP. Snowflake has a proprietary SQL engine that allows queries using simple SQL which adds to its ease of use. With Snowflake you do not need to buy hardware, software, nor invest in dedicated in-house teams for installation, configuration, and maintenance. It is a fully managed solution. The platform’s dynamic architecture scales on-demand, swiftly allocating computing resources based on workload requirements. SQL Server to Snowflake in 4 Easy Steps
What is Change Data Capture (CDC)?
Change Data Capture or CDC is the process that refers to the identification and monitoring of changes taking place in a data source so these changes can be captured in destination systems (e.g. data warehouses, data lakes, on-prem systems) to sync data with source. This helps in maintaining accuracy, data integrity and consistency across systems and data deployments. Change Data Capture is associated with real-time capture of data and provides near real-time updates which are essential for accurate reporting and business intelligence. CDC is designed for data environments which deal with high volumes of data required in real-time. It ensures low-latency, dependable, and scalable data replication, which makes Change Data Capture an excellent choice for zero-downtime migrations to the Cloud. SQL Server CDC for real-time SQL Server Replication
Snowflake CDC: An Overview
One of the strengths of Snowflake is that it can aggregate data from various sources including relational databases, files, web services, queues, and APIs. The Snowflake Change Data Capture (CDC) process is typically used to monitor and capture changes as they happen in source databases and transfer the changed data to Snowflake. Snowflake CDC involves extracting data from various source databases, such as SAP, Oracle, SQL Server, PostgreSQL, Teradata, Netezza, Salesforce, MongoDB, and MySQL etc. to Snowflake, and syncing changes at source using the database log files of each database (log-based CDC).
Snowflake CDC can be done using Snowflake’s native features like Snowflake Streams and Snowpipe Streaming to capture streaming data. It can also be done using third-party tools. Snowflake supports a variety of connectors, data pipelines and tools provided by partners for real-time replication. Here is a comparison between Matillion, Fivetran and BryteFlow for loading data from SQL Server to Snowflake. Also learn about Postgres CDC (6 Easy Methods to Capture Data Changes)
Where is Snowflake CDC used?
Snowflake CDC lends itself to a variety of use cases. SQL Server to Snowflake in 4 Easy Steps
Snowflake CDC can be used to deliver data from operational databases
Databases like SQL Server, Oracle, Postgres, and SAP where data is often needed to be captured in real-time to maintain transactional records. Oracle CDC (Change Data Capture): 13 Things to Know
Snowflake CDC can capture changes from NoSQL databases
NoSQL databases e.g. MongoDB, are used in applications and have a lot of data that is changing by the second. This data can be captured using Snowflake CDC. How to load terabytes of data to Snowflake fast
Snowflake CDC can capture data from event streams
Message brokers like Kafka stream continuous data from events and can be used for streaming CDC data. Snowpipe streaming is particularly useful for this. About Kafka CDC
Snowflake CDC – Some Benefits
Snowflake CDC paves the way for real-time analytics
Using Snowflake CDC, data scientists, engineers and analysts can access real-time data and incremental data changes for real-time dashboards and machine learning models. Snowflake CDC also improves the quality and relevance of business insights derived through analytics. Postgres to Snowflake-2 Easy methods to move data
Snowflake CDC delivers cost-efficiency
Snowflake CDC only processes the changed data, reducing the total volume of data that might need to be moved and processed. This helps in cutting down on storage and compute costs. How to cut costs on Snowflake by 30%
Snowflake CDC maintains data consistency and integrity
Snowflake CDC captures changes at source and syncs data on target with source continuously. This helps to keep data uniform and consistent between systems, improving the quality and accuracy of data for multiple purposes where it is used. Databricks vs Snowflake: 18 Differences You Should Know
Snowflake CDC with Snowflake Streams
Native Snowflake Change Data Capture is based on log-based CDC replication and uses Snowflake Streams to capture changed data. Snowflake CDC captures changes happening at source and sends them to the target using a Change Stream. The Snowflake Stream starts by taking logical snapshots of objects at source including external tables, views, and underlying tables. It also records DML (Data Manipulation Language) changes to source objects and sends these to Snowflake. Think of the change stream as a log of all updates, inserts, deletes and other changes happening at source. As changes come in, the Snowflake change stream is also updated continuously. Oracle to Snowflake – everything you need to know
How Snowflake Streams Work
The Snowflake CDC process starts when a CDC-enabled table is created in the source database. All the data to be replicated is contained in the table, and the table is configured so that any changes made can be automatically captured and transferred to the target database immediately. Once the table is created, 3 additional columns are added to the source table to store metadata, that will monitor changes happening in the source table. These additional metadata columns enable the stream to capture information about inserts, updates, and deletes without needing to actually store the table data. The Snowflake stream (also called Table Stream) begins by creating an initial snapshot of every row in the source object, such as external tables, tables, views or underlying tables, establishing an offset as a timestamp to represent the object’s current transactional version. SQL Server to Snowflake in 4 Easy Steps
Change Tracking in Snowflake Streams
Following the snapshot, the stream’s change tracking system logs information about DML changes, illustrating the state of a row before and after the modification. This includes details about the source object’s column structure and additional metadata columns describing each change event. When queried, the stream retrieves historical data while maintaining the structure and naming of the source object. It also incorporates extra columns providing additional insights into the nature of each change.
Please note, the changes being tracked must be consumed or transferred to permanent storage within the prescribed retention period, else changes captured through the Snowflake stream will not be accessible. You will need to create a new stream to track changes in future. Oracle to Snowflake – everything you need to know
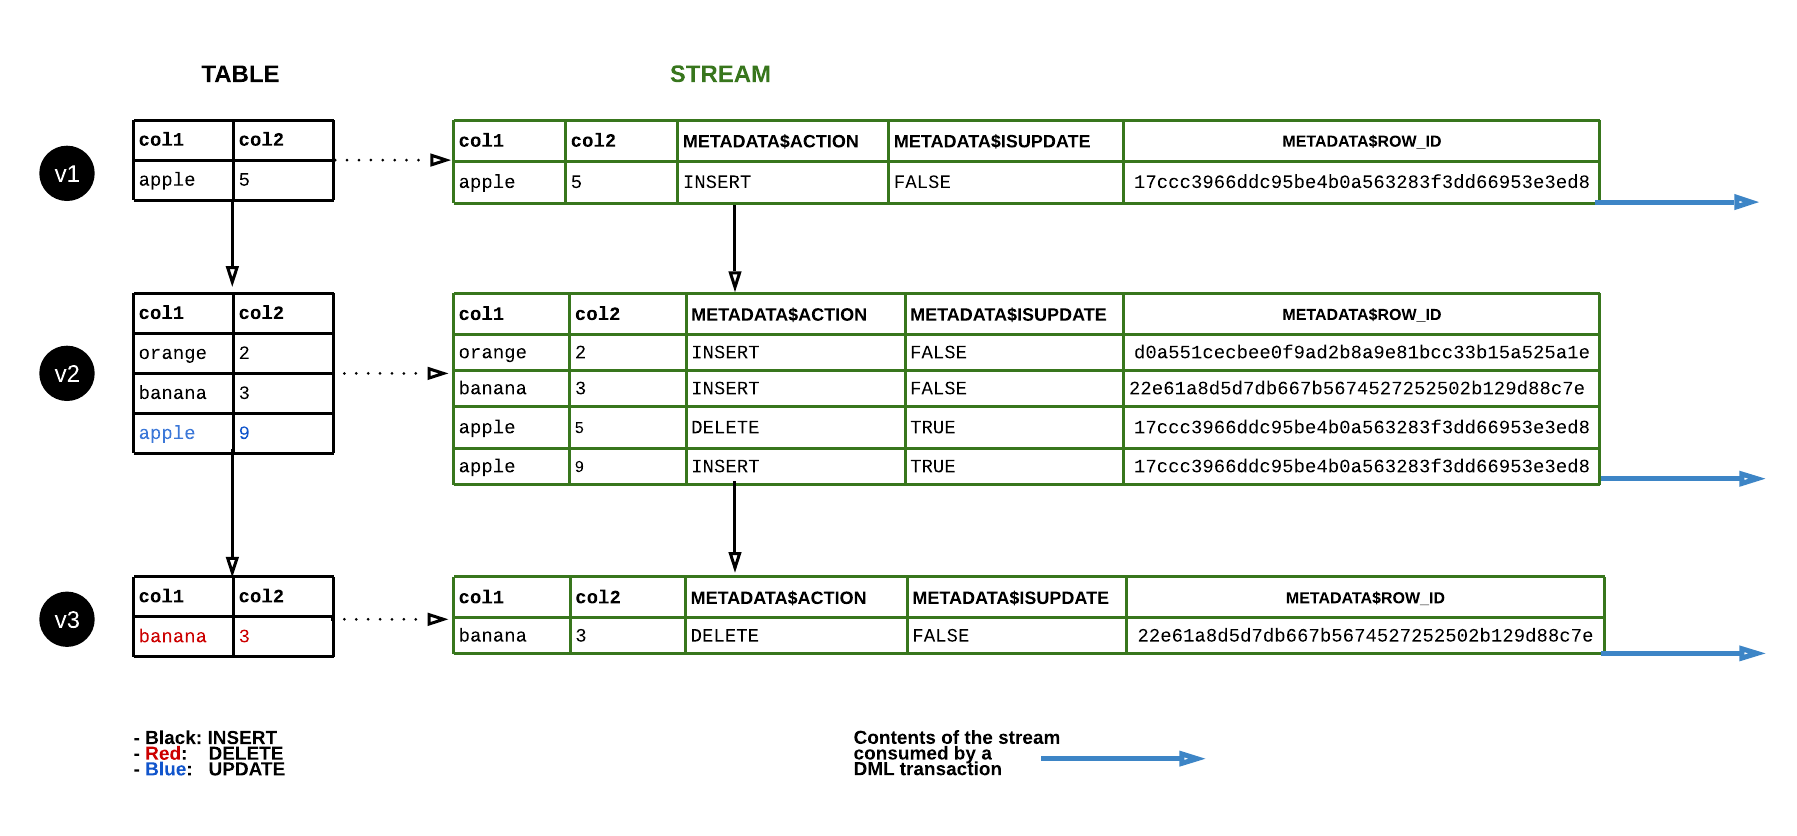
Metadata Columns created as part of the Snowflake Stream Process
The Snowflake stream itself does not store any table data. A Snowflake stream creates an offset, which behaves like a marker on the source table’s version timeline. When the stream gets queried, it accesses the native versioning history and returns only the row changes that happened after the stream’s offset timestamp marker came into being, joining the data with the current table data to sync changes. Please note a stream can be discarded and other streams can be created concurrently or at different points of time to consume the change records for an object at the same or different offsets. Metadata columns include:
- METADATA$ACTION: Indicates the DML operation recorded (INSERT, DELETE, UPDATE)
- METADATA$ISUPDATE: Tracks UPDATEs made as DELETE + INSERT pairs
- METADATA$ROW_ID: Indicates Unique Row Identifier
Types of Snowflake Streams
Snowflake streams are of three types based on the recorded metadata. Learn more
- Insert-only Snowflake Stream: Tailored for external tables exclusively, insert-only streams, like append-only streams, focus solely on tracking row inserts and do not account for deletes. For instance, if File 1 is removed from a cloud storage location referenced by an external table between two offsets, and File 2 is added, the insert-only stream will only return the records of File 2. Unlike standard tables, Snowflake cannot access historical records for files in cloud storage through insert-only streams. To create an insert-only stream on an external table, you can use the following syntax:
CREATE OR REPLACE STREAM my_stream ON EXTERNAL TABLE my_table
INSERT_ONLY = TRUE;
- Standard Snowflake Stream: Referred to as a delta stream, the standard Snowflake stream type is applicable to views, tables, and directory tables. It comprehensively tracks all Data Manipulation Language (DML) changes within the source object, covering updates, inserts, deletes, and table truncates. When querying, it calculates the net change in a row, known as row-level delta, by joining the deleted and inserted rows in a change set. Notably, if a row is both inserted and deleted between two transactional points, the standard stream excludes it from the query results.
- To create a standard stream, you can use the following syntax:
CREATE OR REPLACE STREAM my_stream ON TABLE my_table;
- Append-only Snowflake Stream: Specifically designed for directory tables, standard tables, and views, the append-only stream type exclusively tracks row inserts and does not capture updates or deletes. In this type, if ten rows are inserted into a table but five of them are subsequently deleted, a query to an append-only stream will return all ten rows. This efficiency is advantageous, especially in Extract, Load, Transform (ELT) scenarios or similar situations that rely solely on row inserts, as append-only streams consume fewer resources compared to standard streams.
To create an append-only stream, you can use the following syntax:CREATE OR REPLACE STREAM my_stream ON TABLE my_table
APPEND_ONLY = TRUE;
This is a graphical representation of Snowflake Streams in action. Source
How to set up Snowflake CDC with Streams
To enable Snowflake CDC with Streams, follow the steps outlined below.
- Step 1: Log into the Snowflake Database.
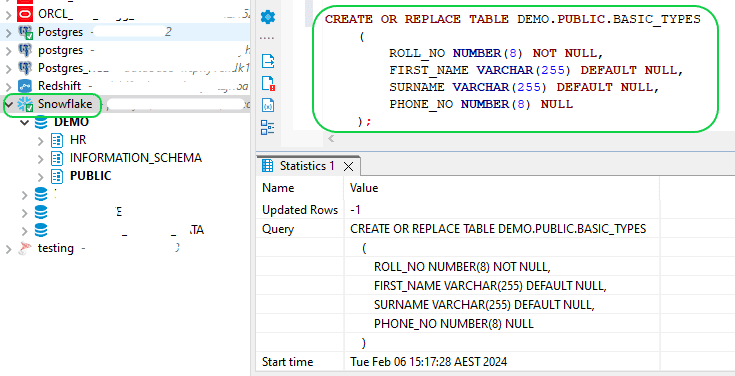
- Step 2:Generate a source table for testing the Stream. You can create the target table by executing the provided command.
CREATE  OR REPLACE TABLE DEMO.PUBLIC.BASIC_TYPES

    (
    ROLL_NO  NUMBER(8) NOT NULL,

      FIRST_NAME  VARCHAR(255) DEFAULT NULL,

      SURNAME  VARCHAR(255) DEFAULT NULL,

      PHONE_NO  NUMBER(8) NULL
);
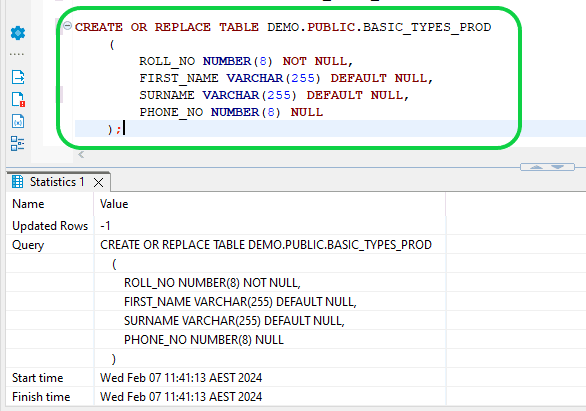
- Step 3:Generate a target table. You can create the Target table by running the following command.
CREATE  OR REPLACE TABLE DEMO.PUBLIC.BASIC_TYPES_PROD

    (
ROLL_NO NUMBER(8) NOT NULL,

      FIRST_NAME  VARCHAR(255) DEFAULT NULL,

      SURNAME  VARCHAR(255) DEFAULT NULL,

      PHONE_NO  NUMBER(8) NULL
);
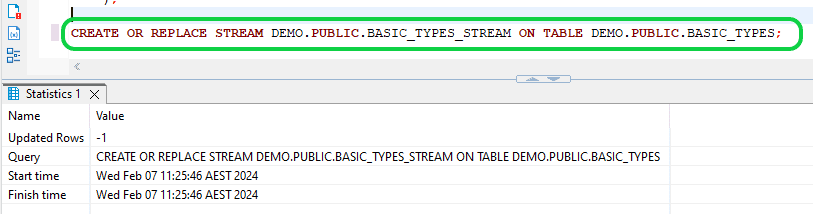
- Step 4:Generate a STREAM to monitor DML changes in your source table by executing the provided command. This STREAM will capture every modification made to the source table.
CREATE OR REPLACE STREAM DEMO.PUBLIC.BASIC_TYPES_STREAM ON TABLE DEMO.PUBLIC.BASIC_TYPES;
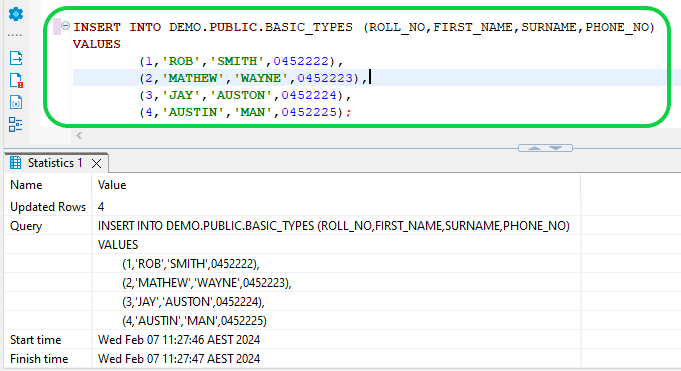
- Step 5:Populate the source table with some data by running the following command.
INSERT INTO

    DEMO.PUBLIC.BASIC_TYPES  (ROLL_NO,FIRST_NAME,SURNAME,PHONE_NO)VALUES1
 (1,'ROB','SMITH',0452222),

      (2,'MATHEW','WAYNE',0452223),

      (3,'JAY','AUSTON',0452224),

      (4,'AUSTIN','MAN',0452225);
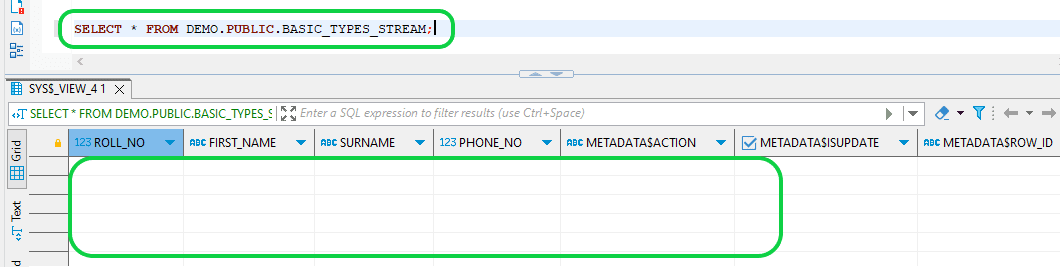
- Step 6: The STREAM captures newly inserted rows in the source table. To access the STREAM change log, execute the following "select" command.
SELECT * FROM DEMO.PUBLIC.BASIC_TYPES_STREAM;
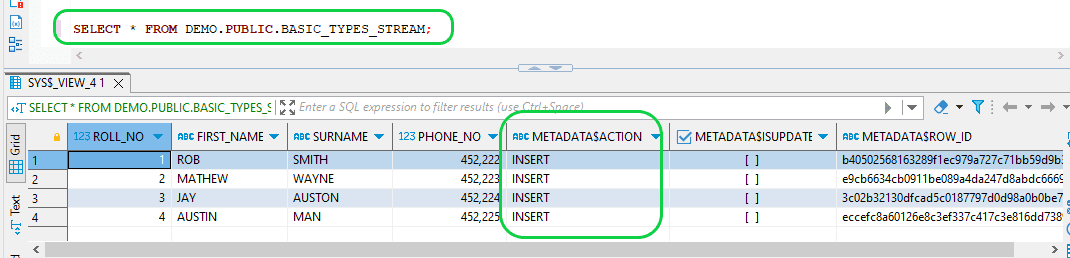
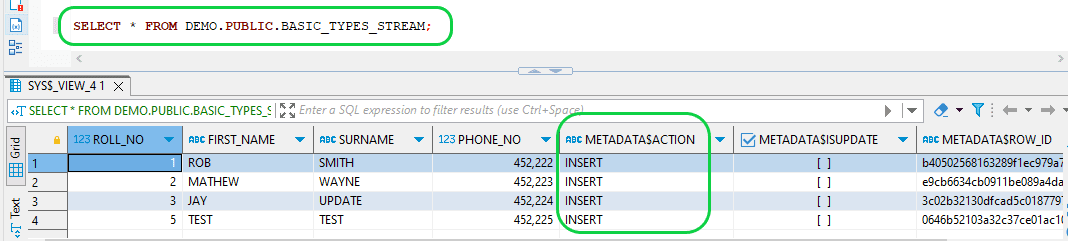
- Step 7:If further DML modifications are made to the source table records, they will be logged as "INSERT" entries under "METADATA$ACTION" in the stream, as they are not yet consumed by the target table. We can verify this by performing an INSERT, UPDATE, and DELETE operation in the source table.
INSERT INTO DEMO.PUBLIC.BASIC_TYPES (ROLL_NO,FIRST_NAME,SURNAME,PHONE_NO) VALUES
(5,'TEST','TEST',0452225);
DELETE FROM DEMO.PUBLIC.BASIC_TYPES WHERE ROLL_NO = 4;
UPDATE DEMO.PUBLIC.BASIC_TYPES SET SURNAME = 'UPDATE' WHERE ROLL_NO = 3;

- Step 8: Verify the STREAM for the new transactions.
SELECT * FROM DEMO.PUBLIC.BASIC_TYPES_STREAM;
- Step 9:Now insert the initial STREAM data batch into the production table.
- First set of data is loaded into the Target table.
- Step 10: Verify the STREAM following data replication to the target table. The STREAM is currently empty as the data has been consumed.
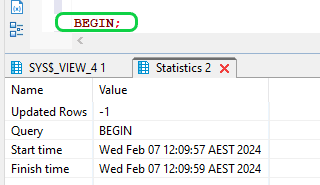
- Step 11: To access and lock the STREAM, execute the following command,
begin;
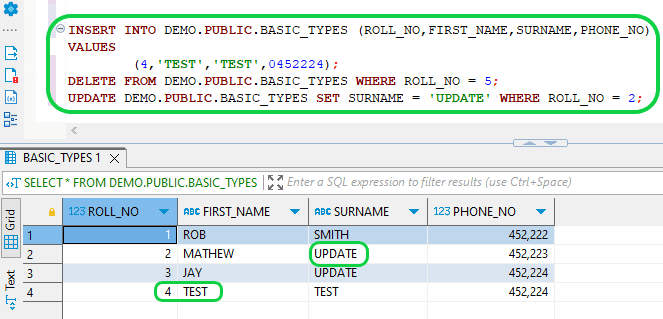
- Step 12:Next, perform additional DML transactions in the source table.
INSERT INTO DEMO.PUBLIC.BASIC_TYPES (ROLL_NO,FIRST_NAME,SURNAME,PHONE_NO) VALUES
(4,'TEST','TEST',0452224);
DELETE FROM DEMO.PUBLIC.BASIC_TYPES WHERE ROLL_NO = 5;
UPDATE DEMO.PUBLIC.BASIC_TYPES SET SURNAME = 'UPDATE' WHERE ROLL_NO = 2;
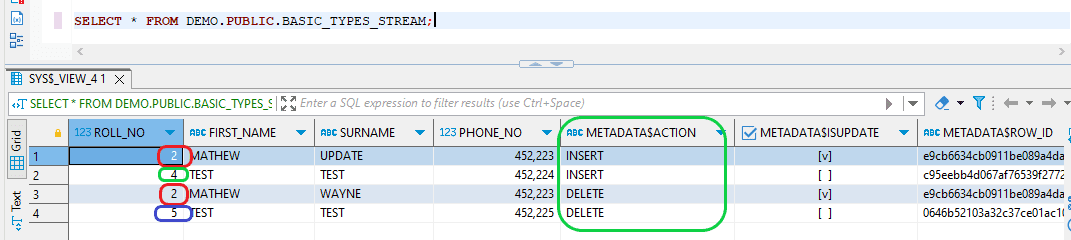
- Step 13: Next, verify the STREAM. The transactions executed in step 12 will not be observable because the STREAM object’s change interval extends from the current offset to the transaction’s commencement time, which signifies the initiation of the transaction’s time.

- Step 14:To record transaction details, execute the "COMMIT" command and then check the STREAM. At this point, the changes will appear, as the stream object utilizes the current transactional time as the endpoint of the change interval.
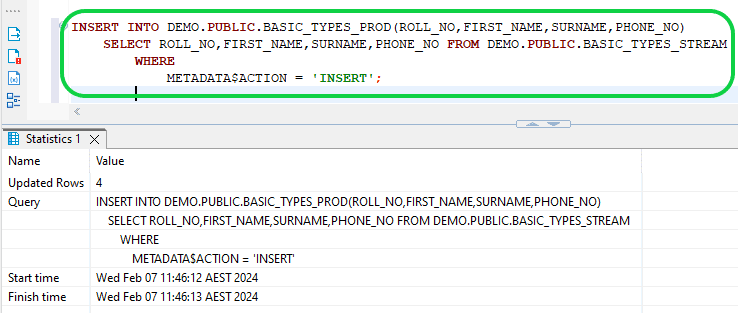
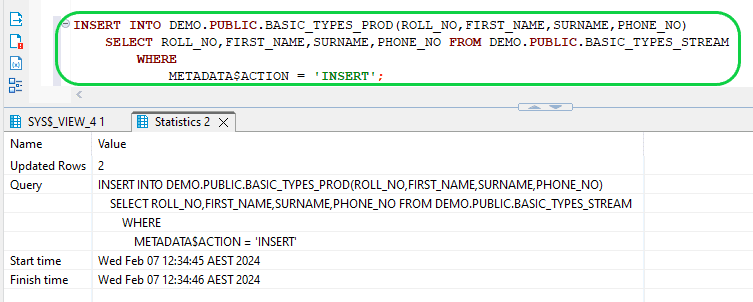
- Step 15:Now populate the production table with the second stream data batch.
INSERT INTO DEMO.PUBLIC.BASIC_TYPES_PROD(ROLL_NO,FIRST_NAME,SURNAME,PHONE_NO)
SELECT ROLL_NO,FIRST_NAME,SURNAME,PHONE_NO FROM DEMO.PUBLIC.BASIC_TYPES_STREAM
WHERE
METADATA$ACTION = 'INSERT';
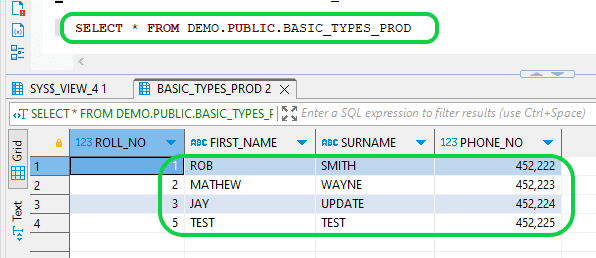
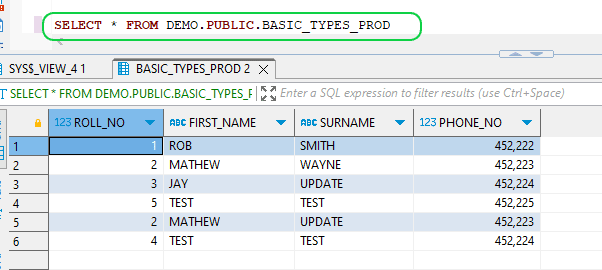
- The output of the target table is as below after the second STREAM
To drop the STREAM, you can use the below command,
- DROP STREAM <name>; or DROP STREAM [ IF EXISTS ] <name>;
- Ex: DROP STREAM BASIC_TYPES_STREAM;
Limitations of Snowflake Streams
Despite their capabilities, Snowflake Streams come with several limitations:
- Snowflake Streams have incompatibilities with certain objects
There are some objects and processes in Snowflake that are not compatible with Snowflake Streams. For e.g. changes in Materialized Views cannot be tracked by streams. Postgres to Snowflake-2 Easy methods to move data - Snowflake Streams track only DML not DDL changes
DML operations such as updates, inserts and deletes are tracked by Snowflake Streams but not DDL changes. SAP to Snowflake (Make the Integration Easy) - Snowflake Streams may attract extra storage or performance charges
Since the offset and change tracking metadata of the source object is saved in hidden internal tables, there may be additional storage to be accounted for. - Snowflake Streams may need a fair degree of maintenance and monitoring.
Snowflake Streams need to be fully and completely consumed for them to advance to the next offset after every query and load operation. If not, the change records could pile up and cause the stream to lag in delivering source object changes. Postgres to Snowflake – 2 Easy methods to move data - Snowflake streams may have scalability issues
Creating and querying multiple Snowflake streams concurrently may impact performance and necessitate throttling.
- High data volume and throughput could overload stream change tracking capabilities
Ingesting high data volumes into source tables could overload stream change tracking capabilities, leading to lagging or data loss. Oracle to Snowflake: Everything You Need to Know - Managing Snowflake Streams might need involvement of data experts
You may need to hire data engineers to handle Snowflake streams since managing numerous streams, monitoring issues, and maintaining robust change-consuming pipelines will require strong data engineering skills. SAP to Snowflake (Make the Integration Easy)
- Snowflake Streams may not support certain data types and formats
Snowflake Streams may not fully support all data types and formats; for instance, they may not capture all changes from semi-structured or geospatial data. Databricks vs Snowflake: 18 Differences
Snowflake Snowpipe Streaming for Change Data Capture (CDC)
Snowflake Snowpipe is a serverless data ingestion service, which helps to load data seamlessly from Cloud storage repositories like Amazon S3, Microsoft Azure Blob or Google Cloud Storage to Snowflake stages on their respective Clouds, enabling users to access data in minutes. Snowpipe scans for new files as they land in the staging area from diverse sources like APIs, WebSockets, CRM applications, and Web Events. Data availability is signaled via Cloud messaging or calling via a public REST endpoint. The data is processed in micro batches using file-based replication instead of transactional logs (unlike CDC).
Here’s Why You Need Snowflake Stages (Internal & External)
Snowpipe Streaming does away with the intermediate staging phase
In contrast, Snowpipe Streaming or Snowflake Streaming as it is also known, allows streaming of data directly into Snowflake (without staging) to enable Change Data Capture. Snowpipe Streaming is a fairly new feature released by Snowflake on March 7, 2023 for public preview. Unlike ingestion with Snowpipe (a two step process), Snowpipe Streaming removes the intermediate step of loading data into staging tables, so end-to-end latency is reduced to only seconds, enhancing both, performance and scalability. To enable real-time CDC directly to Snowflake through Snowpipe Streaming, you can use open-source tools like Apache Kafka or Apache Flink, in conjunction with Debezium connectors and Snowflake’s Kafka Connector. Debezium CDC Explained, and a Great Alternative CDC Tool
Snowpipe Streaming loads data from external sources using a streaming API
Snowpipe Streaming uses a streaming API within a Java SDK wrapper to load data from external sources into Snowflake tables. It transfers data directly from diverse data sources like business applications, IoT devices, and Apache Kafka into Snowflake. This method simplifies the process through a single configuration file, eliminating the need for complex setups or cloud storage notifications. It facilitates real-time data streams with features like exactly-once delivery, ordered ingestion, and error handling with dead-letter queue (DLQ) support. Unlike the original Snowpipe, the Snowpipe Streaming API operates over HTTPS without needing a pipeline or intermediary cloud storage, resulting in lower latency, and eliminates the extra step of moving data from the source to cloud storage.
How does the Snowpipe Streaming API work?
There are two primary ways you can use Snowpipe Streaming. The first uses the Snowflake Ingest Java SDK and the second uses the Snowflake Kafka Connector to capture changes from Kafka.
Snowpipe Streaming CDC with Snowflake Client SDK
Snowflake’s Client SDK, a component of its Java Ingest SDK, can be seamlessly integrated into application code for direct transmission of events to Snowflake through the Snowpipe streaming API. The Java implementation involves creating a custom code wrapper for the Snowflake Ingest SDK, enabling REST API calls.
Channels in Snowflake Client SDK are vital for Snowflake Streaming
In the Snowpipe Streaming framework, channels are important, serving as logical partitions connecting clients and destination tables. Clients can open multiple channels to various tables, each with an ownership property to ensure data arrival consistency. The client SDK facilitates the opening and closing of channels and row insertion using offset tokens for precise source tracking and guaranteed once-only ingestion at the row level. Buffered data is periodically written as encrypted blobs to Snowflake’s internal stage, registering tables as mixed tables containing both FDN and client-generated files (BDEC format). These mixed tables can be immediately queried and transition into regular tables over time. This integration may require adjustments to network firewall rules. Learn More
Error Management in Snowflake Client SDK
The API necessitates a custom Java application interface for handling data pumping and error management. Users are responsible for ensuring continuous application operation and implementing recovery mechanisms in case of failures. The API supports error handling options, such as "ON_ERROR = CONTINUE | ABORT," where "ABORT " halts the entire batch after the first error (default), and "CONTINUE" allows data loading to proceed despite errors. Error capture is implemented using responses from the "insertRow (single row) or insertRows (set of rows)" methods.
Snowpipe Streaming CDC with a Kafka Connector
The second approach to Snowpipe Streaming involves deploying Kafka Connect as a standalone component and establishing a connection to Snowflake through the Snowflake Kafka Connector. The Snowflake Streaming API helps in the direct streaming of rows from Apache Kafka topics into Snowflake tables on a per-row basis, rather than in files. This means Kafka data is available in Snowflake tables faster and can potentially reduce ingestion costs. Kafka CDC Explained and Oracle to Kafka CDC Methods
Integrating Snowflake Streaming API with Kafka
To integrate the Snowflake Streaming API with Kafka, you need to ensure your connector is version 1.9.1 or later. While the Snowflake Kafka connector does use the Client SDK under the hood, a big advantage is that it streamlines configuration, and eliminates the need for users to write a Java client in applicable use cases. This streaming API is compatible with both open-source Kafka and Cloud-managed Kafka provided by AWS or Confluent.
Configuring the Snowflake Kafka Connector
For configurations, users need to update Snowflake properties, specifically setting "Snowflake.Ingest.Method to SNOWPIPE_STREAMING" and "Snowflake.Role.Name" to the desired role for table inserts. These are the essential configurations to enable the Kafka connector to utilize the new Snowflake Streaming API. However, additional properties can be configured for buffer management, polling, and error handling. Notably, the Kafka connector with Snowpipe Streaming lacks support for schema detection or evolution, utilizing the same table schema as Snowpipe.
Use Cases for Snowpipe Streaming
Snowpipe Streaming is ideal for CDC of streaming data that is highly perishable and needs to be accessed immediately. This includes data from the stock market and financial applications, IoT devices and sensors, and data from messaging services.
Snowpipe Streaming for Stock Markets and Financial Applications
Market data needs to be accessed by financial applications in real-time to give participants an opportunity to make fast decisions for profitable trades. The Snowflake Streaming API enables messages from sources to be mapped into columns in tables immediately, saving storage costs and driving faster time to insight.
Snowpipe Streaming for IoT Applications
Phones, sensors, watches, and connected equipment generate a flow of data that IoT devices need to receive uninterruptedly and on time, to ensure operational efficiency and fast business insights. The Snowflake Streaming API helps to capture and load the data to Snowflake with highly reduced latency – since there is no staging involved. Streaming data is made available in seconds for Analytics, Machine Learning models and other use cases.
Snowpipe Streaming for Preventative Maintenance Monitoring Systems
Equipment used in manufacturing industries, mines, oil rigs etc. usually have monitoring systems that record and log metrics that represent the equipment’s health and performance status. The metrics inform about diverse factors such as downtime, process effectiveness, mean time to failure etc. The Snowpipe Streaming API enables engineers and maintenance staff to access the log metrics faster and to take timely action when potential issues are highlighted.
Limitations of Snowpipe Streaming
While Snowpipe Streaming enhances latency and reduces storage needs in your data setup, it does present some challenges.
Snowpipe Streaming will need a Java Client for each source, which is expensive
In case of scenarios that do not use the Snowflake Kafka connector, for e.g. ingesting data from Amazon Kinesis, Google Cloud Dataflow or CDC streams, there will be a need to write a Client in Java for each source, to use the Snowflake streaming API. Developing a Java Client for multiple sources can be complex and time-consuming. It will probably require skilled developers, leading to increased data and configuration costs. An Alternative to Matillion and Snowflake
functionality is limited currently
Presently, the Snowpipe Streaming API only supports insert operations. In order to get updates and deletes, you will also need to build data streaming pipelines and have staging tables which may be complex and expensive. Even if you consider options like ODBC or the Snowflake REST API to enable other operations, these mechanisms are not great for high throughput ingestion. In contrast, a third-party no-code tool like BryteFlow specializes in high volume, high throughput CDC to Snowflake. All updates, inserts and deletes are merged automatically with data, besides ensuring exactly-once and ordered data that is ready-to-use on Snowflake. Build a Snowflake Data Warehouse with BryteFlow
Snowpipe Streaming increases the risk of vendor lock-in
The Snowpipe Streaming API stores data in FDN formats. This means data transformations and pipelines you create can only be used within Snowflake. This restricts you from shifting analytical workloads to other platforms which might be more cost-efficient. It can also increase transformation costs since you constantly need to transform the data streams to the FDN format.
Snowflake CDC with BryteFlow
Snowflake’s native CDC mechanism – Snowflake Streams only delivers CDC for situations where both the source and target tables reside within Snowflake. In the context of CDC for streaming data, Snowpipe Streaming operates solely with cloud data storage sources in conjunction with services like Kafka connectors, IoT devices, and website events. For Change Data Capture directly from external sources (CRM, ERP, and transactional databases etc.) to Snowflake, it is better to enlist an external CDC tool that can perform CDC on your source and move the data into Snowflake in real-time. A tool like BryteFlow.
With BryteFlow, you can avoid all the limitations of Snowflake Streams and the Snowpipe Streaming API. Our CDC tool can load data directly or indirectly (using external staging) to Snowflake. BryteFlow is a completely no-code CDC replication tool that extracts and transfers data from multiple sources to Snowflake. It automatically merges changes (inserts, updates and deletes) in real-time on Snowflake to sync data with source. Oracle to Snowflake: Everything You Need to Know
Sources include databases like SAP, Oracle, SAP HANA, SQL Server, Postgres, Teradata, Netezza and applications like Salesforce. BryteFlow specializes in the transfer of huge volumes of enterprise data with very high throughput, using parallel, multi-thread loading, partitioning and compression. It provides data type conversions out-of-the box, so your delivered data is immediately ready for consumption on Snowflake. BryteFlow creates schema and tables automatically on destination, besides automating other processes including data extraction, Change Data Capture, data mapping, DDL, masking and SCD Type-2 history, so you never need to write a line of code. Postgres to Snowflake: 2 Easy Methods to Move Data
Highlights of BryteFlow for Snowflake CDC
- Capability to load data directly (without external staging), in real-time to Snowflake on AWS, Azure or GCP, using proprietary log-based Change Data Capture technology. How BryteFlow Works
- Can also load data indirectly to Snowflake on AWS, Azure or GCP using Cloud storage like S3 or Azure Blob for staging.
- BryteFlow XL Ingest uses parallel, multi-thread loading and partitioning for initial full ingest of data. This is followed by BryteFlow Ingest to load incremental data and deltas using real-time, log-based CDC. SQL Server to Snowflake in 4 Easy Steps
- Automates schema and table creation besides data extraction, upserts, CDC, data mapping, SCD Type2 history, and masking. Making CDC Automation Easy
- BryteFlow provides data type conversions out-of-the-box. Formats include Parquet-snappy or ORC, so data is ready-to-use on Snowflake for Analytics, Reporting, Machine Learning models etc.
- The data ingestion tool provides data versioning so data can be retrieved at any point in the timeline.
- BryteFlow has a user-friendly, visual UI – it is a self-service tool and reduces DBA involvement.
- It incorporates Snowflake best practices for data replication out-of-the-box.
- BryteFlow uses the lowest compute when replicating data to Snowflake, reducing costs.
- BryteFlow enables CDC from multi-tenant SQL and Oracle databases into Snowflake for ISVs. Read the Optimove Case Study
- It has extremely high throughput – approximately 1,000,000 rows in just 30 seconds – 6x faster than GoldenGate.
- BryteFlow Blend our data transformation tool enables you to merge and transform data from virtually any source including any database, any flat file or any API for querying on Snowflake. ETL and ELT on Snowflake.
- BryteFlow has an automatic network catch-up mode. It just resumes where it left off in case of power outages or system shutdowns when normal conditions are restored.
- BryteFlow TruData provides automated data reconciliation with row counts and columns checksum, so there is no incomplete or missing data.
- BryteFlow is fast to deploy, and you can start getting delivery of data in just 2 weeks.
Change Data Capture to Snowflake with BryteFlow – Step by Step
Please ensure that all prerequisites have been met and all security and firewalls have been opened between all the components. This is the initial screen of BryteFlow Ingest.
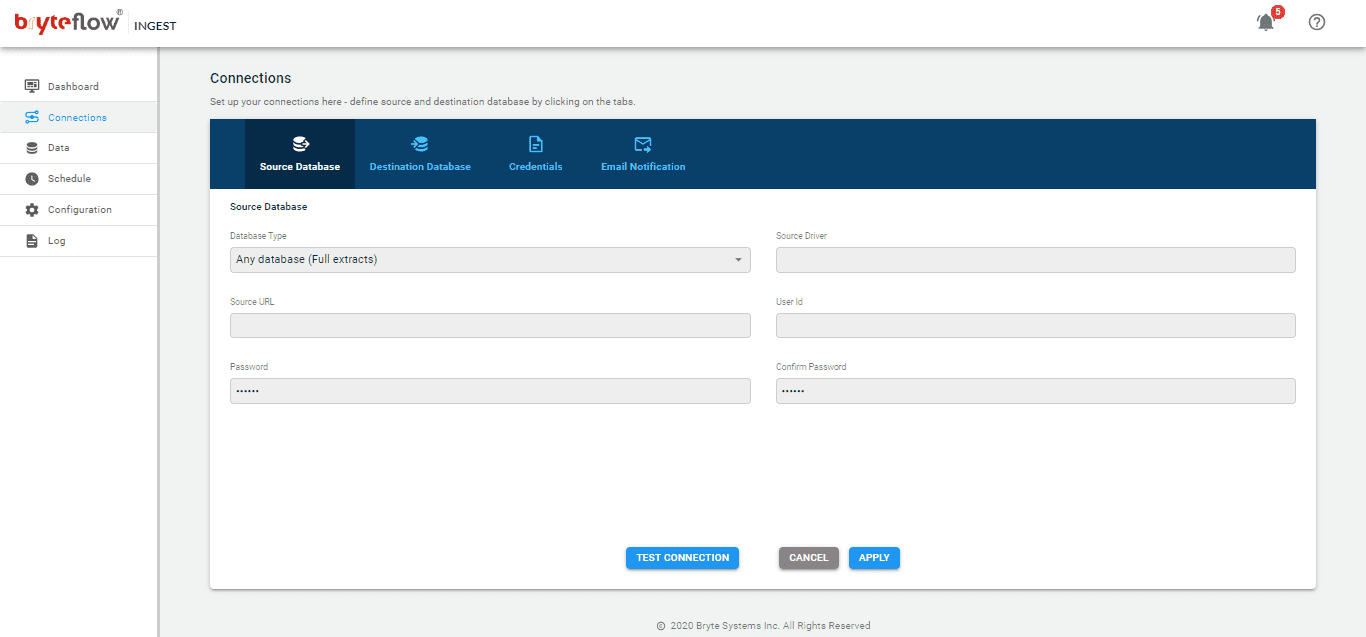
Step 1: Login and Configure Source database after installing the Bryteflow Ingest package.
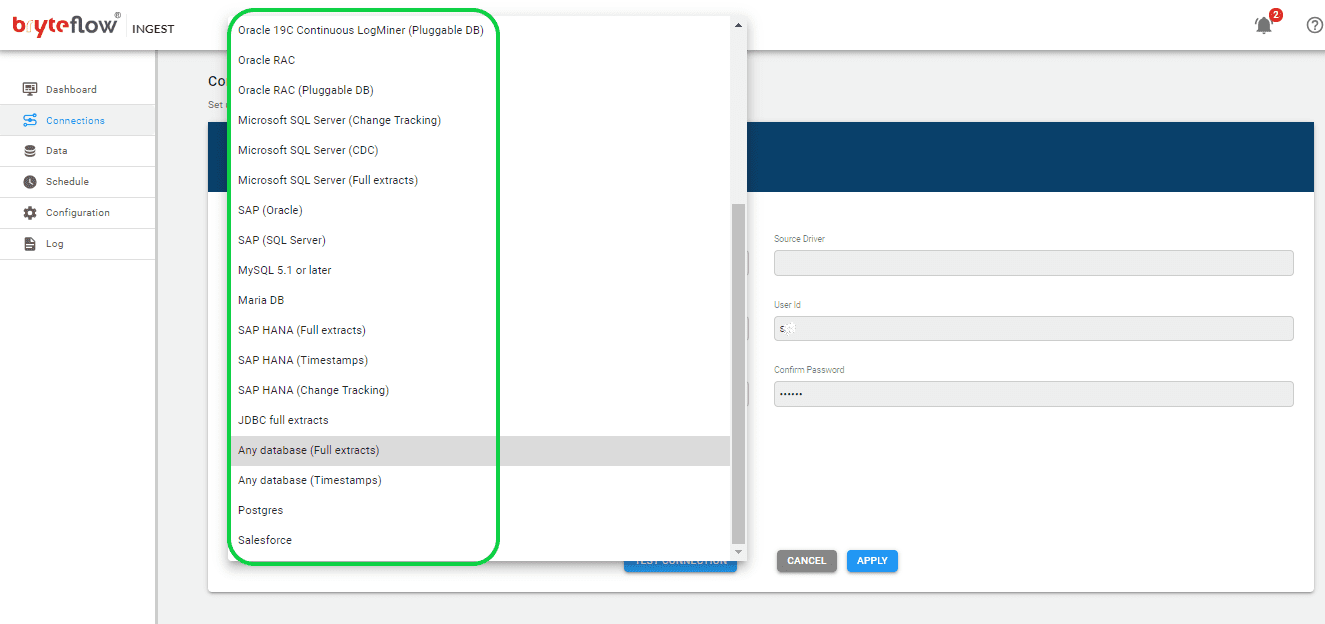
Select “Connections” in the left panel and then select the “Source Database” tab. From the options in the dropdown, you can select ‘Any Database (Full extracts)’ or your desired database. Now you can configure the source database by filling in the required details.
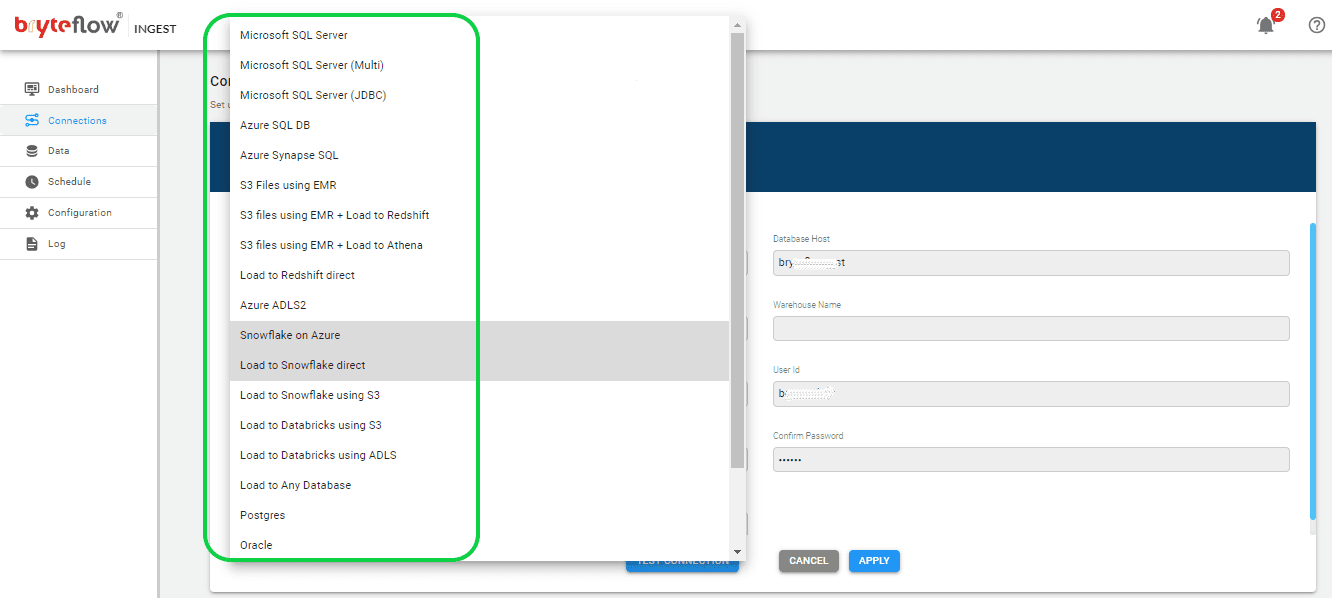
Step 2: Configure destination database.
Now select the “Destination Database” tab on the blue navigation bar. From the dropdown menu, select “Load to Snowflake Direct”. Fill in the fields to configure the destination database.
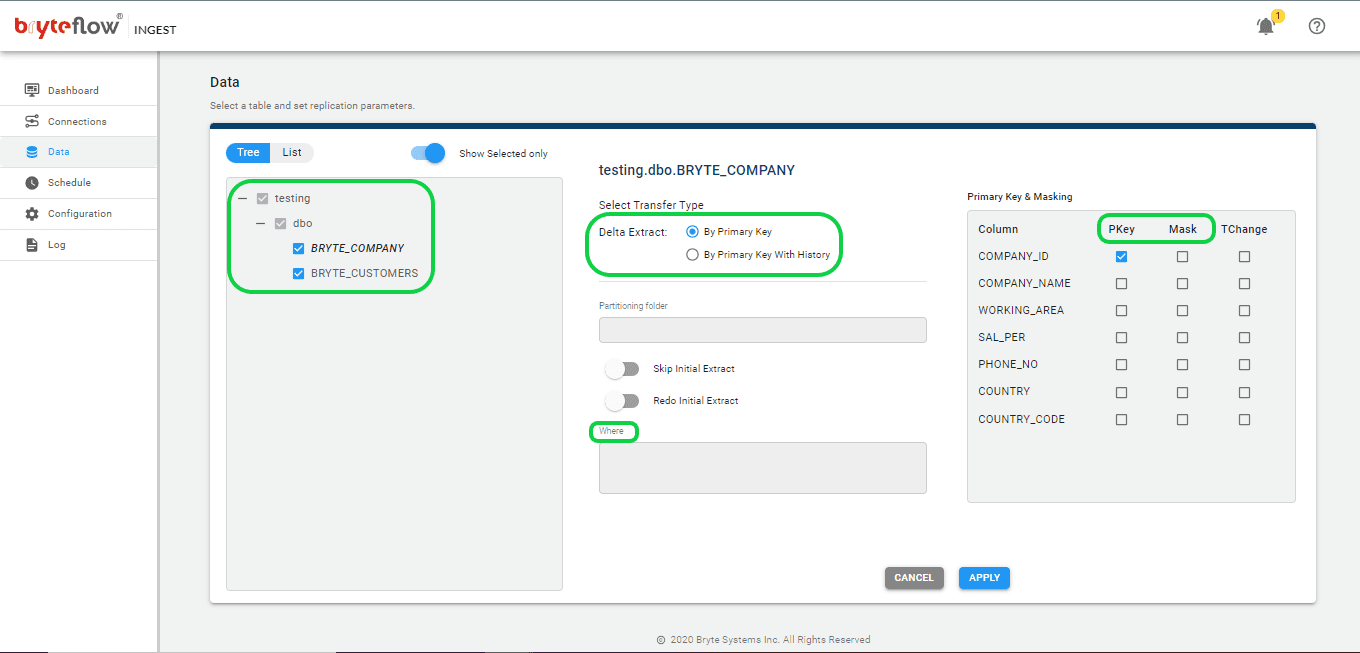
Step 3: Select the tables you want to replicate.
Set up the source table(s) to be replicated, select the primary key and the transfer type for each table. Selecting ‘By Primary key with History’ automatically keeps SCD Type2 history on Snowflake. The ‘By Primary Key’ transfer type stores a mirror of the source, without history. Additionally, you can filter out the unwanted data using the “Where” option and Byteflow Ingest also gives you the option to “mask” the sensitive data in the column.
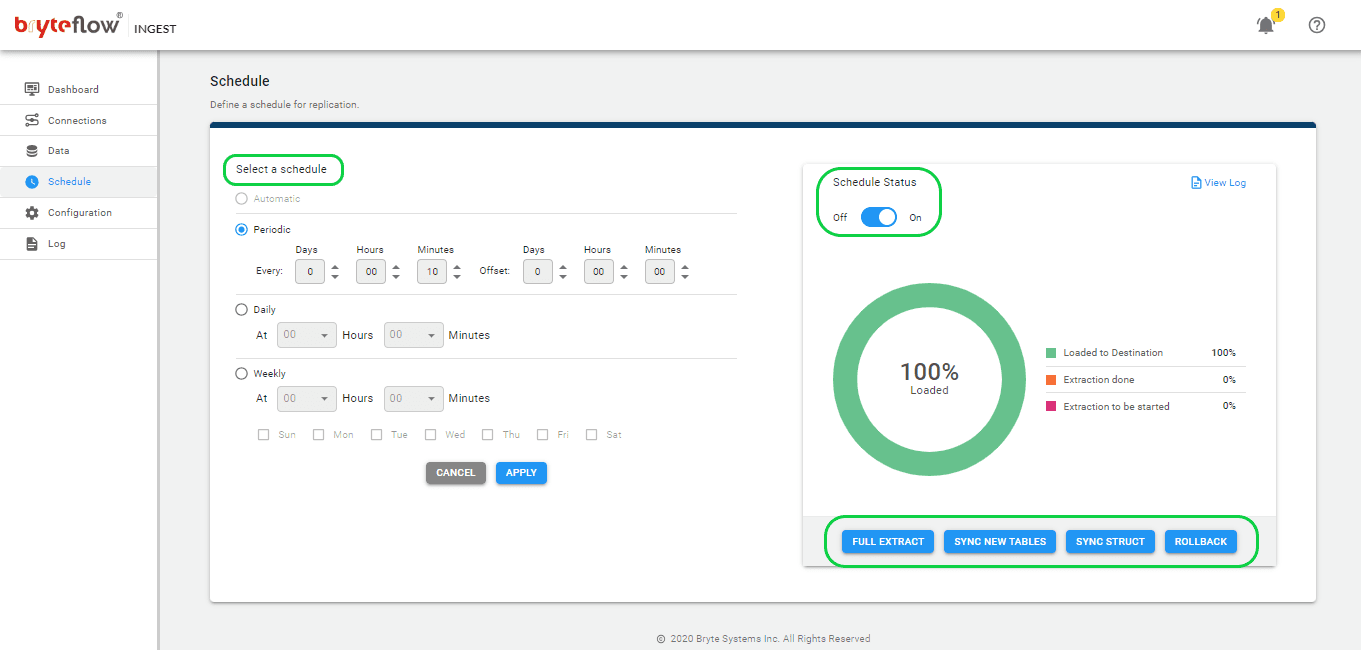
Step 4: Schedule the replication.
Once the tables are selected, then schedule your data replication time and get your data flowing to Snowflake in near real-time. Here you have the option to select “Periodic”, “Daily” and “Weekly”. The “Full extract” option is for initial load (For very large tables over 50 GB, XL Ingest is the best option). The “Sync New Tables” is for adding new tables after replication is enabled for other tables, the “Sync Struct” is for replicating any structure change of the existing table and “Rollback” is to go back into any successful previous run (mainly used when replication has stopped due to an outage).
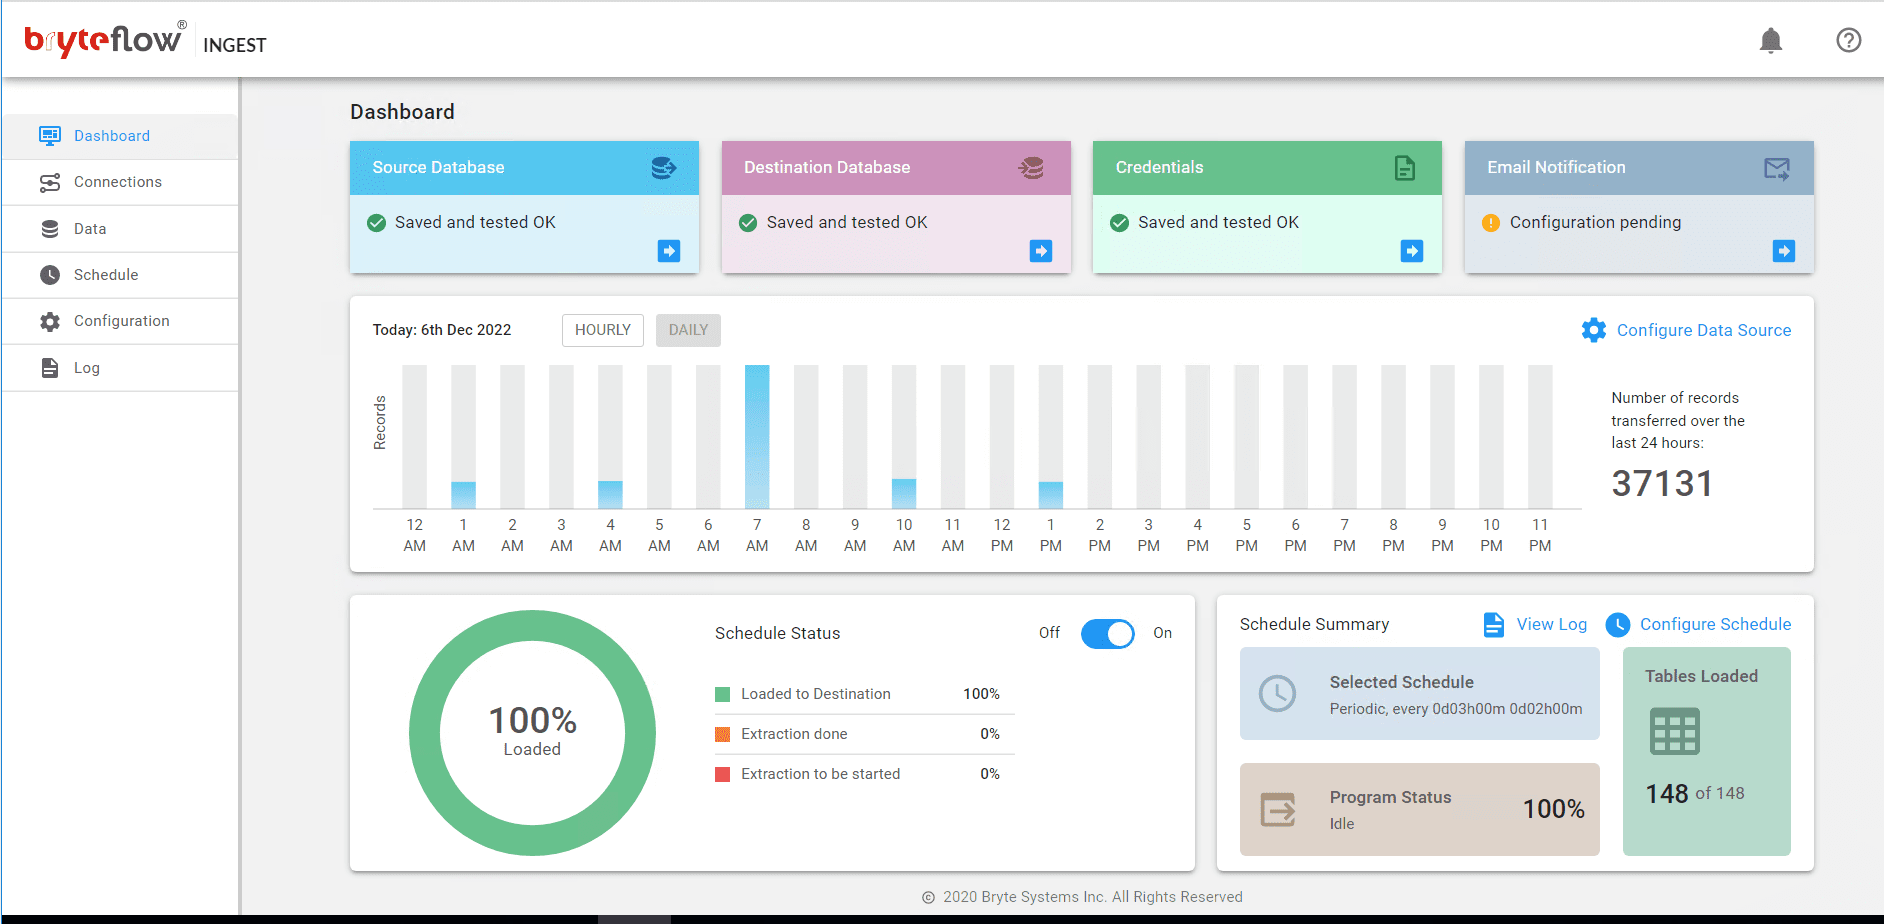
Monitor the progress of the ingest instance via the “Dashboard”screen. The Dashboard gives you a detailed overview of what is happening – the details of the total records loaded, and number of tables loaded, whether the ingest is currently loading or not, status of the connection etc.
In this blog we have learned about Snowflake CDC and some ways to achieve it, including native Snowflake CDC enabling features like Snowflake Streams, and Snowpipe Streaming API for change data capture of streaming data. We also examined the limitations of each, and how BryteFlow as a no-code CDC tool can provide a completely automated data replication route to Snowflake.
If you would like a demo of BryteFlow, do contact us