Looking to get your data from Postgres to Snowflake? In this blog you can find out why and when moving from Postgres to Snowflake can make sense, and two easy methods to accomplish this. The first method is manual and uses the COPY command and Amazon S3 for staging, while the second uses BryteFlow, our CDC replication tool, to provide a completely no-code process for Postgres CDC to Snowflake.
Quick Links
- About PostgreSQL Database
- About Snowflake
- Why move from Postgres to Snowflake?
- Reasons to move from Postgres to Snowflake
- Postgres to Snowflake Data Type Mappings
- 2 Easy Postgres to Snowflake Migration Methods
- Method 1: Move Data from Postgres to Snowflake using COPY command and Amazon S3
- Method 2: Moving Data from Postgres to Snowflake with BryteFlow
- Why use BryteFlow to move data from Postgres to Snowflake
About PostgreSQL Database
Postgres is a highly flexible enterprise open-source DBMS that caters to a lot of use cases. Postgres runs on all major operating systems, can scale to cover the most complex workloads and is ACID-compliant. The PostgreSQL DB is always evolving since it allows users to create custom functions and define their own data types. It is used as a data warehouse by many web, mobile, analytical, and geo-spatial applications and is used to power many dynamic websites and applications. Data Integration on Postgres
Postgres is versatile and can handle both, SQL and JSON for relational and non-relational queries. It has outstanding support for advanced data types and supports many modern programming languages like Python, Java, C#, Ruby etc. Postgres is highly compliant with SQL standards which means it can be used easily with other applications. In Postgres it is possible to have highly customized extensions for particular requirements, like extensions to handle time-series, geo-spatial data, extended logging etc. Postgres is compatible with many BI tools and lends itself well to data analytics, data mining and business intelligence objectives. Postgres CDC (6 Easy Methods to Capture Data Changes)
About Snowflake
Snowflake is a fully managed Cloud platform with great data warehousing capabilities and unlimited scalability. It is built on on Cloud platforms like Amazon Web Services, Microsoft Azure, and Google Cloud. The great thing about Snowflake is that it is a fully managed SaaS data warehousing solution and there is no infrastructure to manage. Data from different sources can be integrated on Snowflake easily and subjected to analytics. Snowflake CDC With Streams and a Better CDC Method
Snowflake can be used for data warehousing, data lakes and data analytics. It has massively parallel processing which makes short work of complex queries. The Snowflake architecture is considered a hybrid combination of shared disk (Snowflake has a central repository to store data that can be accessed by all compute nodes) and shared-nothing architecture in which each node maintains a part of the complete data set. Snowflake has three distinct layers – the compute, storage, and cloud services layers, these are integrated, but can scale independently. SQL Server to Snowflake in 4 Easy Steps
But why move from Postgres to Snowflake?
Considering the ongoing explosion of data, emergence of new data sources and organizational expansion into new geographies, many organizations find they benefit immensely from having a centralized Cloud data repository like Snowflake. This allows for concurrent access, data sharing and the availability of a ‘single source of truth’. Also, the Snowflake Cloud has unlimited scalability to handle ever-growing workloads and data volumes. Here are some points that will explain why migrating from PostgreSQL to Snowflake makes sense. Aurora Postgres and How to Setup Up Logical Replication
Reasons to move from Postgres to Snowflake
Migrating from Postgres to Snowflake will provide consolidated data
It may be that organizations may have Postgres data in different instances and wish to obtain a centralized view of the data for operational reasons. Having your data on Snowflake is an easy way to ensure this. Decoupled storage and compute, scaling and cost optimization features, data cloning and time travel features, not to mention role-based-access control is a huge plus. Learn about Oracle to Postgres migration
Postgres to Snowflake migration, does your use case warrant it?
Is your use case related to OLTP (Online Transaction Processing) or OLAP (Online Analytical Processing)? Postgres is an OLTP database that excels in handling transactional data, processing orders, updating inventory, managing customer accounts etc. In contrast, Snowflake is into data aggregation, complex data analysis, report generation, providing business insights etc. If your use case tends towards complex analytics and data warehousing, Snowflake is a good choice. Databricks vs Snowflake: 18 Differences
Data that is expanding rapidly will benefit from Postgres to Snowflake migration
If the data in your organization is growing rapidly, and multiplying exponentially every year, it would make sense to move data from Postgres to Snowflake. Snowflake has unlimited scalability and compute that can be spun up or down easily to scale to any workload. Its built-in cost optimization features and storage-compute separation keeps costs low. How to load TBs of data to Snowflake fast
Moving from Postgres to Snowflake reduces DB Admin effort for teams
If you would like to free up more of your tech team’s time, Snowflake may be a better choice than Postgres. Snowflake is a fully managed platform so upgrading OS or database is not an issue. You don’t need to spend time managing the database including its security, performance, or capacity analysis. This is in itself is a big cost saving. How to Make PostgreSQL CDC to Kafka Easy (2 Methods)
Postgres to Snowflake migration may reduce your data costs
On the face of it this may seem counter-intuitive, but with Snowflake’s Pay-As-You-Go model, you are actually paying only for the compute you actually use, and this can be turned off when not required. You can always open a Snowflake account and try out a few workloads before committing. How to reduce Snowflake costs by 30%
Postgres to Snowflake Data Type Mappings
When moving data from Postgres to Snowflake you will need to apply domain-specific logic. There are some other points to keep in mind as well, to ensure a smooth transition. Load TBs of Data to Snowflake fast
- Snowflake supports a number of character sets including UTF-8 out-of-the-box. View the Complete List
- Snowflake supports SQL constraints like UNIQUE, PRIMARY KEY, FOREIGN KEY, NOT NULL constraints unlike many other cloud analytical platforms. Postgres CDC (6 Easy Methods to Capture Data Changes)
- Snowflake has a large set of data types by default. We have provided some Snowflake data types and corresponding PostgreSQL types. More on Source to Target Mapping
Postgres to Snowflake Data Type Conversions
| PostgreSQL Data Type | Snowflake Data Type |
| BIGINT | NUMBER |
| BINARY | BINARY |
| bigserial / serial8 | Number |
| bit varying(precision), 1 <= p <= 83886080 | binary(size), 1 <= size <= 6291457 |
| bit(precision), 1 <= p <= 83886080 | binary(size), 1 <= size <= 6291457 |
| BOOLEAN | BOOLEAN |
| box | binary(115) |
| BYTEA | BINARY |
| character varying(size), 1 <= size <= 10485760 | varchar(size), 4 <= size <= 16776004 |
| character(size), 1 <= size <= 10485760 | varchar(size), 4 <= size <= 16776004 |
| cidr | varchar(45) |
| circle | binary(87) |
| DATE | DATE |
| daterange | varchar(29) |
| DECIMAL | NUMBER |
| DOUBLE | FLOAT |
| DOUBLE PRECISION | FLOAT |
| ENUM | No type for ENUM. Must use any type which can represent values in ENUM |
| Float | Float |
| Float4 | Float |
| Float8 | Float |
| inet | varchar(45) |
| Int2 | Number |
| int4range | Number |
| int8range | Number |
| INT, INTEGER | Number |
| json | variant |
| jsonb | variant |
| line | binary(85) |
| lseg | binary(117) |
| LONGTEXT | STRING, TEXT |
| MEDIUMINT | NUMBER |
| MEDIUMTEXT | STRING, TEXT |
| macaddr | varchar(17) |
| macaddr8 | varchar(23) |
| money | number(19,2) |
| NUMERIC(p,s) | DECIMAL |
| numeric | Number |
| numeric(p,s), 1 <= p <= 38, 0 <= s <= 37 | number(p,s), 1 <= p <= 38, 0 <= s <= 37 |
| numeric(p,s), 38 <= p <= 1000, 38 <= s <= 1000 | number(size), 41 <= size <= 1003 |
| numrange | varchar(294917) |
| path | binary |
| point | binary(57) |
| polygon | binary |
| REAL | FLOAT |
| serial / serial4 | Number |
| SMALLINT | NUMBER |
| smallserial / serial2 | Number |
| TEXT | VARCHAR |
| time(precision) with time zone, 0 <= p <= 6 | timestamp_tz(precision), 0 <= p <= 6 |
| time(precision) without time zone, 0 <= p <= 6 | time(precision), 0 <= p <= 6 |
| timestamp(precision) with time zone, 0 <= p <= 6 | timestamp_tz(precision), 0 <= p <= 6 |
| timestamp(precision) without time zone, 0 <= p <= 6 | timestamp_ntz(precision), 0 <= p <= 6 |
| TIMESTAMP with local time zone; time zone, if provided, is not stored. | TIMESTAMP_LTZ |
| TINYINT | TINYINT |
| TINYTEXT | STRING, TEXT |
| tsrange | varchar(63) |
| tstzrange | varchar(75) |
| txid_snapshot | Does not Support |
| uuid | varchar |
| VARCHAR(n) | VARCHAR |
| VARBINARY | BINARY |
| xml | variant |
2 Easy Postgres to Snowflake Migration Methods
There are several processes that can help to migrate data from Postgres to Snowflake. Here we will discuss two methods to move data from Postgres to Snowflake on AWS. The first one is manual and involves using the COPY command along with Amazon S3 as an external stage to load the data from Postgres to Snowflake. The second one is automated and uses BryteFlow as a no-code ETL tool to transfer data from Postgres to Snowflake on AWS. Aurora Postgres and How to Setup Up Logical Replication
Method 1: Move Data from Postgres to Snowflake using COPY command and Amazon S3
Step 1: Load the data from Postgres DB into a CSV file.
Run the below query in Postgres to load data into a CSV file.
- Format:
- COPY <schema>.<table_name> TO ‘<location>\<File_name>.csv’ DELIMITER ‘,’ CSV HEADER;
- Ex:
- COPY public.NIMI_BASIC_TYPES_PART_PK TO ‘C:\Test\NIMI_BASIC_TYPES_PART_PK.csv’ DELIMITER ‘,’ CSV HEADER;
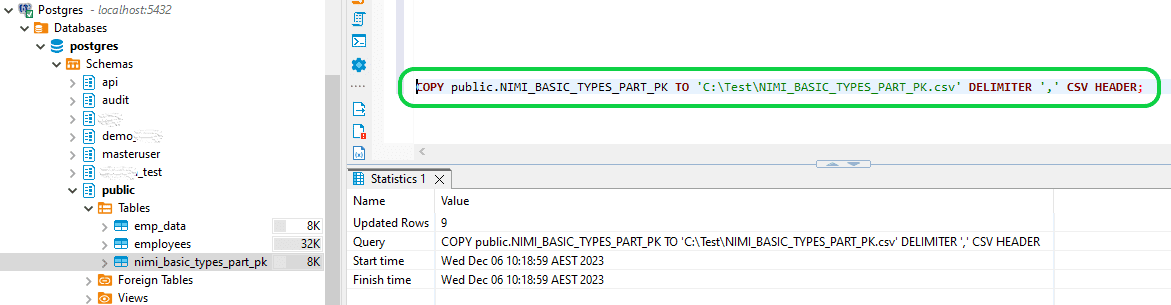
Once the above query is executed, the CSV file with data will be generated in the given location as below.

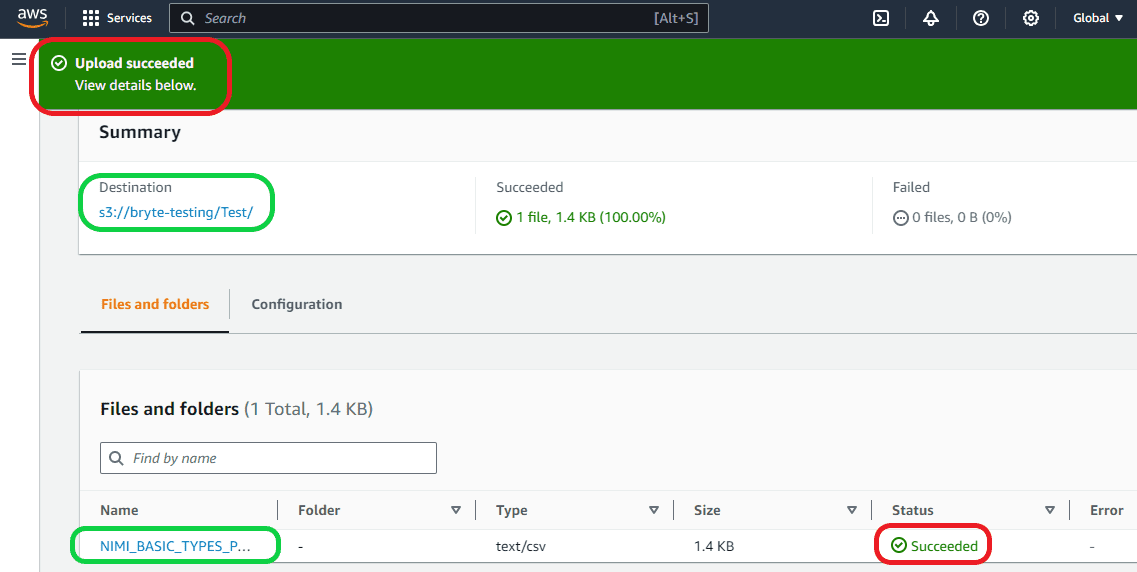
Step 2: Upload the CSV file into the AWS S3 bucket.
Make sure you have the S3 bucket created before proceeding with this step. To upload the CSV file, go to the S3 bucket, then choose the “Upload” option. It will take you to the Upload page where you can click on the “Add files” option. Then go to the location where your CSV file was created, then select the CSV file to upload to S3 bucket. Once the file is selected then click on the “Upload” option available in bottom right corner.

Then the next page will tell you whether the file is uploaded successfully or not, as seen below.
Step 3: Create the Storage Integration and connection from AWS to Snowflake.
First you need to create the Storage Integration, only then you can create the stage. The query to create stage is given below:
- Format:-
- CREATE <Stage_Name>
URL=’<S3 bucket folder where CSV file is stored>’
STORAGE_INTEGRATION = <Storage integration name>
- CREATE <Stage_Name>
- Ex:
- CREATE STG_AWS
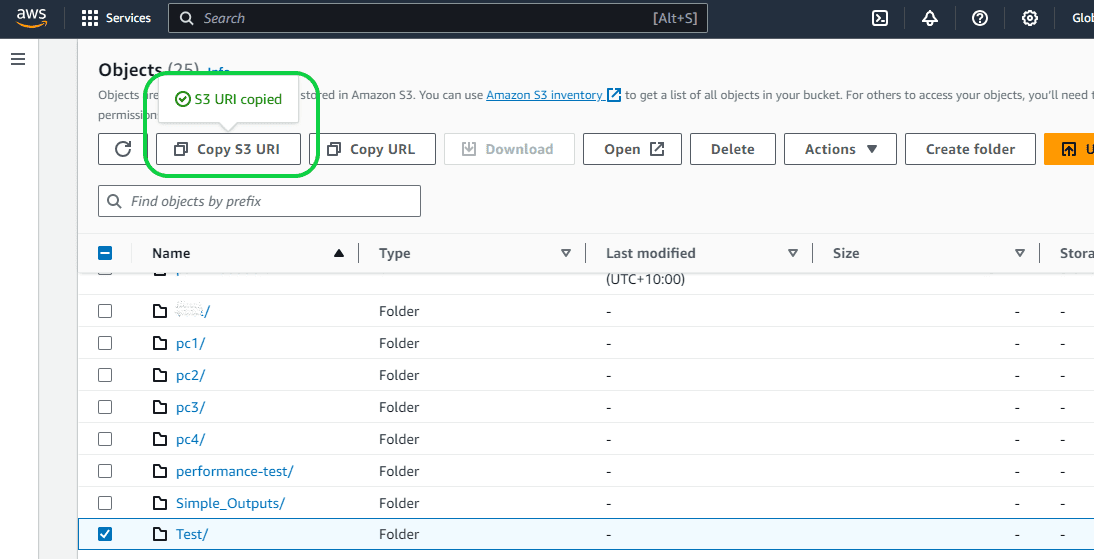
URL=’s3://bryte-testing/Test/’
STORAGE_INTEGRATION = AWS_CSVINTG
- CREATE STG_AWS
URL can be copied from AWS S3 bucket as seen below.
STORAGE_INTEGRATION helps to create connections between Snowflake and AWS accounts. Without Storage integration we cannot create an External stage in Snowflake. The following are the steps to create STORAGE_INTEGRATION.
Create the STORAGE_INTEGRATION using the below query and properties:
- Format:-
- CREATE STORAGE INTEGRATION <Name of your choice>
TYPE = <Internal or External Stage>
ENABLED = <Change into TRUE, by default FALSE>
STORAGE_PROVIDER = <You storage>
STORAGE_ALLOWED_LOCATIONS = <(‘CSV file location’)>
STORAGE_AWS_ROLE_ARN = <‘AWS IAM Role details’>;
- CREATE STORAGE INTEGRATION <Name of your choice>
- Ex:-
- CREATE STORAGE INTEGRATION AWS_CSVINTG
TYPE = EXTERNAL_STAGE
ENABLED = TRUE
STORAGE_PROVIDER = S3
STORAGE_ALLOWED_LOCATIONS = (‘s3://bryte-testing/Test/’)
STORAGE_AWS_ROLE_ARN = ‘arn:aws:iam::60000000000:role/CSVROLE’;
- CREATE STORAGE INTEGRATION AWS_CSVINTG
- Here:
- “CREATE STORAGE INTEGRATION <Name of your choice>” is the query and rest are properties of the STORAGE INTEGRATION.
- TYPE tells you whether the stage is Internal or external. Here it works for External Stage since we are given External Stage.
- ENABLED – By default its value is “FALSE”, we need to change it into “TRUE”.
- STORAGE_PROVIDER – You need to give the storage provider details here. In our case its AWS S3
- STORAGE_ALLOWED_LOCATIONS – You need to give the S3 folder location where the CSV file is stored. Remember to put it in the brackets.
- STORAGE_AWS_ROLE_ARN – This is the ID created using the AWS IAM policy.
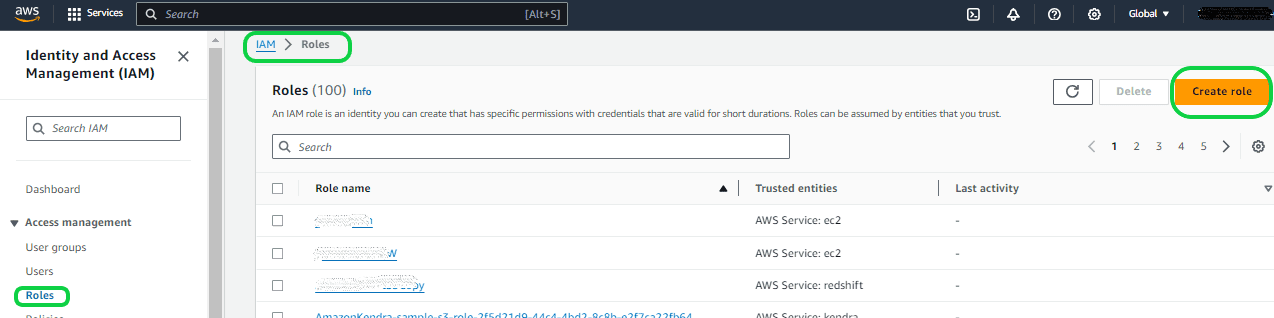
You can create the AWS ROLE using the steps below:
To create the AWS ROLE go to the AWS account and search for IAM and go to the IAM page, then select “Roles” from the left panel under “Access management”. Then select the option “Create roles”.
Once you are in the “Create Role” screen, you need to select the “AWS account” because it allows you to connect to third-party applications like Snowflake. Then select the “Require External ID” under the “Options”. For now, you can give a default value. Later Snowflake will create a valid value and you can replace it. Here a default value of “12345” is given. Then click “Next”.

In the next screen under “Permissions policies” select “AmazonS3FullAccess”. This is to give full access permission to Snowflake to access the S3 bucket. Otherwise, Snowflake won’t be able to access it. Then click “Next”.

In the next screen you provide the Role Name and click “Next”, Here the Role Name given is “CSVROLE”. Then click on “Create Role”.
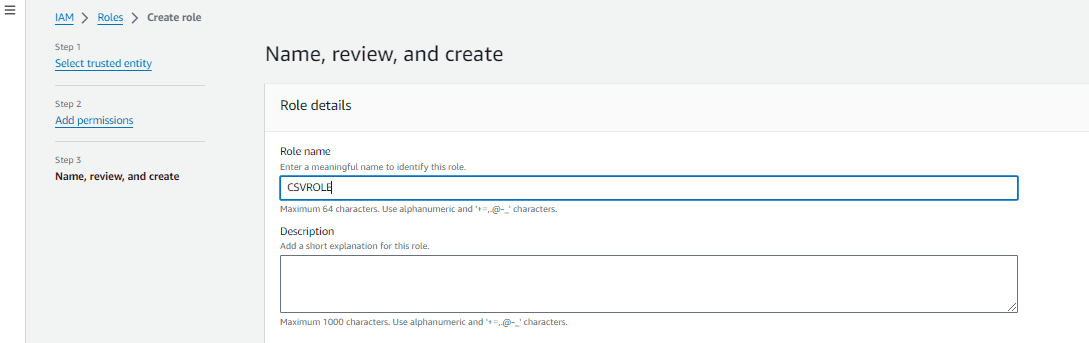
In the next screen you can see that the Role is created.

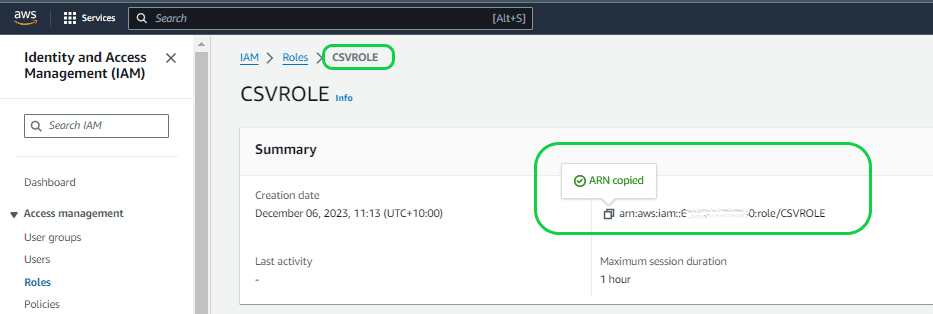
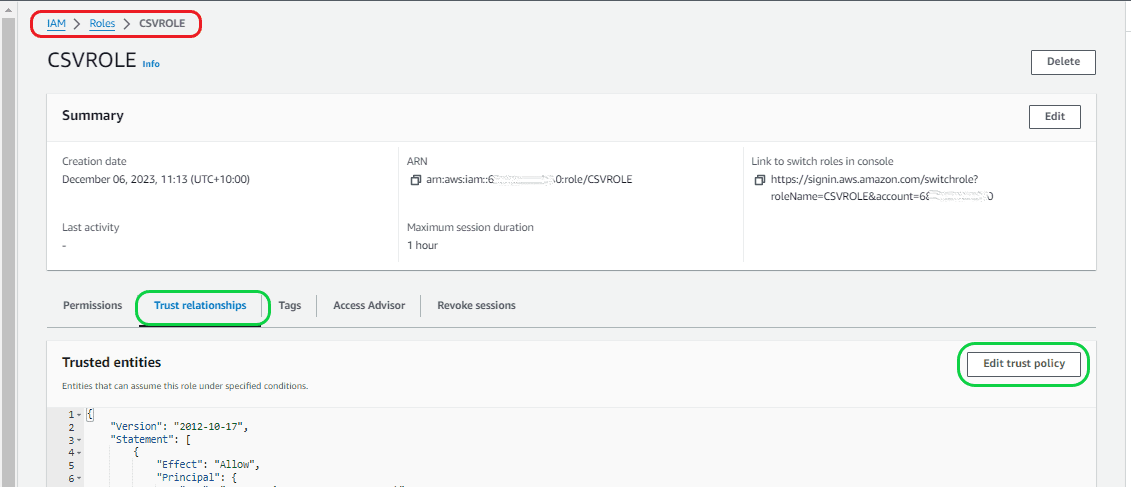
Then click on the role you created, and it will take you to the Role page. Here it is “CSVROLE”. Then copy the ARN details and update it in the STORAGE INTEGRATION property “STORAGE_AWS_ROLE_ARN”.
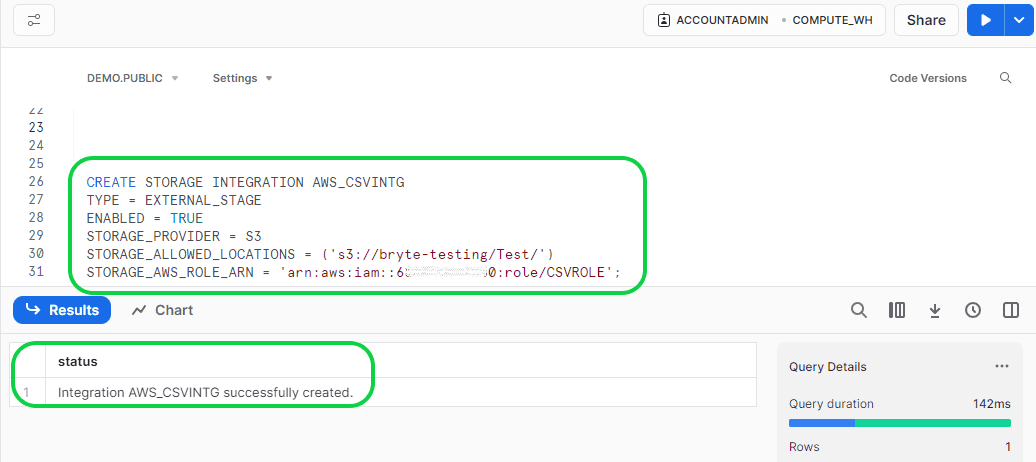
Then execute the completed query in Snowflake to create the “STORAGE INTEGRATION”.
- CREATE STORAGE INTEGRATION AWS_CSVINTG
TYPE = EXTERNAL_STAGE
ENABLED = TRUE
STORAGE_PROVIDER = S3
STORAGE_ALLOWED_LOCATIONS = (‘s3://bryte-testing/Test/’)
STORAGE_AWS_ROLE_ARN = ‘arn:aws:iam::60000000000:role/CSVROLE’;
Now the “STORAGE INTEGRATION” is created and connection from AWS to Snowflake is established but the connection from Snowflake to AWS is yet to be established. Follow the below steps to establish a connection from Snowflake to AWS.
Step 4: Create the connection from Snowflake to AWS.
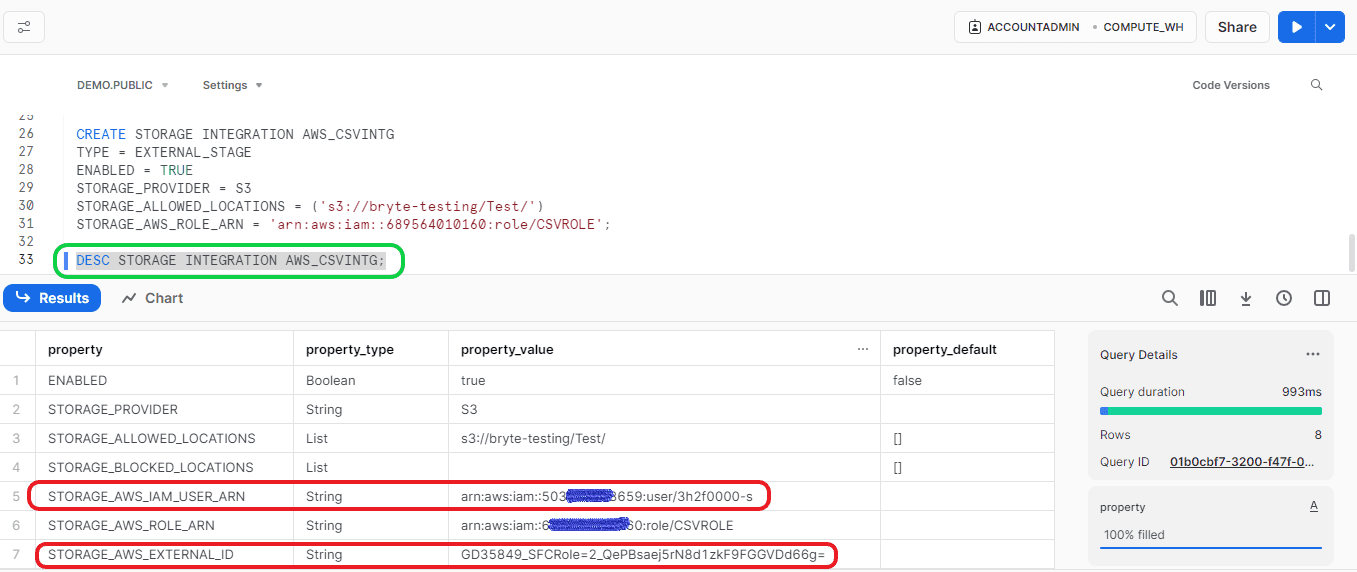
To establish the connection, we need to get the “STORAGE_AWS_IAM_USER_ARN” and “STORAGE_AWS_EXTERNAL_ID” from Snowflake using the below query,
- Format:
- DESC STORAGE INTEGRATION <Your Storage Integration name>;
- Ex:
- DESC STORAGE INTEGRATION AWS_CSVINTG;
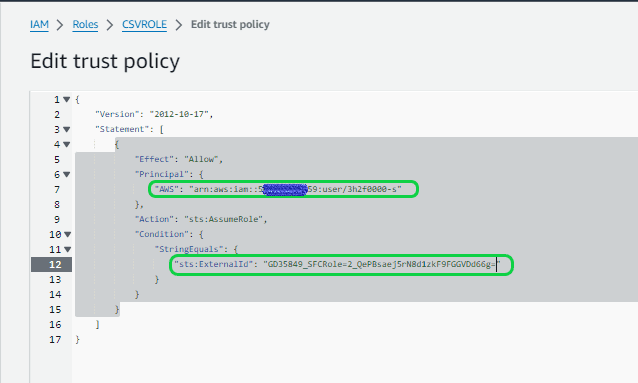
Then go to the Role location. In the Role location, select “Trust relationships” and click on “Edit trust policy”. It will take you to the “Edit trust policy” page.
Now go back to the Snowflake and copy the “STORAGE_AWS_IAM_USER_ARN” id and “STORAGE_AWS_EXTERNAL_ID” ids. Then replace the “AWS” value with copied “STORAGE_AWS_IAM_USER_ARN” id and “sts:ExternalId” with “STORAGE_AWS_EXTERNAL_ID” id. Then click on “Update policy”.
Now the connection from Snowflake to AWS is established.
Step 5: Create the External Stage
In the beginning of step 3, we mentioned creating stages. Now we have all the details required for creating the stage. Why you need Snowflake Stages
- Format:-
- CREATE <Stage_Name>
- Ex:
- CREATE STG_AWS
If you run the above query, it will create an internal stage only. To create it as external stage, you need to add some properties as seen below:
- Format:-
- CREATE <Stage_Name>
- URL=’<S3 bucket folder where CSV file is stored>’
- STORAGE_INTEGRATION = <Storage integration name> We created this in Step 3.
- CREATE <Stage_Name>
- Ex:
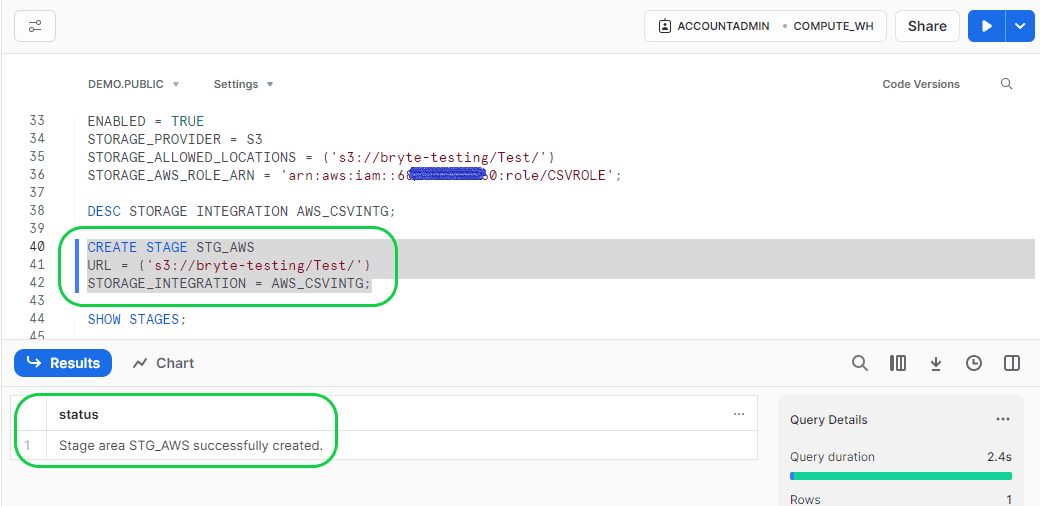
- CREATE STAGE STG_AWS
- URL = (‘s3://bryte-testing/Test/’)
- STORAGE_INTEGRATION = AWS_CSVINTG;
- CREATE STAGE STG_AWS
Execute the above query to create the stage.
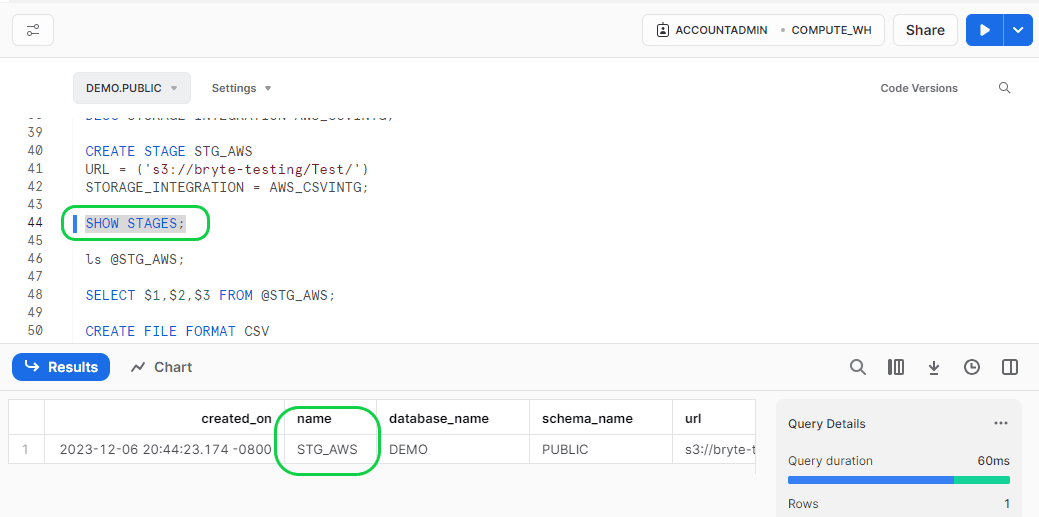
You can verify whether the stage is created or not by running the below command in Snowflake.
- Format:-
- SHOW STAGES;
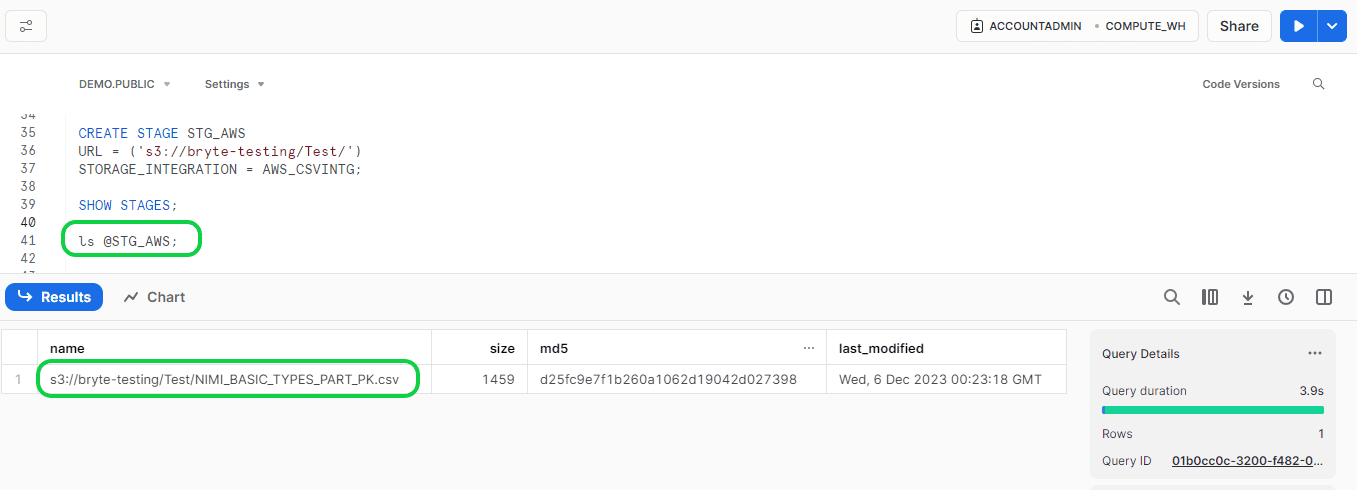
Step 6: Load the data to External Stage in Snowflake.
Before loading the data from Stage to Snowflake, we can check and confirm whether the data is available in the stage or not using the below query in Snowflake.
- Format:
- ls @<your stage name>;
- Ex:
- ls @STG_AWS;
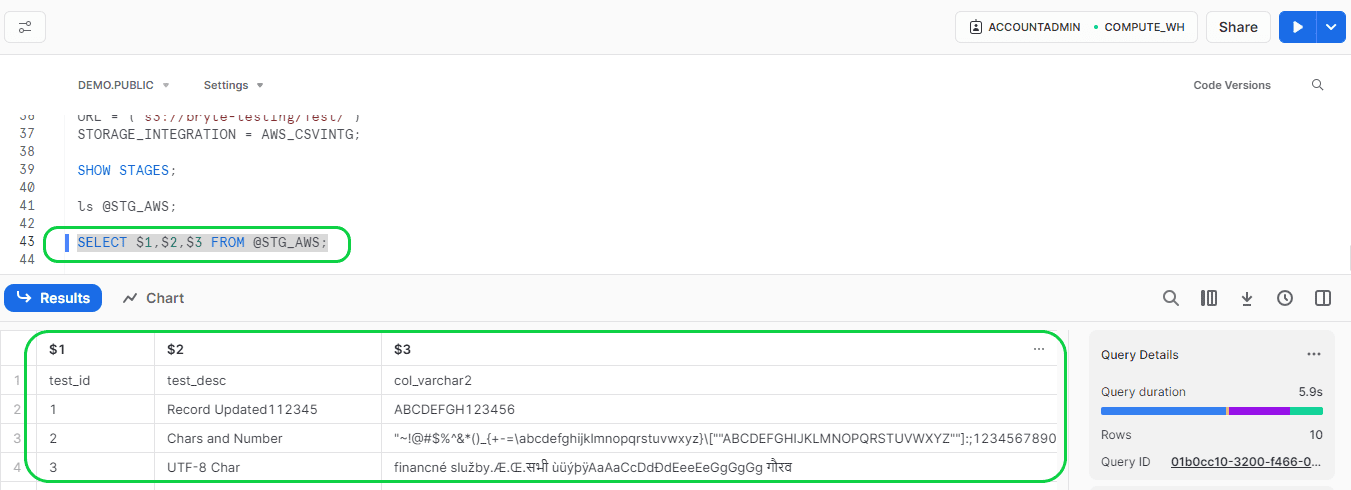
If you want to verify the data in the stage file before loading to the Snowflake stage, then run the below command:
- Format:
- SELECT $<Column position>,$<Column position>,$<Column position> etc FROM @STG_AWS;
- Ex:
- SELECT $1,$2,$3 FROM @STG_AWS;
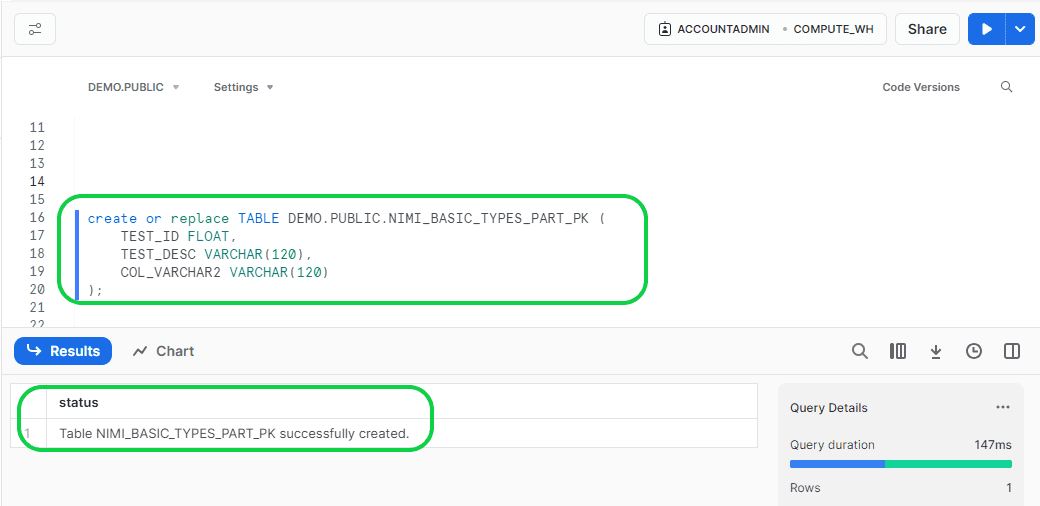
Now create the table using the DDL copied from Postgres for the data to load.
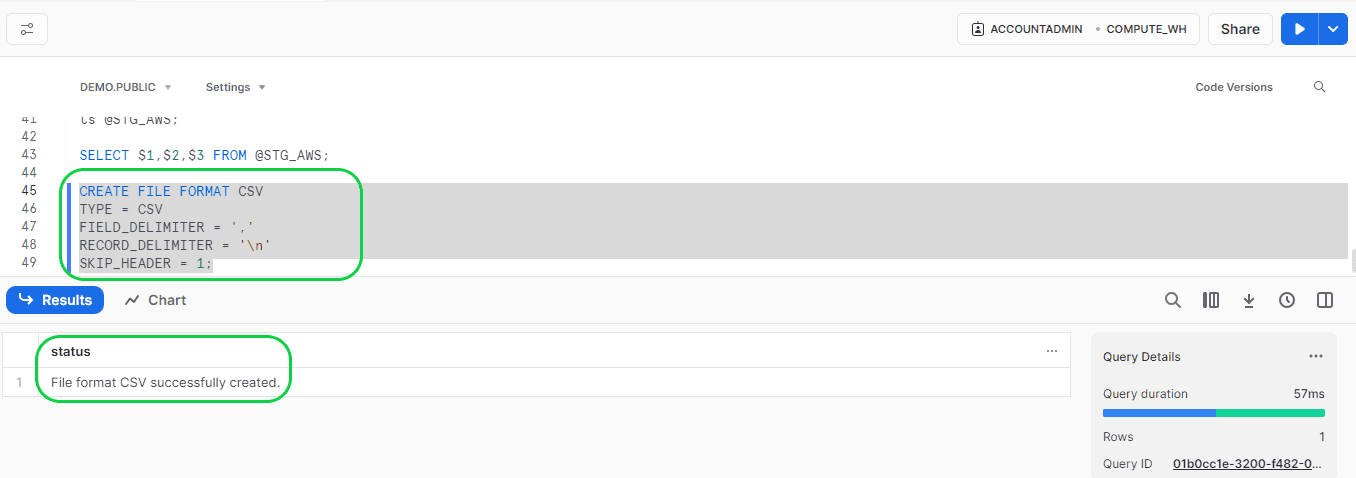
Now you need to create the file format before you copy the data from Stage to Snowflake. This is to tell Snowflake that the first line in the CSV file is header and needs to be skipped, and what is the delimiter in the CSV file for the column and rows. It is done by creating the file format using the below query:
- Format:
- CREATE FILE FORMAT CSV
- TYPE = <What type of file>
FIELD_DELIMITER = ‘<The delimiter used in the file to separate the columns>’
RECORD_DELIMITER = ‘<The delimiter used to separate each row in the file. Normally it is ENTER, so use ‘\n’ to show the new line >’
SKIP_HEADER = <update here whether it is required to skip the first line or not>;
- TYPE = <What type of file>
- CREATE FILE FORMAT CSV
- Ex:
- CREATE FILE FORMAT CSV
- TYPE = CSV
FIELD_DELIMITER = ‘,’
RECORD_DELIMITER = ‘\n’
SKIP_HEADER = 1;
- TYPE = CSV
- CREATE FILE FORMAT CSV
Now load the data from the external stage to Snowflake table using the below COPY command:
- Format:
- COPY INTO <your CSV source file name>
FROM @<your stage name>
FILE_FORMAT = <format of the file>;
- COPY INTO <your CSV source file name>
- Ex;
- COPY INTO NIMI_BASIC_TYPES_PART_PK
FROM @STG_AWS
FILE_FORMAT = CSV;
- COPY INTO NIMI_BASIC_TYPES_PART_PK
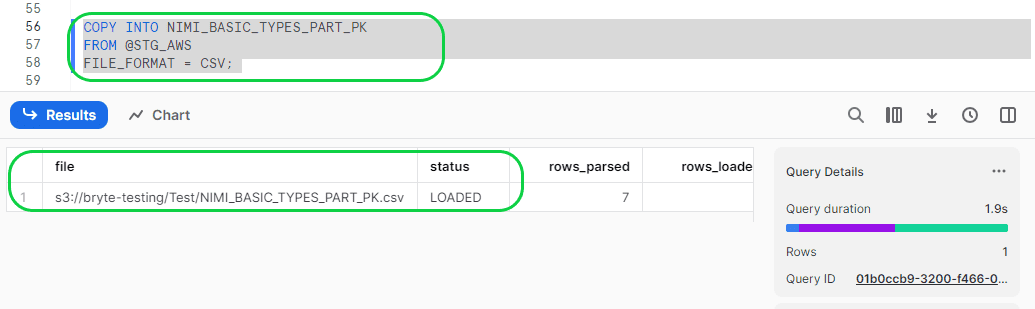
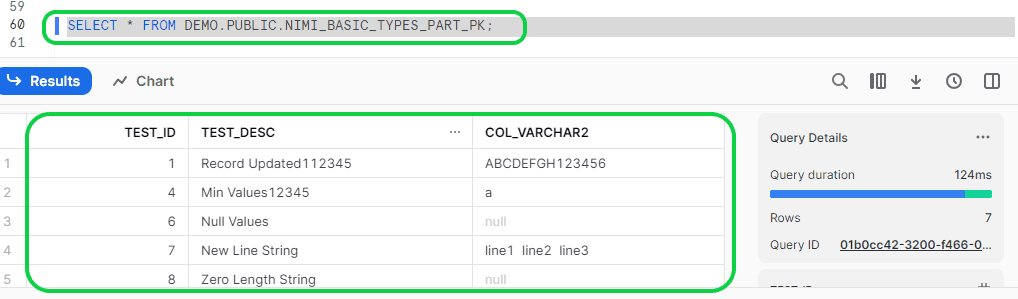
Now the data is loaded into the Snowflake table.
Method 2: Moving Data from Postgres to Snowflake with BryteFlow
BryteFlow is a completely no-code CDC replication tool that can ETL your data from Postgres to Snowflake with an easy point-and-click interface. BryteFlow is cloud-native and ideal for large enterprises for transferring large volumes of data. There is no coding for any process. To use BryteFlow Ingest, you will to contact the BryteFlow team or download it from the AWS Marketplace and install it. Get a Free Trial
Step 1: Download And Install BryteFlow Ingest
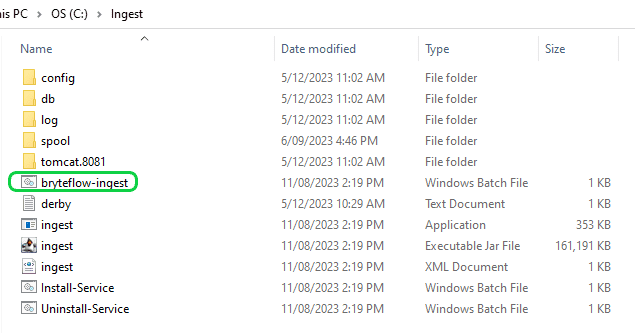
Once BryteFlow Ingest is downloaded, establish a home directory for it; typically, the default location is where BryteFlow Ingest is downloaded. After the download process, simply follow the steps outlined to complete the BryteFlow Ingest installation.
- After downloading and extracting the software, navigate to the ‘ingest’ directory within the main ‘bryteflow’ directory.
- To install the service, open the Windows Command Prompt with administrative privileges.
- Change the directory to ‘ingest.’
- Run the command “Install-BryteFlow Ingest Service.bat.”
- The ‘BryteFlow Ingest’ service is now successfully installed on the server.
- Access Windows ‘services’ and initiate the Ingest service.
- Open the user interface using the Google Chrome browser with the URL: localhost:8081.
- Proceed to complete the Ingest setup by configuring the Source and Destination databases.
- Ensure you possess a valid license before initiating replication; contact the BryteFlow team to obtain one.
Step 2: Setting up the PostgreSQL Database
Following the installation of BryteFlow Ingest, the next task is to configure the PostgreSQL database specifically for BryteFlow Ingest. This entails integrating the prerequisites for the PostgreSQL source outlined below. View Prerequisites
- Use a PostgreSQL database that is version 9.4.x or later
- The IP address of the BryteFlow machine must be added to the pg_hba.conf
- configuration file with the “replication” keyword in the database field.
- Example:
- host replication all 189.452.1.212/32 trust
- Example:
- configuration file with the “replication” keyword in the database field.
- Set the following parameters and values in the postgresql.conf configuration file as below.
- Set wal_level = logical
- Set max_replication_slots to a value greater than 1. The max_replication_slots value should be set according to the number of tasks that you want to run. For example, to run four tasks you need to set a minimum of four slots. Slots open automatically as soon as a task starts and remain open even when the task is no longer running. You need to manually delete open slots.
- Set max_wal_senders to a value greater than 1. The max_wal_senders parameter sets the number of concurrent tasks that can run.
- Set wal_sender_timeout =0
- The wal_sender_timeout parameter terminates replication connections that are inactive longer than the specified number of milliseconds. Although the default is 60 seconds, we recommend that you set this parameter to zero, which disables the timeout mechanism.
- Note:- After changing these parameters, a restart is needed for PostgreSQL
- Grant ‘superuser’ permissions for the user account specified for the PostgreSQL source database. Superuser permissions are needed to access replication-specific functions in the source.
- Create a logical replication slot for the database you want to sync by running the following command:
- SELECT pg_create_logical_replication_slot(‘bflow_replication_slot’, ‘test_decoding’);
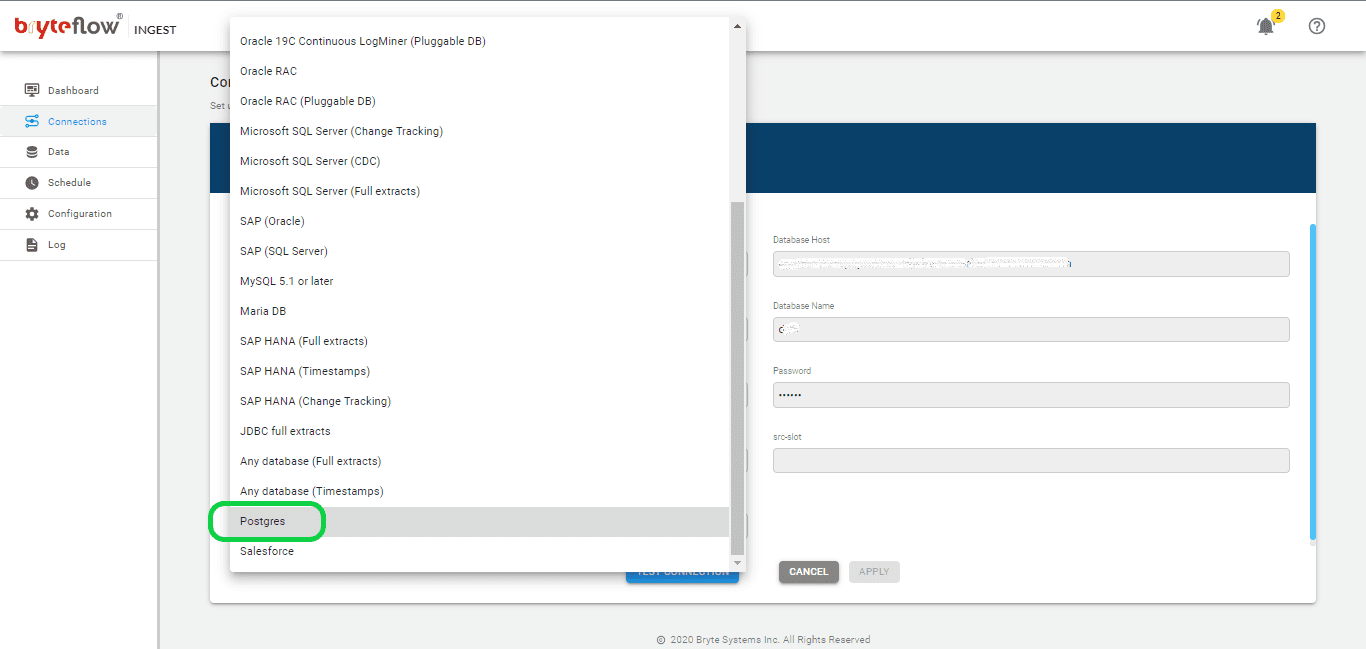
Step 3: Setup Connection Configuration for Source PostgreSQL
Retrieve the following information and incorporate it into the Ingest source configuration within the “Connections” option to establish a connection with the Postgres Database. Get the following details and update accordingly,
- Select “Postgres” as the Database Type from the available sources.
- Provide the Host Details of the Postgres for the Database Host field.
- Specify the Port Details of Postgres for the Database Port field.
- Enter the DB Details of the Postgres for the Database Name field.
- Input the User name used to connect to the Postgres Database for the User Id field.
- Input the User password associated with the User Id for connecting to the Postgres Database in the Password field.
Step 4: Set up Connection Configuration for Snowflake
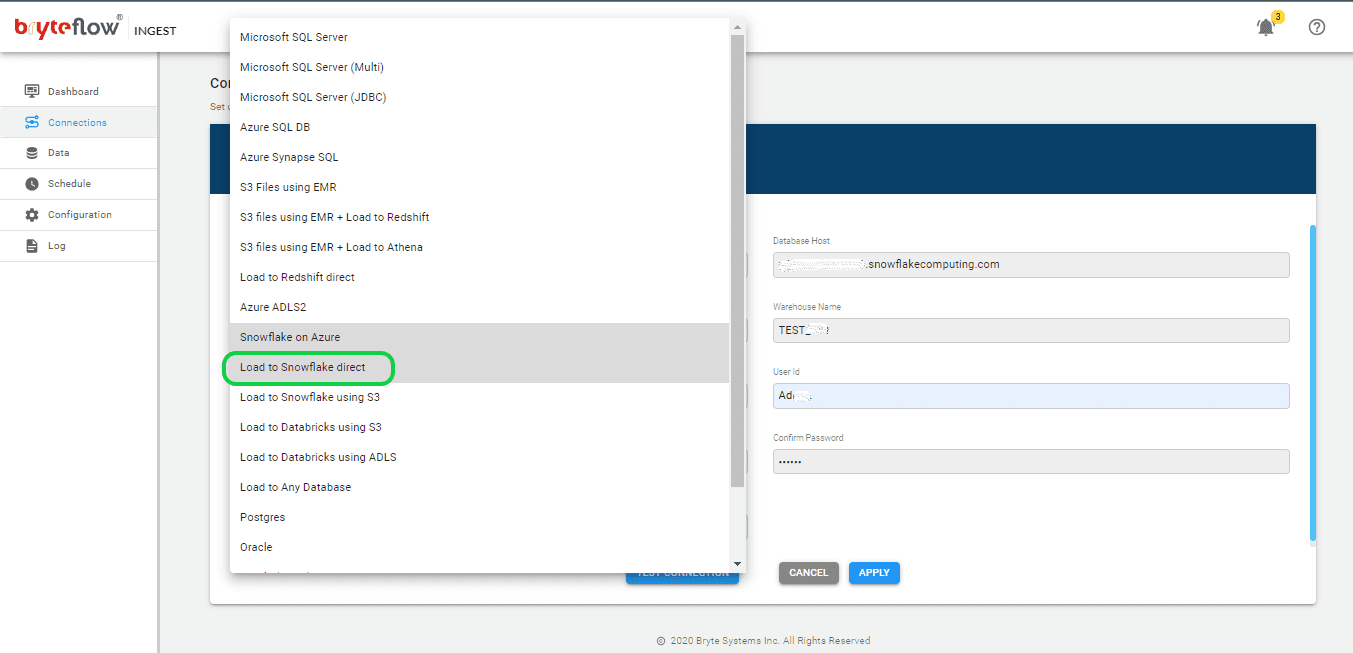
Get the below details and update them in the Ingest Destination configuration under “Connections” to connect to AWS Snowflake. Two Snowflake options are available “Snowflake on Azure” and “Load to Snowflake direct”. Make sure to select “Load to Snowflake direct” for AWS. Get the following details and update accordingly.
- Select “Load to Snowflake direct” from the dropdown for Database Type.
- Specify the host details for Snowflake under Database Host.
- Provide the account details for Snowflake as the Account Name.
- Enter the details for the Snowflake warehouse under Warehouse Name.
- Update the Database name in the respective field.
- Update the User ID in the designated space.
- Enter the password in the Password field.
- Reconfirm the password by entering it again in the Confirm Password field.
- Update JDBC details in the JDBC Options section.
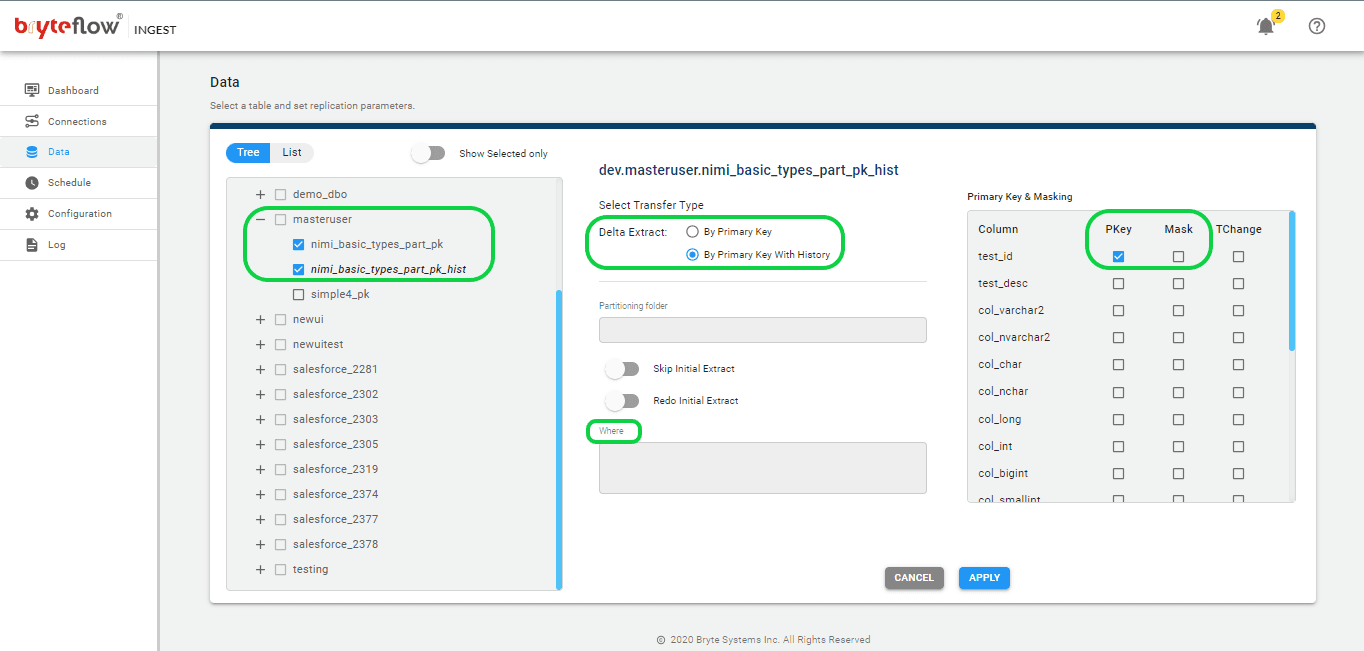
Step 5: Set up the tables to be replicated.
- Configure the source table(s) for replication by specifying the primary key and transfer type for each table. Choosing ‘By Primary key with History’ automatically maintains Snowflake’s SCD Type2 history. Opting for the ‘By Primary Key’ transfer type creates a mirrored version of the source table without historical data. You also have the ability to filter undesired data using the “Where” option, and Byteflow Ingest provides the option to “mask” sensitive data within columns.
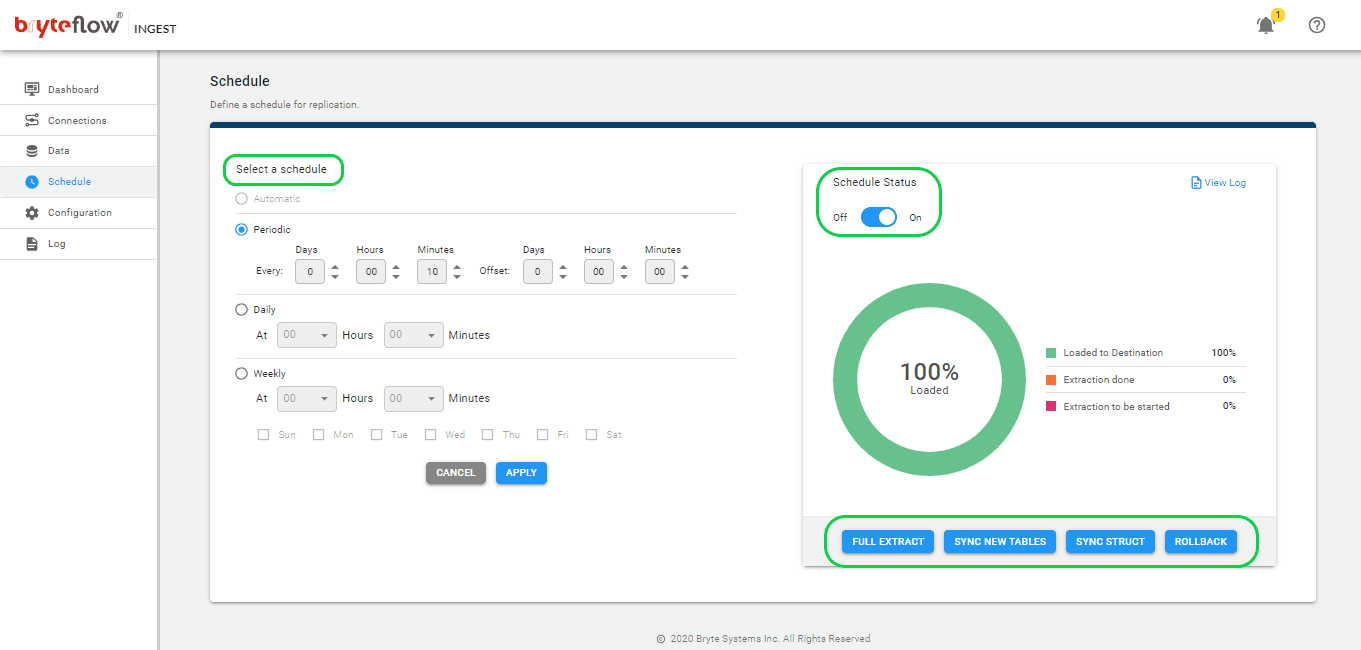
Step 6: Schedule the data replication
- After choosing the tables, proceed to set the schedule for data replication, enabling a seamless flow of your data to Snowflake in almost real-time. You can choose between “Periodic,” “Daily,” and “Weekly” options. Use the “Full Extract” option for the initial load, “Sync New Tables” to add new tables post-replication activation, “Sync Struct” for replicating structural changes in existing tables, and “Rollback” to revert to a successful previous run, particularly helpful in case replication is interrupted due to any outage.
Step 7: Monitor the progress
Upon completing the above steps, data replication from PostgreSQL to Snowflake initiates automatically based on the scheduled time. You can conveniently track the progress through the Ingest “Dashboard,” which provides comprehensive insights into BryteFlow Ingest activities. Key features in this section include:
- Total loaded records information.
- The count of loaded tables.
- Current loading status of Ingest.
- Connection status updates.
- Replication frequency details.

Why use BryteFlow to move data from Postgres to Snowflake
BryteFlow is a completely automated third-party CDC tool that manages all your migration processes including Postgres to Snowflake, in real-time without coding. It is self-service, GUI-driven, and automates every process including data extraction, Change Data Capture, merging, masking, schema, and table creation, and SCD Type2 history. Snowflake CDC With Streams and a Better CDC Method
BryteFlow supports movement of very large tables (over 100GB) easily with BryteFlow XL Ingest for the initial full refresh, using parallel, multi-thread loading, smart configurable partitioning and compression, and loads incremental data using log-based CDC with BryteFlow Ingest. Data is time-stamped, and incremental changes are merged with existing data automatically. BryteFlow TruData reconciles your data automatically with the use of row counts and columns checksum and alerts you for missing or incomplete data. The replication process can be monitored using the BryteFlow ControlRoom.
BryteFlow employs automated, log-based CDC (Change Data Capture) to replicate data from transactional databases (On-Prem and Cloud) like SAP, Oracle, PostgreSQL, MySQL and SQL Server to Cloud platforms like Amazon S3, Amazon Redshift, Snowflake, Azure Synapse, Azure Data Lake 2, PostgreSQL, Google BigQuery, SQL Server, Teradata, Kafka and Databricks in real-time. How to Make PostgreSQL CDC to Kafka Easy (2 Methods)
BryteFlow has very high throughput, transferring approx. 1,000,000 rows in just 30 seconds. It offers rapid deployment, allowing you to receive your data within two weeks, in contrast to the months typically required by our competitors. As a data replication tool, BryteFlow provides high availability out-of-the-box. It can also reduce data costs on Snowflake substantially since it uses very low compute resources. Postgres CDC (6 Easy Methods to Capture Data Changes)
As you can see, using BryteFlow is a much easier, faster and fully automated method to move your data in real-time from Postgres to Snowflake, do get in touch if you are interested in trying it out.