Interested in knowing how to migrate from SQL Server to Snowflake? This blog gives an overview of why migrating data from SQL Server to Snowflake is a good idea, presents some SQL Server to Snowflake migration tools, why BryteFlow is the easiest way to move data from SQL Server to Snowflake and how to use BryteFlow to load data from SQL Server to Snowflake in 4 simple steps. Click here to access the BryteFlow section if you are in a hurry.
Quick Links
- Planning a SQL Server to Snowflake migration or replication?
- Snowflake vs SQL Server
- SQL Server to Snowflake Migration tools, some popular choices
- SQL Server to Snowflake Data Type Mapping
- SQL Server to Snowflake Migration Planning
- Executing the SQL Server to Snowflake Migration
- The easiest way to get data from SQL Server to Snowflake is with BryteFlow
- SQL Server to Snowflake Migration: BryteFlow Highlights
- Ingesting data from SQL Server to Snowflake Step by Step
Planning a SQL Server to Snowflake migration or replication?
If you need to load SQL Server data to Snowflake we will show you one of the easiest ways to do so. BryteFlow’s replication of SQL Server data is completely automated, no-code and real-time. But first let’s examine why it may be worth your while to migrate from SQL Server to Snowflake.
Snowflake Advantages: Why Migrate to Snowflake
- Snowflake users do not need to worry about infrastructure and installation. Snowflake Cloud is a completely managed solution and delivered as Data Warehouse-as-a-Service (DWaaS). Build a Snowflake Data Lake or Data Warehouse
- It has pay-as-you-use pricing and separation of storage and compute so you can cut down costs of computational workloads, running queries only on data that is needed. Databricks vs Snowflake: 18 differences you should know
- You can easily share data internally within the company and externally with clients or vendors. SQL Server to Databricks (Easy Migration Method)
- No hardware provisioning is required, you can scale up compute easily when needed. Postgres to Snowflake : 2 Easy Methods of Migration
- You can have multiple copies of databases, schema, and tables, without needing to actually copy the data which can reduce data storage costs and save on copying time. Here’s Why You Need Snowflake Stages (Internal & External)
- Snowflake is an analytics database and Snowflake tables can be loaded and queried using standard SQL data types e.g. BOOLEAN, VARCHAR, NUMBER, TIMESTAMPS, etc.
- Snowflake offers almost infinitely scalable compute and is ideal if you have huge datasets and need for high concurrency. Snowflake CDC With Streams and a Better CDC Method
- All types of data – structured, semi-structured and unstructured can be stored in Snowflake. Postgres to Snowflake : 2 Easy Methods of Migration
- Snowflake is versatile and runs on all three main Cloud service providers: AWS, Azure, and GCP so it can fit into any cloud migration strategy. How to load terabytes of data to Snowflake fast
Snowflake vs SQL Server
If you compare Snowflake vs SQL Server, some points will jump at you right off. As you can see, Snowflake is a highly, secure automated cloud data warehouse with almost infinite computational power that does not require installation of hardware or software. Snowflake’s big data architecture is shared and multi-cluster with each cluster accessing data and running independently without conflict. This is ideal for running large queries and operations simultaneously. Learn how to cut costs on Snowflake by 30%
SQL server on the other hand is a relational database, an OLTP (Online Transaction Processing) one with different editions and versions that though versatile, isn’t as flexible and responsive in handling workload increases. There is a common pool of compute resources that is shared by all SQL server processes in contrast to Snowflake where you can separate different use cases into different compute buckets. Snowflake has been built ground up for the Cloud and to handle big data requirements. It is easily scalable with compute power that can be scaled up or down as needed. Though SQL Server may offer Server virtualization and Azure SQL Server scaling is available, the procedure could be slower and may incur downtime. SQL Server can slow down if handling multiple BI tasks since they will compete for the same resources. Learn about SQL Server CDC
SQL Server to Snowflake Migration Tools, some popular choices
For your SQL Server to Snowflake migration, there are many ETL tools that can help in moving data from SQL Server to Snowflake whether it is Snowflake on AWS, Snowflake on Azure or Snowflake GCP. Here we will give you an overview of some of them. Databricks vs Snowflake: 18 differences you should know
AWS DMS for SQL Server to Snowflake on AWS
If you need to migrate SQL Server data to Snowflake on AWS, you could use AWS DMS or AWS Database Migration Service. AWS DMS is a fully managed AWS cloud migration service that can migrate data to the AWS cloud, from on-premises or cloud hosted data stores. It can do a one-time full load or incremental continual replication of data in real-time using CDC (Change Data Capture) to sync source and target. AWS DMS simplifies the SQL Server to Snowflake process but does have some limitations. Compare AWS DMS with BryteFlow
AWS DMS Limitations
AWS DMS does not move data directly from SQL Server to Snowflake
AWS DMS does not move data directly to Snowflake. It will need to replicate SQL Server data to a staging area on Amazon S3 from where the data can be loaded to Snowflake. This can add to the latency and overall complexity. Snowflake CDC With Streams and a Better CDC Method
AWS DMS will need additional scripting to enable CDC for SQL Server to Snowflake migration
AWS DMS needs some amount of scripting for Change Data Capture of incremental loads. This can prove to be costly and time-consuming. How to Make CDC Automation Easy
AWS DMS doesn’t do schema or code conversion
AWS DMS cannot process items such as indexes, users, privileges, stored procedures, and other database changes not directly related to table data. To process these and extend DDL support you will need to download and enlist the AWS Schema Conversion Tool (SCT).
AWS DMS may find large database migrations challenging
AWS Database Migration Service ingests a full load using resources on your source database. By default, AWS DMS can load 8 tables in parallel and performs a full table scan of the source table for each table under parallel processing. This can prove challenging if you need to move very large volumes of data. Also, every migration-related task queries the source as part of the change capture process which may impact the source adversely and there may be replication lags. Oracle to Snowflake: Everything You Need to Know
Azure Data Factory for SQL Server to Snowflake on Azure
Azure Data Factory can be used to migrate data from SQL Server to Snowflake on Azure. This is a cloud-based data integration and ETL service that can create, schedule, and orchestrate data integration workflows (data pipelines) at scale, and integrate data from various sources and destinations. ADF has built-in connectors for different sources and destinations including SQL Server and Snowflake. ADF also has a user-friendly interface to drag and drop components like source and destination connectors, transformations, and data flows and create data pipelines. The data pipelines can be scheduled to run at a specific time or interval. ETL Pipelines and 6 Reasons for Automation
Azure Data Factory Limitations
SQL Server to Snowflake on Azure will need staging
Data from SQL Server will need to be landed into a staging area such as Azure Blob before moving it to Snowflake. Adding a hop is likely to increase latency and data stoppages.
Data transformation capability is limited
Azure Data Factory provides basic data transformation capabilities, however more complex transformations may need other tools to be used with Data Factory. The Native transform functions are absent and there are limited trigger functions.
Data Factory pipelines may lack flexibility
Flexibility is lacking with Data Factory pipelines since they may need to be moved between different environments like testing and development leading to a further need for enhanced security and flexibility.
Debugging and troubleshooting may not be easy
Azure Data Factory pipeline troubleshooting, and debugging might be difficult since visibility into pipeline execution and data flows is limited.
SQL Server to Snowflake with SSIS (SQL Server Integration Services)
Microsoft SQL Server Integration Services (SSIS) is a data integration and ETL tool that is included with SQL Server, and it supports a variety of data sources and destinations, including Snowflake. SSIS is a data integration platform that enables data extraction, transformation, and loading (ETL) packages for data warehousing. As an ETL tool, it can define your loads and extracts and can be used to migrate data from SQL Server to Snowflake. It has a graphical UI and can be used for a variety of workflow functions like executing SQL statements, data sources and destinations for extracting and loading data, FTP operations, transformations like cleaning, aggregating, merging, and copying data. It has tools for creating and debugging packages. SQL Server to Databricks (Easy Migration Method)
SSIS (SQL Server Integration Services) Limitations
SSIS does not publish to reporting tools
SSIS does not have the ability to publish to reporting tools. To view a package execution report, you need to install SQL Server Management Studio (SSMS), without which you would have limited visibility into package execution and data flows.
SSIS uses a lot of memory and CPU resources
SSIS uses a lot of memory especially if you need to run packages in parallel. The resource allocation for processing needs to be done properly between SQL and SSIS to avoid execution slowdown.
SSIS does not handle very large datasets well
SSIS does not handle very large data volumes well and processing of very large datasets may be a challenge when moving data from SQL Server to Snowflake.
SSIS performs only batch ETL
SSIS does only batch processing so it may not be suitable for real-time data streaming from SQL Server to Snowflake where low latency is required.
Custom coding may be required for SSIS processing
For complex processing that is not supported by the built-in components, you may need to do custom coding or use other tools to achieve your goal.
SSIS needs a Windows operating platform to run
SSIS packages are built to run on a Windows operating system and have limited portability for other platforms. This can make SSIS integration with other tools challenging.
All the SQL Server to Snowflake tools discussed so far require significant coding and are not fully automated. However, there are third-party tools like Matillion and Fivetran which provide a high degree of automation. Learn how BryteFlow stacks up as an Alternative to Matillion and Fivetran for SQL Server to Snowflake Migration.
SQL Server to Snowflake Data Type Mapping
Snowflake supports many basic SQL data types (with some limitations) for use in columns, expressions, local variables, parameters, and other suitable locations. In some situations, one data type can be converted to another type.
This is a list for mapping Data Types from SQL Server to Snowflake that you may find helpful. (Source)
| SQL SERVER (TSQL) | SNOWFLAKE | COMMENTS |
| BIGINT | NUMBER | Precision and scale not to be specified when using Numeric. |
| BIT | BOOLEAN | Recommended: Use NUMBER if migrating value-to-value to capture the actual BIT value. Use Boolean in Snowflake if the desired outcome. is to restrict to Ternary Logic (three valued): TRUE, FALSE, or NULL (UNKNOWN). |
| DECIMAL | NUMBER | Default precision and scale are (38,0). |
| INT | NUMBER | Precision and scale not to be specified when using Numeric. |
| MONEY | NUMBER | Money has a range of 19 digits with a scale of 4 digits, so NUMBER(19,4) can be used. |
| NUMERIC | NUMBER | Default precision and scale are (38,0). |
| SMALLINT | NUMBER | Default precision and scale are (38,0). |
| SMALLMONEY | NUMBER | NUMBER with precision of 10 digits, with a scale of 4, so NUMBER(10,4) can be used. |
| TINYINT | NUMBER | Default precision and scale are (38,0). |
| FLOAT | FLOAT | Snowflake uses double-precision (64-bit) IEEE 754 floating point numbers. |
| REAL | FLOAT | The ISO synonym for REAL is FLOAT(24). |
| DATE | DATE | Default in SQL Server is YYYY-MM-DD. |
| DATETIME2 | TIMESTAMP_NTZ | Snowflake: TIMESTAMP with no time zone, time zone is not stored. DATETIME2 has a default precision of up to 7 digits, Snowflake has TIMESTAMP_NTZ with the precision of 9 digits. |
| DATETIME | DATETIME | SQL Server datetime is not ANSI or ISO 8501 compliant. Storage size is 8 bytes. Accuracy is rounded to increments of .000, .003, or .007 seconds. |
| DATETIMEOFFSET | TIMESTAMP_LTZ | Up to 34,7 in precision, scale. |
| SMALLDATETIME | DATETIME | SMALLDATETIME is not ANSI or ISO 8601 compliant. It has a fixed 4 bytes storage space. |
| TIMESTAMP (Unsupported) | TIMESTAMP_NTZ | Use DATETIME2 or CURRENT_TIMESTAMP function. |
| TIME | TIME | SQL Server has a precision of 7 nanoseconds. Snowflake has precision of 9 nanoseconds |
| CHAR | VARCHAR(1) | Any set of strings that is shorter than the maximum length is not space-padded at the end. |
| TEXT | VARCHAR | This data type will be discontinued on SQL Server. Use NVARCHAR, VARCHAR, or VARBINARY instead. |
| VARCHAR | VARCHAR | Any set of strings that are shorter than the maximum length is not space-padded at the end. |
| NCHAR | VARCHAR | NCHAR is used on fixed-length-string data. |
| NTEXT | VARCHAR | This data type will be discontinued on SQL Server. Use NVARCHAR, VARCHAR, or VARBINARY instead. |
| NVARCHAR | VARCHAR | NVARCHAR’s string length can range from 1–4000. |
| BINARY | BINARY | Snowflake: maximum length is 8 MB. |
| IMAGE | N/A | This data type will be discontinued on SQL Server. Use NVARCHAR, VARCHAR, or VARBINARY instead. |
| VARBINARY | BINARY | Snowflake: maximum length is 8 MB. |
| UNIQUEIDENTIFIER | N/A | N/A Not Supported. |
SQL Server to Snowflake Migration Planning
Here we will give you some insight into how to plan and execute your SQL Server to Snowflake migration. (Source)
Document your existing solution before moving from SQL Server to Snowflake
This step will give you overall clarity into what the migration should achieve, and what exactly you should take across from SQL Server to Snowflake. This will consist of some important lists.
- The Microsoft SQL Server databases that you need to migrate. About SQL Server CDC
- The SQL Server database objects to migrate.
- SQL Server schemas to migrate. SQL Server to Postgres – A Step-by-Step Migration Journey
- Processes and tools that populate and pull data from Microsoft SQL Server.
- Security roles, users, and permissions.
- List of Snowflake accounts that exist or need to be created.
- Frequency of security provisioning processes.
- Documenting the existing Microsoft SQL Server solution as an as-is architecture diagram.
Besides sources of data, you must also list out tools and processes involved in migration. These could include ETL/ELT tools, Scripting Languages, Reporting/Visualization tools, Data Science processes, Machine Learning processes etc. Check the level of Snowflake support for the tools in use which will help point you to the migration approach to take.
Define your SQL Server to Snowflake Migration Approach
Now that you have decided to migrate or replicate data from SQL Server to Snowflake, there are some steps you need to follow for a successful migration. Examine your current implementation and then list down the following.
- List of processes that can be migrated ‘as-is’.
- List of processes that would need reengineering.
- List of processes in need of fixing.
- A Draft of Migration Deliverables.
- The new to-be architecture diagram after migration.
Ideally you should have minimal reengineering for the first iteration unless your current system needs repair. Reengineering will affect downstream reporting and visualization tools. It will also need development and testing, which will extend the timeline considerably.
What development and deployment processes are part of your SQL Server to Snowflake Migration?
You need to examine which tools are part of the migration, the existing tools, which ones will be deprecated, and which new ones will be introduced? You also need to list the development environments needed (Dev/QA/Prod/Pre-Prod) and the deployment processes for the migration (source control repository) and method for deploying changes (e.g. CDC or batch replication etc.) SQL Server Change Tracking for real-time SQL Server Replication
Prioritize Datasets that should be migrated first from SQL Server
You need to consider which dataset should be migrated first. Ideally this should be a simple dataset that provides a quick win and creates a base of development and deployment processes which can set the foundation of the rest of your migration. Be sure to account for the process dependencies of the data sets and document them. Identifying dependencies before will lead to fewer issues during migration. The Easy Way to CDC from Multi-Tenant Databases
Who will be in the SQL Server to Snowflake Migration Team?
Here you need to define the team that will be doing the migration. Define the team members and their roles. Also list the contact details for all team members. The document should have each team member’s name, contact info and role. Obvious roles would include developer, quality assurance engineer, program manager, scrum master, business owner, project manager and communication expert.
Finalize the SQL Server to Snowflake Migration Deadline and Budget
Now you need to set a migration deadline. You must also consider organizational expectations, budget, resources and their availability and the reengineering effort required. Here are some documents to get ready. SQL Server to Postgres – A Step-by-Step Migration Journey
- List of business expectations for the SQL Server to Snowflake migration deadline.
- Documented migration plan and budget for moving data from SQL Server to Snowflake.
- An estimated costs template for running Snowflake.
Determine the results you need from the SQL Server to Snowflake migration that will tell you whether the migration was successful. For this, you could have a list of outcomes that will come into play once migration is finished, and a document to communicate migration results, and its potential advantages to stakeholders. Key to the budget is how many Snowflake compute clusters you will require for the migration and the number of compute clusters you will need after the migration is done. How to cut costs by 30% on Snowflake
Executing the SQL Server to Snowflake Migration
Get your security in place when starting SQL to Snowflake migration
Ready to start moving your data from SQL Server to Snowflake? When setting up your Snowflake account, initially you can manually create users and roles to get started. From then on adopt an automated process to create users, assign user roles and delete users. Some common roles can be created for developer access, including read-only access, read and write access, and administrative access, for nonproduction databases. For sensitive data additional roles might be required for restricting access to sensitive data. SQL Server Change Data Capture (CDC) for real-time SQL Server Replication
Create a Test Plan for SQL Server to Snowflake Migration
You need to set up the scope and level of testing for each environment (Dev, QA, Prod etc.) and preferably automate it as much as possible. This makes testing repeatable and makes identification of issues easy. Get sign-off on the acceptance criteria for the tests.
Prepare Snowflake for the migration from SQL Server
For a single Snowflake account, you need to create a Snowflake database for combining the SQL Server environment and the database you need to migrate. For e.g Dev_Marketing/Prod_Marketing/QA_Marketing etc.
Create schemas in Snowflake to match the schemas from Microsoft SQL Server that you need to migrate. Create a Snowflake database for each Microsoft SQL Server environment (such as Dev/QA/Prod) that you need to migrate to Snowflake and then create the schemas for each database. This method displays the environment and database in the database name and uses schemas for holding the tables and views. This makes it simple for tools to extract data from Microsoft SQL Server to Snowflake. Create a Data Lake on Snowflake
Load initial datasets to Snowflake from SQL Server
If your SQL Server instance is on-premise, you can look for a tool like AWS Snowball, Azure Data Box,
or Google Transfer Appliance to transfer the data. For Cloud data sources a good migration tool (preferably automated) is very helpful. For e.g. our BryteFlow replication software can move data from both – on-premise and Cloud SQL sources to Snowflake without any coding, and even create schemas automatically on destination. You can move data into Snowflake after extracting data from SQL Server into a Cloud staging area Like S3 or ADLS. Make use of the initial data loading to test database configuration, objects, compute clusters, and your security protocols. Learn how to load large volumes of data to Snowflake fast
Keep data from SQL Server to Snowflake updated
You need to now think about processes to keep data current after you have loaded the historical data sets from SQL Server to Snowflake. You should put in place data loading schedules that mimic the existing SQL Server loading or create processes to load data into Snowflake that are completely new. Understand the process dependencies and schedule the loading in such a way that the order of populating data is maintained in the right sequence. Along with the loading schedule, monitoring must be in place to understand and display the status of various processes, like loading in progress, loading completed or an error showing loading failed.
SQL Server to Snowflake Implementation Test Plan
Start the implementation with initial data sets loaded and processes running to update the data.
Get the team members you selected earlier to start testing the implementation. After testing and validation, get more groups to test their data sets and applications in the Snowflake environment. Investigate and resolve differences in data. Connect SQL Server to Databricks (Easy Migration Method)
Redirect tools to Snowflake from SQL Server
Once a satisfactory volume of data is migrated, redirect the tool connections to Snowflake. This usually means copying and updating the current solution to connect to Snowflake (not SQL Server as was the case previously). Compare the output of the tools on Snowflake whether it the same on both systems, also check whether the tools are performing on Snowflake as per expectations. How to Select the Right Data Replication Software
Cutover in the SQL Server to Snowflake migration
Once the initial data has been migrated, processes have been put in place to keep data updated, testing has been done to validate the efficiency of the migration, and tools have been redirected to Snowflake, plan for the cutover and communicate the cutover date well in advance to the SQL Server users. Ensure they can login to Snowflake and use the tools that have been redirected. To finish the cutover, turn off data processes populating SQL Server, and disable access for users and tools to SQL Server. SQL Server Replication with BryteFlow
The easiest way to get data from SQL Server to Snowflake is with BryteFlow
Why is BryteFlow your best bet to get data from SQL Server to Snowflake? BryteFlow is an automated, self-service tool (no DBAs needed) that is completely no-code and easy to use. The point-and-click user interface lets you connect to your SQL Server sources (on-premise and on Cloud) and replicate data to Snowflake continually or as scheduled, with SQL Server CDC or SQL Server Change Tracking after the initial full refresh. This ensures data is always updated and in sync with data at source. You also get automated data reconciliation to ensure your data is complete. How to load terabytes of data to Snowflake fast
BryteFlow supports migration of very heavy datasets with automated multi-threaded parallel loading, partitioning and compression. There is NO coding for any process. Data replication, CDC, data extraction, schema creation, data type conversion, SCD Type2 history, and DDL (Data Definition Language) etc. are completely automated. A big advantage of BryteFlow is that it offers CDC for multi-tenant SQL Server databases. Learn about SQL Server CDC for real-time SQL Server replication
SQL Server to Snowflake Migration Tool Highlights
- BryteFlow migrates data from SQL Server to Snowflake in real-time using log-based Change Data Capture.
- It provides other CDC mechanisms as options, including SQL Server Change Tracking and timestamps to identify changed records.
- BryteFlow is a completely no-code tool that automates data replication, CDC, data extraction, data type conversion, data mapping, SCD Type2 history, and DDL (Data Definition Language) etc. The Easy Way to CDC from Multi-Tenant Databases
- It creates the schemas automatically on the target with the optimum data types and implements best practices for the target. Source to Target Mapping Guide (What, Why, How)
- Provides low latency and very high throughput of approx. 1,000,000 rows in 30 seconds. SQL Server to Databricks (Easy Migration Method)
- Supports On-premise and Cloud-hosted SQL Server sources. (eg AWS RDS, Azure SQL DB etc.) Compare Databricks vs Snowflake
- BryteFlow can automate CDC from multi-tenant SQL databases easily. It enables data from multi-tenant SQL databases to be defined and tagged with the Tenant Identifier or Database ID to simplify use of data. BryteFlow merges and delivers complete, ready-for-analytics data from multi-tenant SQL databases that can be queried immediately with your preferred BI tools. Oracle to Snowflake: Everything You Need to Know
- BryteFlow can be installed On-premise or on the Cloud and supports SQL Server Always ON configuration.
- SQL Server to Snowflake replication works whether Primary Keys are available or not. About Snowflake Stages
- Delivers analytics-ready data on Snowflake that can be queried immediately with BI tools of choice.
- BryteFlow offers enterprise grade SQL Server replication to Snowflake and watertight security.
Ingesting data from SQL Server to Snowflake Step by Step
Use the BryteFlow Ingest software and follow these steps:
Please ensure that all prerequisites have been met and all security and firewalls have been opened between all the components.
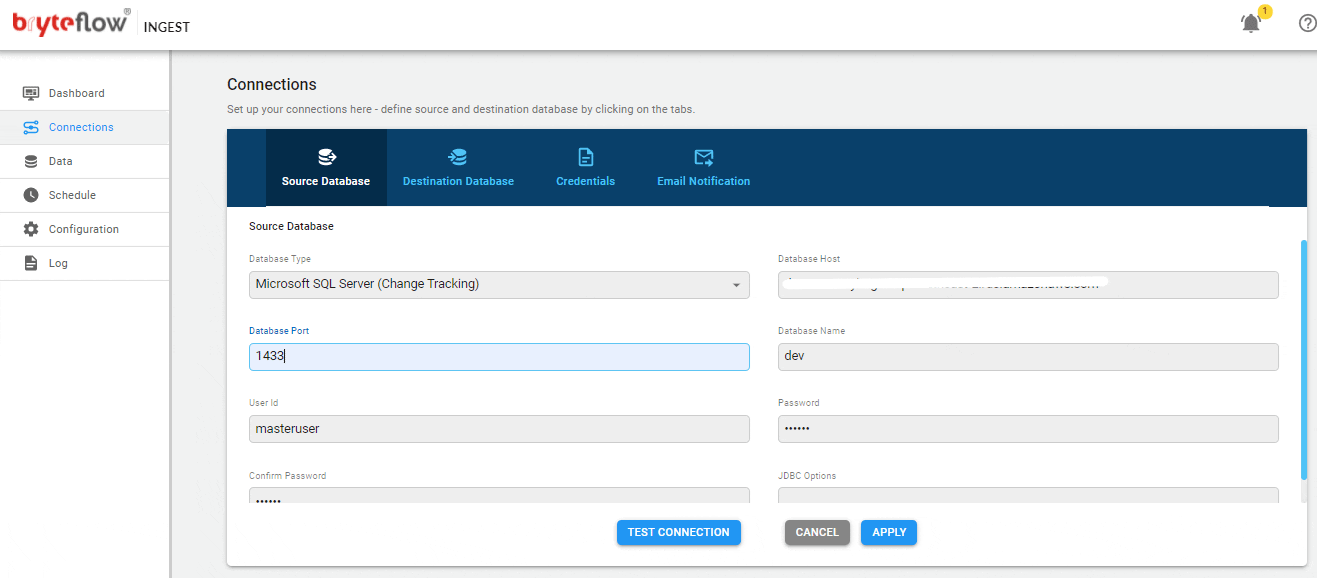
Set up the source connection details, assuming the source is SQL Server.
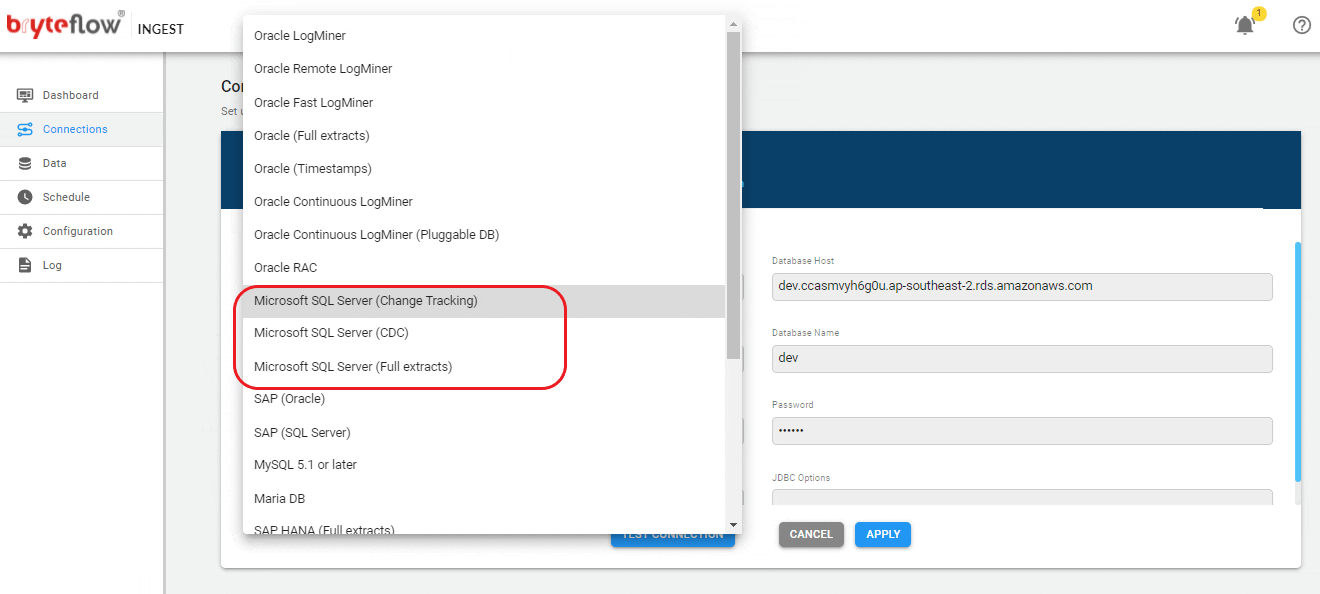
Set up the source connection details. The source can be on the cloud or on-premises.
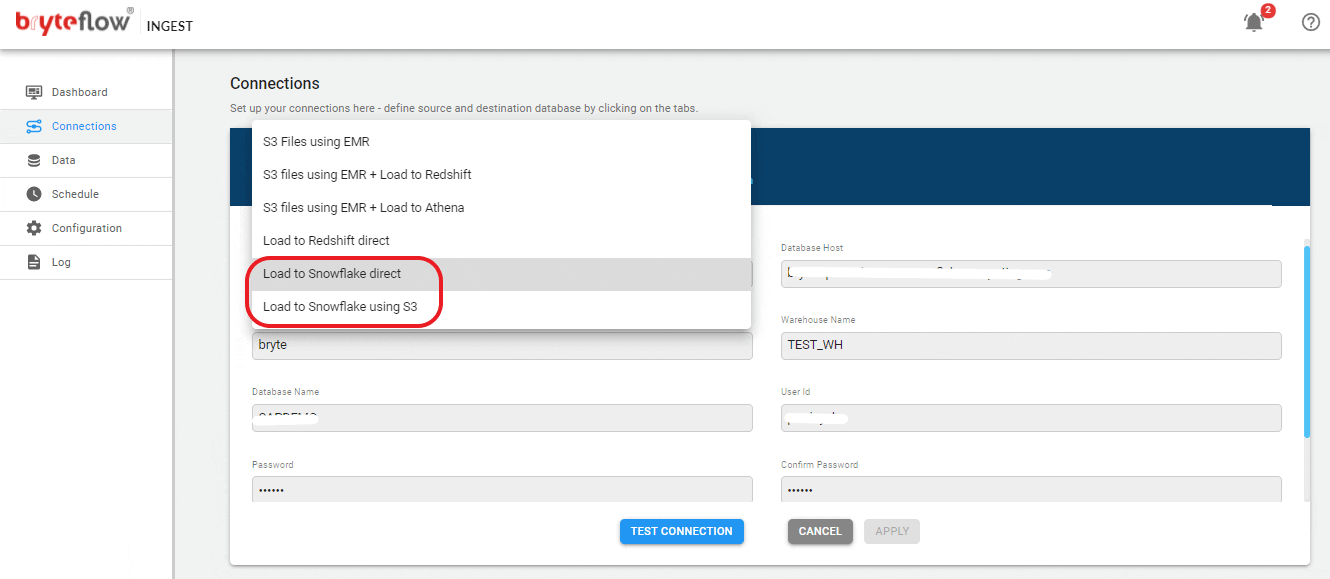
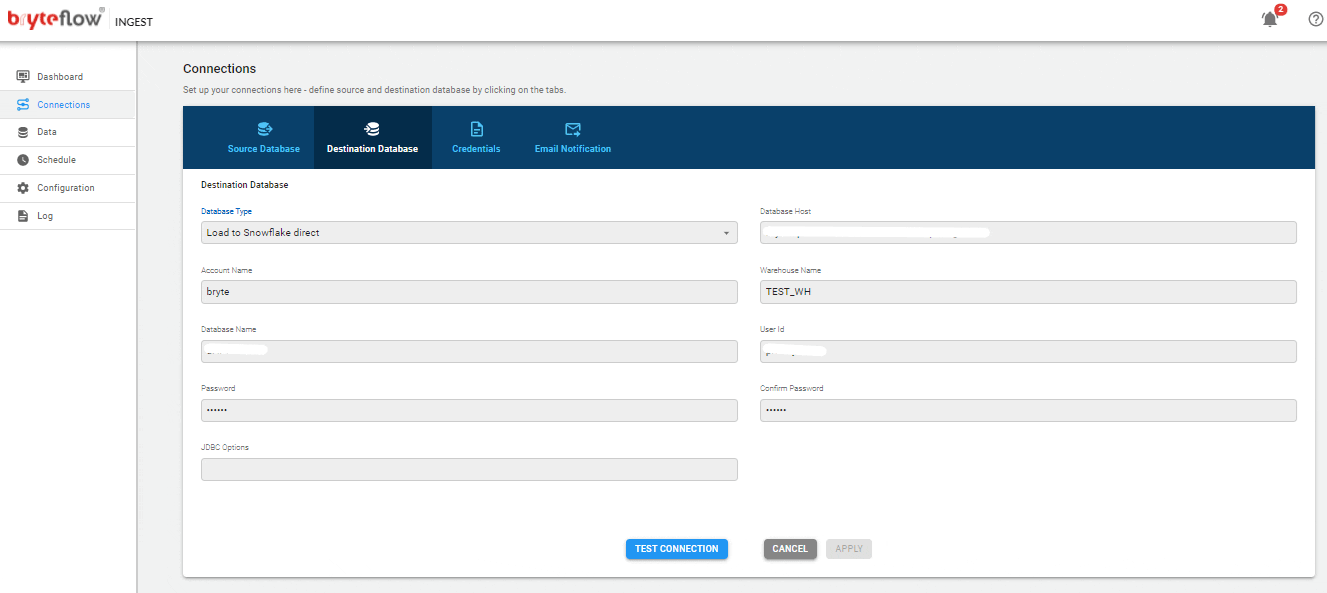
Set up destination as Snowflake using your preferred choice:
- Load to Snowflake direct
- Load to Snowflake using S3
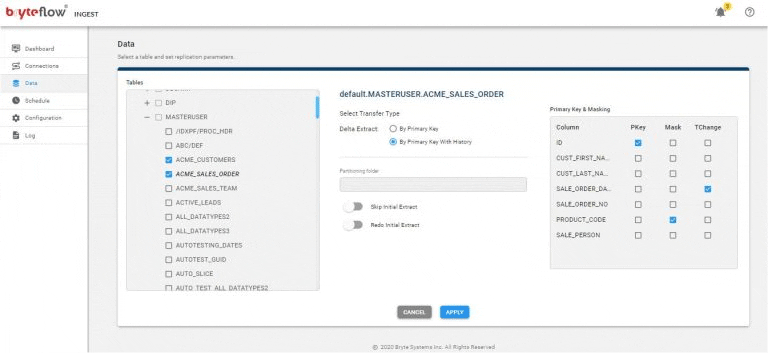
Set up the table(s) to be replicated, select the primary key and the transfer type. Primary key with history automatically keeps SCD Type2 history on Snowflake. Primary key transfer type keeps a mirror of the source, without history.
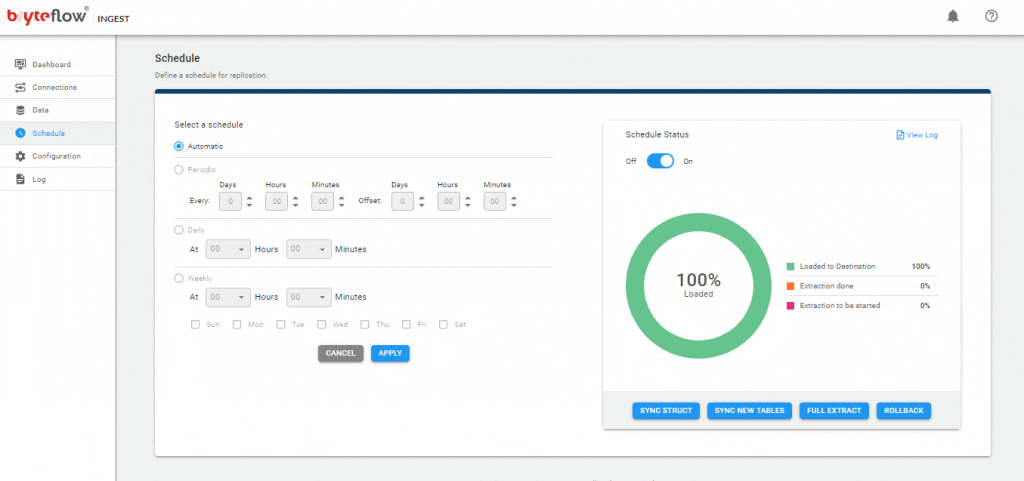
Schedule your data replication time and get your data flowing to Snowflake near real-time.
Initial sync for really large tables
Use the BryteFlow XL-Ingest software and follow these steps:
The tables can be any size, as terabytes of data can be brought across efficiently.
Configure the large table to be brought across.
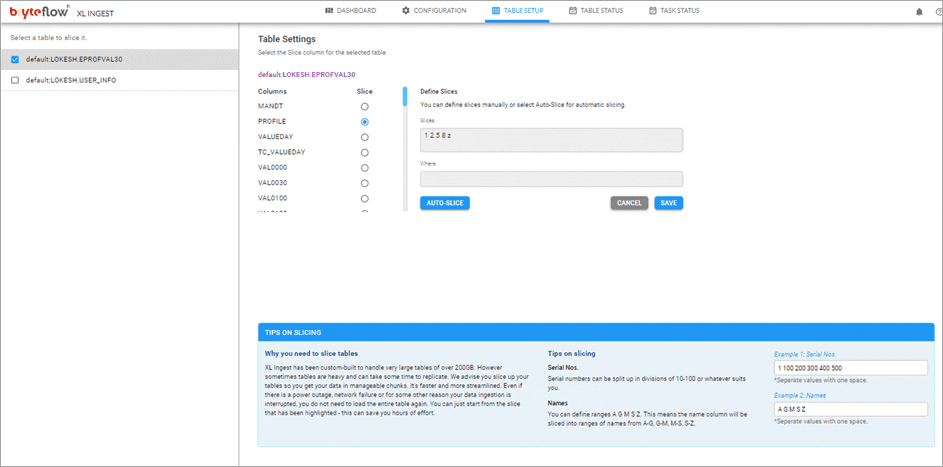
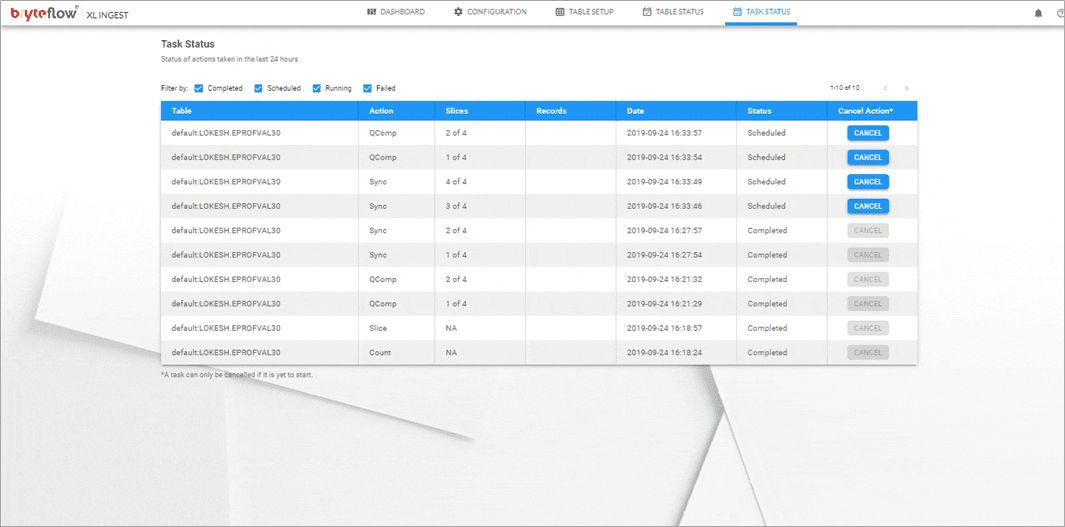
Monitor the process, as the table is brought across. The table is replicated on Snowflake and is ready to use with SCD Type2 history, if configured. Overall status is displayed on the dashboard.
To experience BryteFlow with Snowflake, start with the free POC or Contact us for a Demo
Learn about BryteFlow’s SQL Server Change Data Capture for real-time SQL Server Replication
Learn about BryteFlow’s SQL Server Change Tracking for real-time SQL Server Replication

