This blog talks about Amazon Aurora, what the Aurora PostgreSQL database is all about, its benefits, how to set it up, and how to enable logical replication on Aurora Postgres. We also present BryteFlow as a no-code tool that can completely automate replication to Postgres on Amazon Aurora. BryteFlow’s Data Integration on Postgres
Quick Links
- What is Amazon Aurora?
- About Amazon Aurora Postgres
- Benefits of Amazon Aurora Postgres
- What is Aurora Postgres Logical Replication?
- How does Postgres Logical Replication work with Aurora?
- Creating the Aurora Postgres Database: Steps to set up the DB
- Setting up Logical Replication for your Aurora PostgreSQL Database
- Aurora Postgres Logical Replication Limitations
- Bryteflow, a Tool for Real-Time, No-Code Postgres Replication
- BryteFlow CDC Highlights for Aurora Postgres Replication
What is Amazon Aurora?
Amazon Aurora is a part of the Amazon Relational Database Service (Amazon RDS) whose purpose is to make it simpler to implement, operate and scale relational databases in the Cloud. Amazon Aurora, also called AWS Aurora, is a fully managed relational database known for its compatibility with MySQL and PostgreSQL. Though MySQL and PostgreSQL are open-source databases, they offer many of the features of high-quality commercial databases combined with the low cost and ease of use of open-source databases. Amazon Aurora enables you to use the tools, code and applications of existing MySQL and Postgres databases and deliver workloads with many times the throughput of both Postgres and MySQL, without needing to change anything in existing applications. You can select Aurora MySQL or Aurora PostgreSQL as the DB engine option when setting up new database servers through Amazon RDS. Postgres CDC (6 Easy Methods to Capture Data Changes)
Amazon Aurora has a unique storage sub-system
You should note that Aurora contains a storage sub-system that enhances performance since the Aurora MySQL and Aurora PostgreSQL database engines are built to benefit from the speedy, distributed storage. The storage expands automatically as required. For e.g. an Aurora cluster can expand upto 128 tebibytes (TiB). AWS Aurora makes database configuration and management easier since it automates and standardizes DB clustering and replication. Postgres Replication Fundamentals You Need to Know
It is possible to go serverless with Amazon Aurora via Amazon Aurora Serverless. This is an on-demand configuration that auto-scales. The database can scale up or down based on the requirements of your application and can even start up or shut down automatically. Aurora Serverless enables you to run your Cloud database without managing any database instances. More on Amazon Aurora Serverless
About Amazon Aurora Postgres
In this blog we are taking a close look at Amazon Aurora PostgreSQL replication, so let’s dive in. Amazon Aurora PostgreSQL is a Postgres compatible, fully managed, ACID compliant database engine that works as a stand-in for Postgres, and allows you to easily set up, scale and operate existing and fresh PostgreSQL deployments in AWS Cloud. It streamlines tasks like hardware provisioning, setup, patching, and backups. Operating on AWS, it automatically adjusts storage from 10 GB to 128 TiB. Its compatibility with PostgreSQL enables seamless integration with existing applications. Aurora Postgres not only maintains PostgreSQL compatibility, but also enhances capabilities, providing you with the familiar experience of Postgres while capitalizing on AWS Cloud infrastructure benefits. Learn about Oracle to Postgres Migration (The Whys & Hows)
Benefits of Amazon Aurora Postgres
Why go with Aurora Postgres? There are several advantages in terms of performance and database management that we will list here.
Aurora Postgres is highly scalable
Aurora Postgres offers seamless scalability as per workload requirements. This means the business has an elastic database that can grow to accommodate data without exorbitant upfront costs or complexity associated with legacy database systems. The built-in storage subsystem scales to handle storage requirements. Postgres to Snowflake: 2 Easy Methods to Move Data
Aurora Postgres provides better performance than the traditional Postgres DB
Aurora Postgres can provide 3x more throughput compared to a standard Postgres database on the same hardware. This is largely due to some optimized features including the virtualized SSD based storage layer custom-built for database workloads and fast, distributed storage. The storage expands automatically as per workload. SQL Server to Postgres – A Step-by-Step Migration Journey
Aurora Postgres is highly secure
Aurora Postgres has multiple layers of security including encryption at rest using AWS Key Management Service, and encryption in transit using SSL besides network isolation using Amazon VPC. Also data is backed up continually in Amazon S3 and replication across different Availability Zones delivers high availability and data protection. How to Make PostgreSQL CDC to Kafka Easy (2 Methods)
Aurora Postgres offers easy migration from Postgres and easy data management
It is easy to migrate data from Amazon RDS into Aurora with push-button software that transforms the existing database for Postgres applications to Aurora PostgreSQL. AWS Aurora is fully managed by the Amazon Relational Database Service (RDS). You don’t have to be concerned about routine tasks like provisioning, patching, backup, recovery, failure detection, and repair. Aurora Postgres also automates database clustering and replication making database configuration easier. What to look for in a Real-Time Data Replication Tool
Aurora Postgres has compliance with industry standards
Aurora Postgres is compliant with multiple industry standards that deal with sensitive data, for e.g. it can be used to build HIPAA-compliant applications and store data related to healthcare including protected health information (PHI). It is also FedRAMP HIGH eligible.
What is Aurora Postgres Logical Replication?
When you replicate data objects and their subsequent changes via their replication identity, typically using a primary key, the process is called Logical Replication. Logical replication is used to replicate data from one database to another. Logical replication however differs from physical replication since logical replication allows for precise control over data replication and security unlike physical replication which uses byte-by-byte replication. Logical replication allows for far more flexibility and customization than physical replication, since it is possible to replicate only the changes made to individual rows or just the transactions, instead of copying the entire database. Postgres CDC (6 Easy Methods to Capture Data Changes)
The Publish and Subscribe pattern for Postgres Logical Replication
Logical replication uses a publish and subscribe pattern. Here a ‘publisher’ (primary database) sends out messages which form a queue and the ‘subscribers’ (secondary databases) wait for the events or messages and pick them up in the order they were transmitted. In this context, the primary database is the ‘publisher’ and transmits changes that take place in the database – the INSERT, UPDATE and DELETE operations on a row level to the ‘subscribers’ that are the secondary databases. A primary key or a unique index on the table serves as the replication identity. This publish and subscribe pattern is also used by message brokers like Kafka. Kafka CDC Explained and Oracle to Kafka CDC Methods
Postgres Logical Replication guarantees Transactional Consistency
The logical replication process starts with copying a snapshot of the publisher database data to the subscriber. After this, changes to the publisher database are transmitted to the subscriber database as they happen (in real-time). The subscriber applies the data in the same sequence as updated on the publisher, so transactional consistency is guaranteed. It should be noted that the subscriber database tables and schema must be created using nearly the same DDL as present on the publisher schema and tables. The subscribe cluster could even be a data warehouse cluster. Logical replication was first implemented in PostgreSQL 10 to overcome the limitations of physical replication. SQL Server to Postgres Migration
How does Postgres Logical Replication work with Aurora?
As mentioned earlier, Postgres Logical replication uses a publish and subscribe model. By using Postgres logical replication in conjunction with an Aurora PostgreSQL DB cluster, you have the capability to replicate and sync individual tables instead of the whole database. Logical replication uses change records from the PostgreSQL write-ahead log (WAL). The publisher sends WAL data for the selected tables to the subscribers to replicate changes and to keep tables synced with source. The set of changes are defined using a ‘publication’ and the changes are received when the subscribers create a ‘subscription’ to create the connection between the source database and its publications. The progress of a publication is tracked by a mechanism called a ‘replication slot’. Oracle to Postgres Migration (The Whys & Hows)
How the Postgres WAL data is read and transmitted in Logical Replication
In the case of Aurora PostgreSQL DB clusters, the WAL records are saved on Aurora storage. In a logical replication scenario, the Aurora PostgreSQL DB cluster that is the publisher, reads the WAL data from Aurora storage, decodes, and transmits it to the subscriber so that the changes can be done on the table of that instance. A logical decoder is used by the publisher to decode the data so it can be used by subscribers. By default, Aurora PostgreSQL DB clusters use the native PostgreSQL pgoutput plugin when sending data. Aurora PostgreSQL also supports other logical decoders like the wal2json plugin that converts WAL data to JSON. PostgreSQL Replication with BryteFlow
Postgres Logical Replication includes multiple replication options
Multiple replication options are available with Aurora. Every Aurora DB cluster has built-in replication between multiple DB instances of the same cluster. Replication can be set up with the Aurora cluster as the source or the target. When you set up replication either into or from an Aurora cluster you have the option to select between built-in features such as Aurora global databases or the traditional replication mechanisms for the MySQL or PostgreSQL DB engines. What you choose should be based on the appropriate combination of high availability and performance as per your requirements. Postgres Replication Fundamentals You Need to Know
Aurora Replicas for Logical Replication
If you create a second or more DB instances, Aurora automatically sets up replication from the writer or source instance to the other DB instances. These other DB instances are read-only and are called Aurora Replicas. As a user, you can send queries to the replicas to scale read operations, by connecting to the cluster reader endpoint. The load for read-only connections can thus be distributed across as many replicas are present in the cluster. Aurora Replicas also serve to increase availability. In case the writer instance of the cluster for some reason becomes unavailable, one of the reader instances will be promoted by Aurora to replace it as the new writer. How to Make PostgreSQL CDC to Kafka Easy (2 Methods)
Aurora DB Clusters in Postgres Logical Replication
An Aurora DB cluster can contain a maximum number of 15 Aurora Replicas. The Aurora Replicas can be distributed across the Availability Zones that a DB cluster covers within an AWS Region. The data in the DB cluster is held as multiple physical copies in the Aurora DB Cluster Volume. An Aurora Cluster Volume is a virtual database storage volume that is spread across multiple Availability Zones, with every Availability Zone storing a copy of the DB cluster data. The data in the cluster volume is viewed by the primary instance and the Aurora Replicas in the DB cluster as a single logical volume. Because of this, the Aurora replicas present the same data in response to queries with hardly any replica lag (less than less than 100 milliseconds after an update on the primary instance). During durations of high write operations an increase in replica lag may be seen. Oracle to Postgres Migration
Aurora Cluster Volume and the shared storage architecture
The Aurora cluster volume is the virtual storage volume that is SSD (solid state drive) based. The cluster volume maintains data copies with automatic replication over 3 availability zones. This makes the data resilient with very few chances of data loss. The cluster volume stores schema objects, user data, internal metadata, stored procedures, tables, indexes, BLOBs (Binary Large Objects) etc. Evey time you create a new Aurora Postgres DB instance, the process is very fast, since Aurora does not need to create a new copy of the table data, the DB instance can simply connect to the shared cluster volume containing all the data. This shared stored architecture makes data independent of the DB instances. In fact, you can even remove a DB instance without impacting the underlying data. What to look for in a Real-Time Data Replication Tool
Some use cases for Postgres Logical Replication include:
- Transmit changes as they happen in an individual database (publisher) or a subset of it to various subscribers.
- Aggregating multiple databases into one typically for analytics.
- Executing triggers for changes as they land on the subscriber.
- Replicating data between PostgreSQL instances located on different platforms.
- Transferring data from on-premises or self-managed PostgreSQL setups to Aurora PostgreSQL
- Replicating to and from different main Postgres versions. Postgres Replication Fundamentals You Need to Know
- Allowing replicated data to be accessed by multiple groups of users.
- Sharing a database subset between multiple databases.
- Synchronizing data between two Aurora PostgreSQL database clusters within the same region to ensure high availability (HA) and facilitate disaster recovery (DR).
- Executing migrations, database upgrades, and application upgrades with minimal downtime.
Creating the Aurora Postgres Database: Steps to set up the DB
Now that you know about the benefits of Amazon Aurora, how do you actually begin to create an Aurora Postgres database? Here we outline the process and the configuration settings you should follow.
Step 1
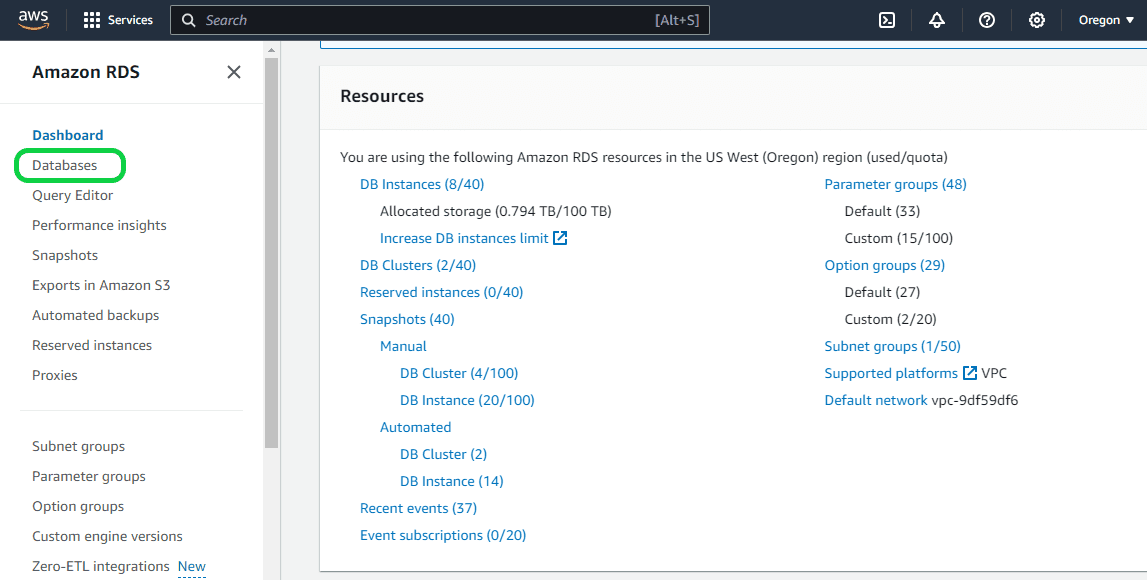
Sign in to the AWS Management Console and open the Amazon RDS console at https://console.aws.amazon.com/rds/. Once you are logged in, click on “Databases” in the left navigation pane.
Step 2
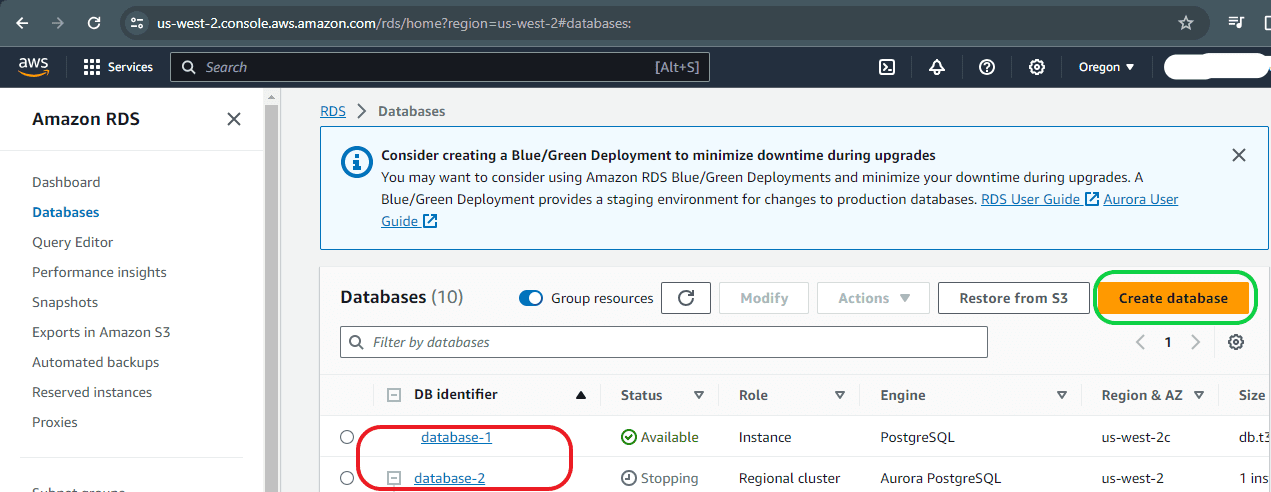
On the Databases page, existing databases are displayed (highlighted in red). To create a new database, simply click on the “Create Database” button.
Step 3
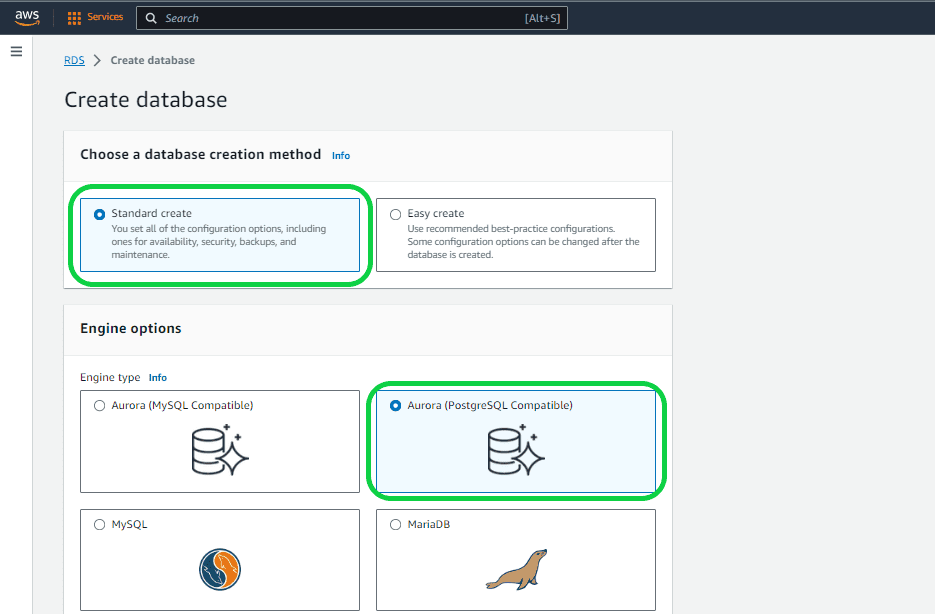
In the “Create Database” page, you will have to select all the settings that are needed for your database.
Setting 1 – “Choose a database creation method”. You can choose between two options: ‘Standard Create’ and ‘Easy Create’. In this case, opt for the “Standard Create’ option.”
- Standard Create: You can select your preferred settings.
- Easy Create: AWS automatically determines settings for you, opting for default configurations that may have associated costs.
Setting 2 – “Engine Options”. Aurora supports both MySQL and PostgreSQL, providing the flexibility to choose between Aurora MySQL compatibility or Aurora PostgreSQL compatibility. In this case, opt for the latter and proceed to the next selection.
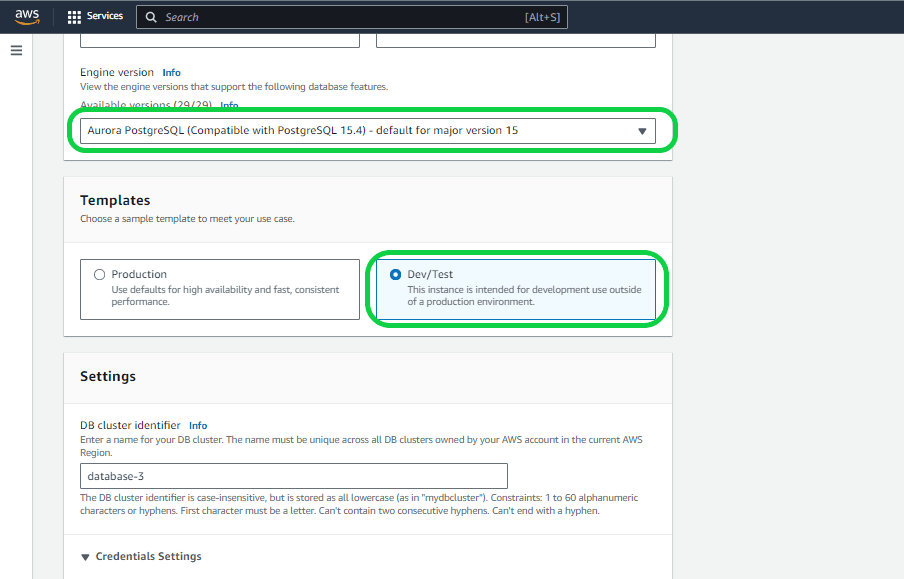
Setting 3 – “Engine Version”. This feature allows you to pick a specific Aurora Postgres version from a range of available options. Opting for the most recent version is advisable, as older versions may become obsolete, necessitating an upgrade to a newer version shortly afterward. In this instance, opt for the latest version.
Setting 4 – “Templates”. There are two choices available: “Production” and “Dev/Test.” Opting for the production option ensures a more secure, highly available, fast, consistent, and high-performance instance compared to Dev/Test. Select the option that best suits your requirements. In this case, opt for Dev/Test.
Setting 5 – “Db Cluster Identifier” under “Settings”. Here you can designate a name for the cluster. Beneath the cluster, numerous instances will be available, and you are free to select any name. In this example, “database-3” serves as the parent name.
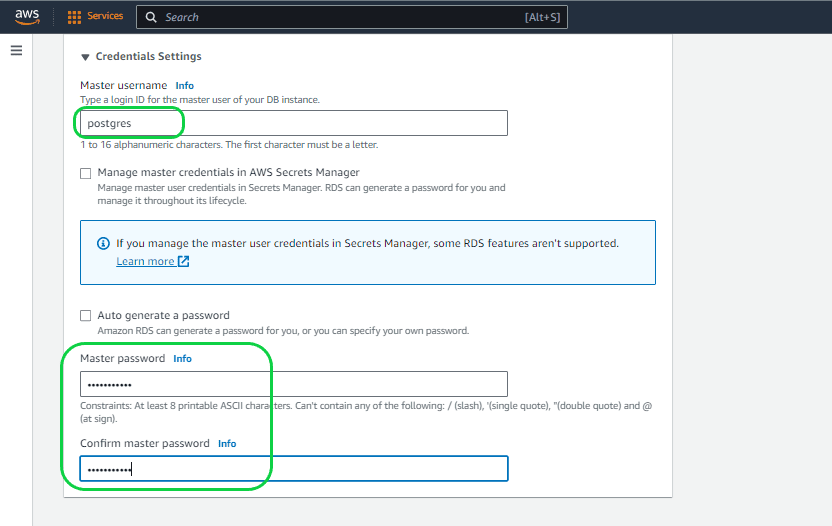
Setting 6 – “Master username” and “Master password” under “Credentials settings”. Within this feature, feel free to select any Username and Password of your preference. It’s advisable to avoid using the default username to enhance security and reduce the risk of hacking. Alternatively, you can utilize Amazon RDS to assist in creating your credentials. Opt for the “Auto generate a password” feature in this case.
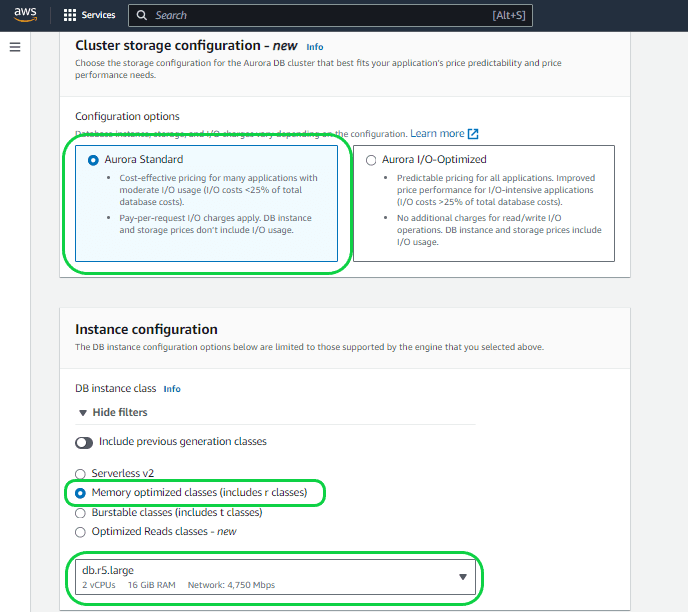
Setting 7 – “Configurations Options”. You can choose between two options: “Aurora Standard” and “Aurora I/O-Optimized.” In this instance, opt for Aurora Standard.
- Aurora Standard: This database cluster configuration is designed to provide cost-effective pricing suitable for the majority of applications with low to moderate I/O usage. With Aurora Standard, your expenses are determined by database instances, storage, and pay-per-request I/O.
- Aurora I/O-Optimized: Tailored for I/O-intensive applications like payment processing systems, e-commerce platforms, and financial applications, Aurora I/O-Optimized offers enhanced price performance. If your I/O spending surpasses 25% of the total Aurora database expenditure, you can achieve up to a 40% cost savings for I/O-intensive workloads. This configuration ensures predictable pricing for all applications, with no additional charges for read and write I/O operations, making it particularly well-suited for workloads with high I/O variability.
Setting 8 – “DB Instance Configuration”. You can choose the memory and size of the instance here, but keep in mind that the instance size is determined by the “Engine version” you previously selected. If you opt for an older version, your choices for instance size may be limited. Additionally, make sure to select the instance that aligns with your specific requirements. Opting for a larger instance will result in higher costs. In this case, opt the smallest instance available.
Setting 9 – “Availability and Durability”. Opting for the “Create an Aurora Replica or Reader node” feature results in the generation of a reader node or a duplicate of your database, whether in the same data center or across different data centers. This guarantees continuous data availability, even in the event of issues in one of the data centers. This unique functionality of Aurora, with zero failover, is particularly beneficial for production databases. However, for this Dev/Test database, opt to bypass this option.
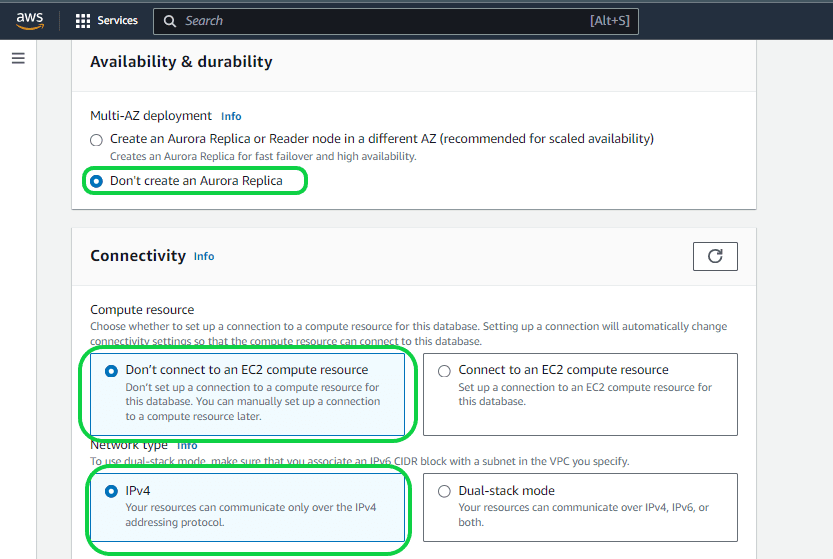
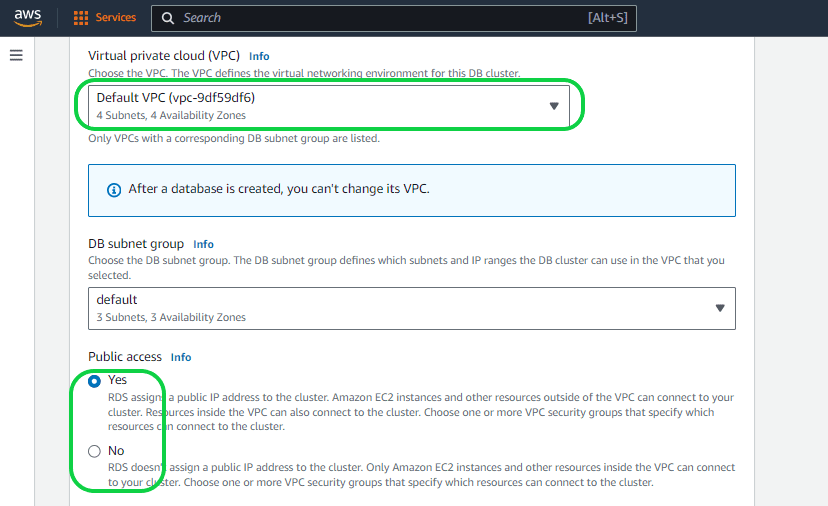
Setting 10 – “Virtual Private Cloud (VPC)” under “Connectivity”. When initiating an RDS, it is deployed within a Virtual Private Cloud (VPC), offering a secluded space in the Cloud where other AWS users cannot access or observe your RDS, and vice versa. You have the option to choose either your custom VPC (accessible through the dropdown menu displaying all VPCs created by you) or AWS’s default VPC, which comes with essential features. It’s important to note that altering the assigned VPC for a database after creation can be challenging. In this instance, opt for the default VPC provided by AWS.
Setting 11 – “Public Access”. Typically, the default setting is “NO” to prevent exposing databases to the public. It’s advisable not to switch to “YES” for a production database, unless you intend to modify the access permissions later. In this instance, opt for “NO”.
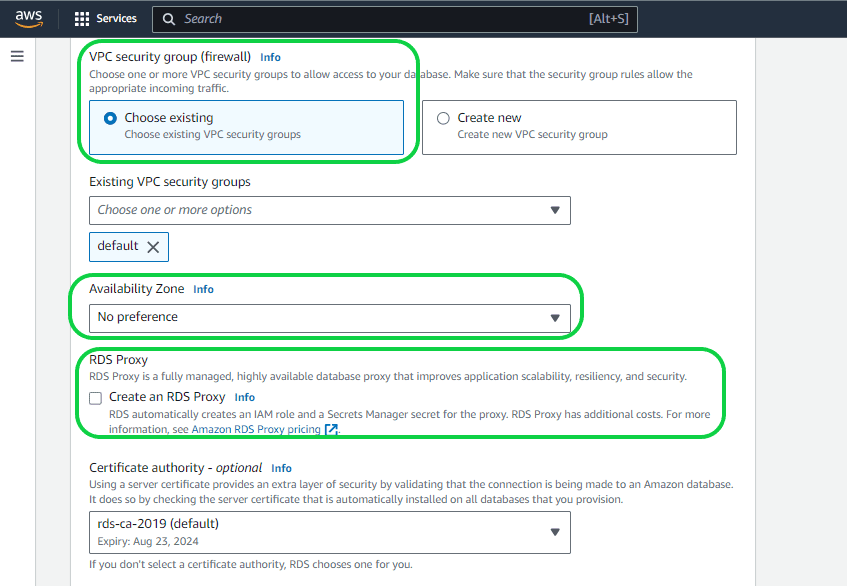
Setting 12 – “VPC security group (Firewall)”. This setting manages both incoming (IN) and outgoing (OUR) data. By default, the VPC prohibits all incoming data, but you can specify port and protocol levels to selectively allow it. In this case, select the “Choose Existing” option.
Setting 13 – “Availability Zone”. You can choose your preferred zone. No rule specified for this.
Setting 14 – “RDS Proxy”. The RDS Proxy manages the communication between the client application and the database by actively interpreting the database protocol. It dynamically adapts its behavior according to the SQL operations initiated by your application and the corresponding result sets from the database. Amazon RDS Proxy provides enhanced data security options by allowing you to opt for IAM authentication for database access, preventing the need to embed database credentials directly into your application code. It’s important to note that enabling IAM authentication may result in additional costs, and in this case, we are choosing not to activate it.
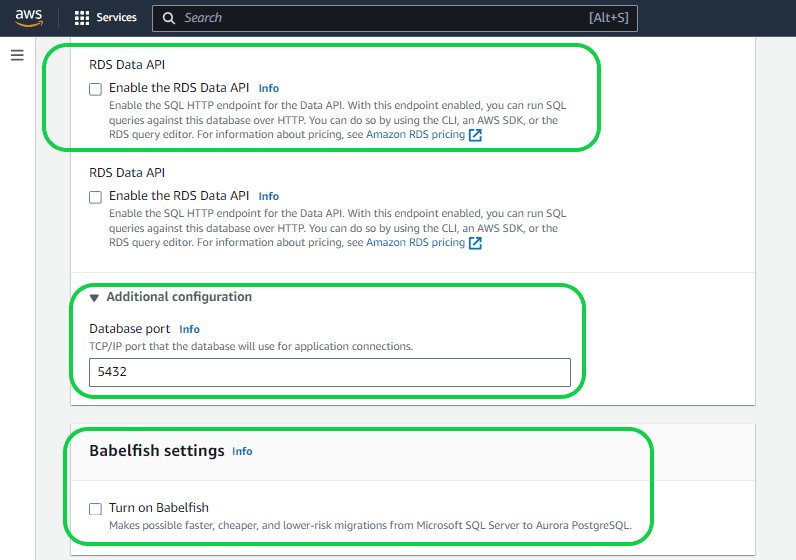
Setting 15 – “RDS data API”. The RDS Data API, also known as Data API, offers a web-services interface for an Amazon Aurora DB cluster. Instead of handling database connections directly from client applications, you can execute SQL commands through an HTTPS endpoint.
Setting 16 – “Database Port”. The TCP/IO port facilitates the connection of applications to the database.
Setting 17 – “Babelfish settings”. Babelfish for Aurora PostgreSQL expands the capabilities of your Aurora PostgreSQL DB cluster by enabling it to accept database connections from SQL Server clients. However, this functionality is not needed in this case.
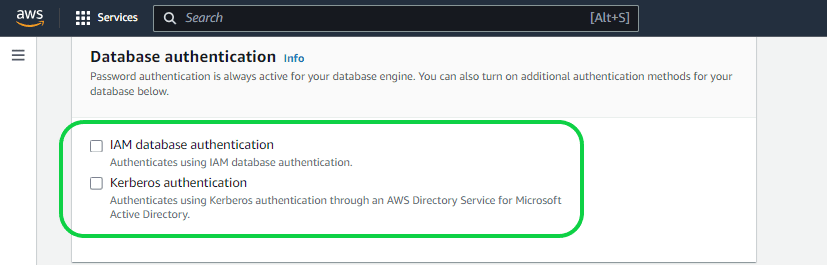
Setting 18 – “Database Authentication”. You are presented with two alternatives for additional authentication methods.
- IAM database authentication – You can authenticate your DB instance using AWS Identity and Access Management (IAM) database authentication, which is compatible with MySQL and PostgreSQL. With this authentication method, there is no need for a password when connecting to a DB instance; instead, an authentication token is utilized.
- Kerberos authentication – Amazon RDS supports external authentication of database users through Kerberos and Microsoft Active Directory. Kerberos is a network authentication protocol that employs tickets and symmetric-key cryptography, eliminating the necessity to transmit passwords over the network. Active Directory incorporates Kerberos and is designed for authenticating users to network resources like databases.
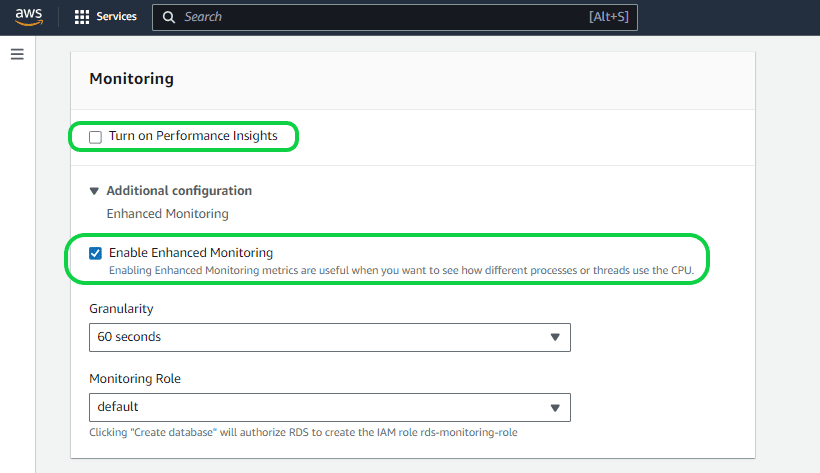
Setting 19 – “Performance Insights”. This advanced and valuable setting serves as a feature for tuning and monitoring database performance. It allows a quick assessment of the database load, performance issues, and query performance problems, guiding you on when and where to take necessary actions. Importantly, enabling or disabling Performance Insights does not result in downtime, reboots, or failovers. The Performance Insights agent consumes minimal CPU and memory on the database host. Be aware that enabling this option may incur additional costs, which depend on your database’s features, size, and usage.
Setting 20 – “Enhanced Monitoring” under Monitoring. This feature enables the monitoring of various metrics such as Memory, CPU, and disk utilization for your instance. The granularity level can be set from 1 second to 60 seconds. It’s important to note that selecting a 1-second granularity will result in the generation of event logs sent to CloudWatch every second, incurring potentially high costs. Therefore, it’s crucial to choose the granularity based on your priorities or only enable it when necessary. You have the flexibility to enable this feature later whenever the need arises.
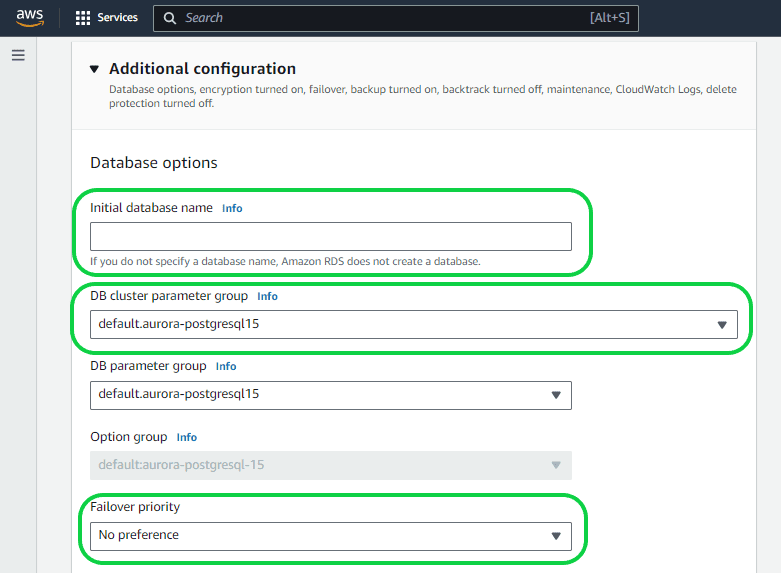
Setting 21- “Initial Database name” under “Database Options”. You have the flexibility to name your database as you see fit. If no name is provided, a default database name will be assigned. In this instance, we’ve left the field blank, resulting in the assignment of a default name.
Setting 22 – “DB cluster parameter group” and “DB parameter group”. A DB cluster parameter group functions as a container for engine configuration values that are universally applied to all DB instances within an Aurora DB cluster. In contrast, a DB parameter group serves as a container for engine configuration values applied to one or more DB instances individually. DB cluster parameter groups are specific to Multi-AZ DB clusters, where the settings apply universally to all instances within the cluster. To sum up, the DB Parameter Group manages instance-level parameters, while the DB Cluster Parameter Group handles cluster-level parameters, affecting all instances in a cluster.
Setting 23 – “Failover Priority”. Read replicas are now linked to a priority tier ranging from 0 to 15. In the event of a failover, Amazon RDS will elevate the replica with the highest priority (starting from tier 0) to the new primary instance, unless a specific priority is already set. This results in the promotion of the tier-0 replica (reader-1) as the new primary instance during a failover, while the old primary instance becomes a new read replica. If multiple replicas share the same priority, RDS will promote the one equivalent in size to the previous primary instance. In this case, no specific preferences are being set.
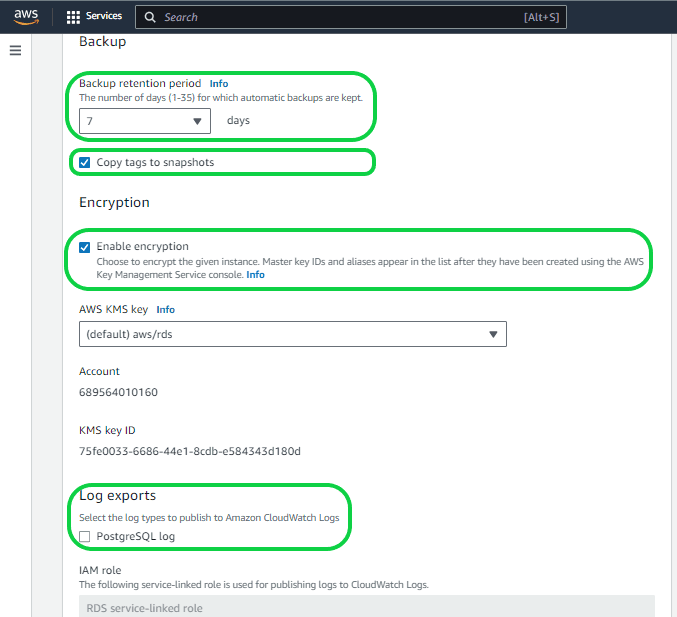
Setting 24 – “Back up”. You have the flexibility to customize the data retention period for backups, ranging from 1 to 35 days according to your specific requirements. The default setting is 7 days.
Setting 25 – “Copy tags to Snapshots”. This functionality enables you to assign metadata and implement access policies for your Amazon RDS resources. Tags set on your database instances can be automatically propagated to both automated and manual database snapshots derived from those instances. This simplifies the process of aligning metadata, including access policies, between the snapshots and their parent instances. You can activate this feature during the creation of a new instance or apply it to an existing database instance, with the option to disable it later. Once activated, tags are copied to all subsequent iterations of a snapshot, including those created in different regions.
Setting 26 – “Enable Encryption”. Enabling this option in Amazon RDS ensures the encryption of your databases using keys managed through the AWS Key Management Service (KMS). This encryption covers data at rest in the underlying storage, as well as automated backups, read replicas, and snapshots associated with the database instance.
Setting 27 – “Log exports”. This feature directs database log events to CloudWatch Logs, offering a direct integration that enhances your interaction with database instance logs. By storing logs in Amazon CloudWatch, you can create more robust and seamless interactions. Notably, the logs are not retained in RDS memory but instead reside in the local storage of the DB instance, with the size of the local storage varying based on the DB instance class.
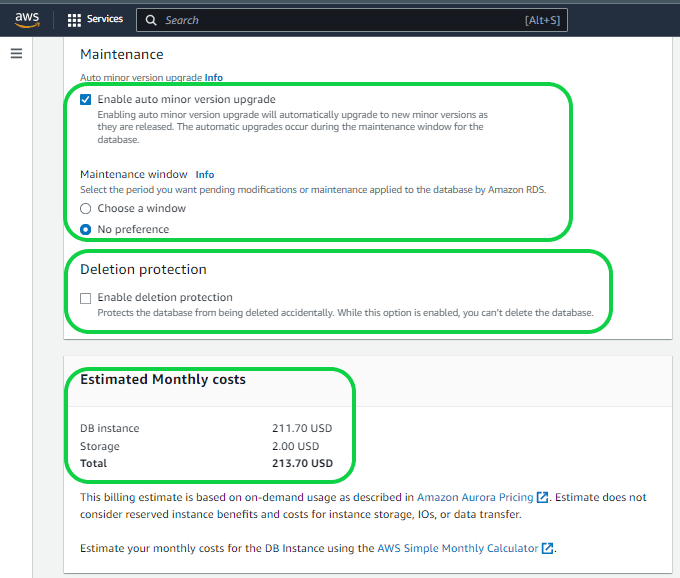
Setting 28 – “Maintenance and Maintenance Window”. Enabling this feature will automatically update your database upon the release of a new version. Additionally, you can specify a maintenance window by choosing the “Select Window” option, allowing you to set the preferred day, time, and duration. This helps in minimizing disruptions to your database during periods of high traffic. Opting for the “No Preference” option means AWS will handle maintenance at their chosen time, potentially during high or low transaction periods.
Setting 29 – “Deletion Protection”. This functionality serves as a safeguard against accidental database deletions, particularly beneficial for Production databases. If you activate this feature and attempt to delete the database, disabling the option becomes a somewhat challenging task.
Setting 30 – “Estimated Monthly Cost”. It provides an estimate of the monthly cost for the database based on the selected features.
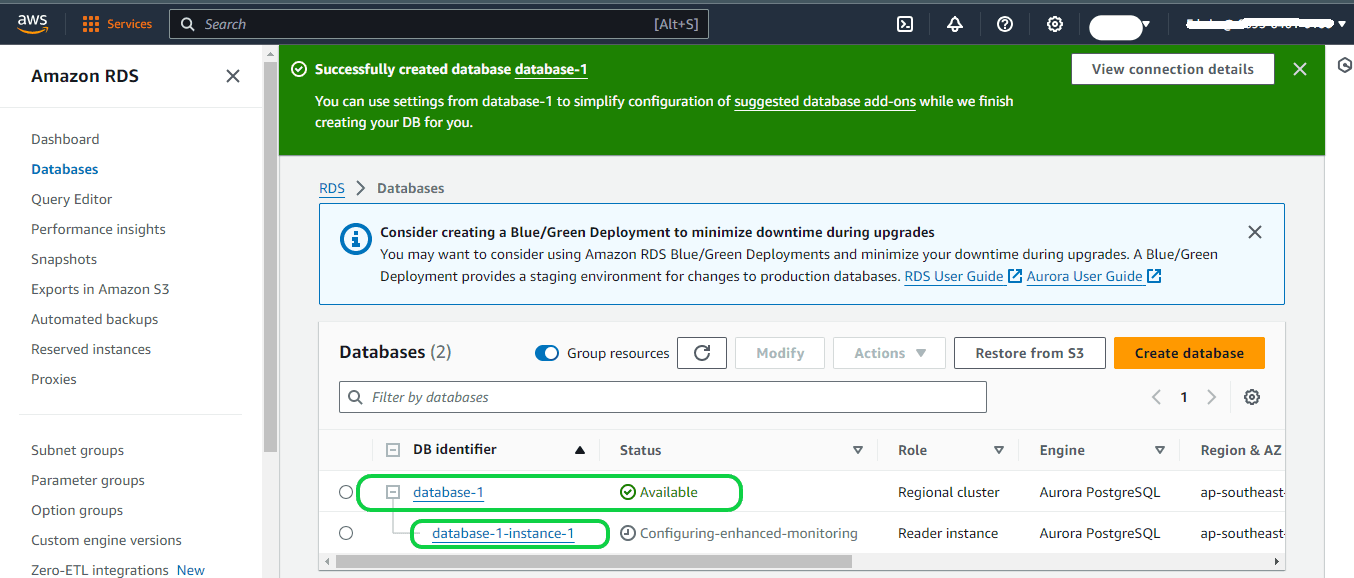
Setting 31 – Click on the “Create Database” button to create the database. It will take a while to create the database based on the size and other features you selected.

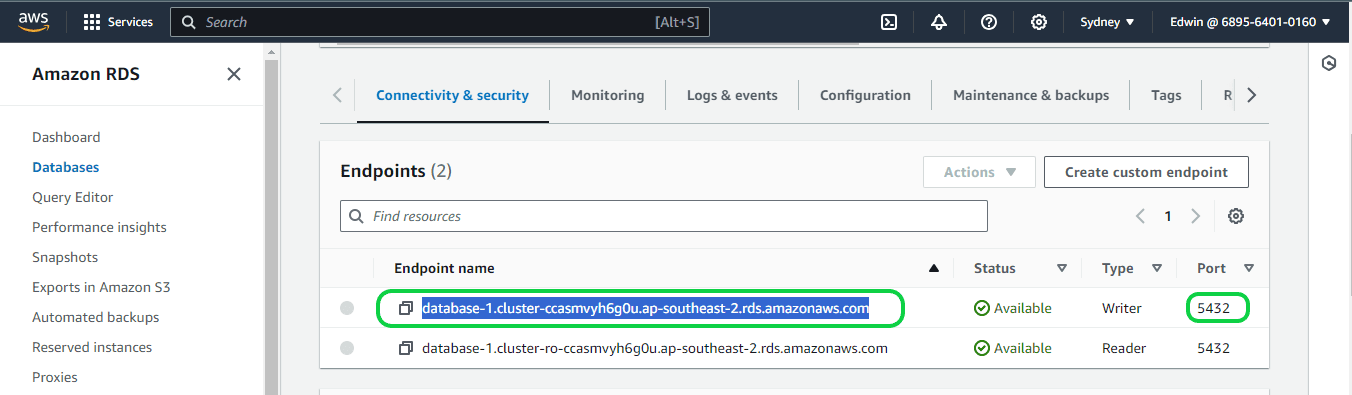
Step 4
The created database and the “endpoint name” can be seen under the RDS in AWS. Here, “database-1” is the cluster and “database-1-instance-1” is the instance.
Setting up Logical Replication for your Aurora PostgreSQL Database
Now that we have set up the Aurora Postgres DB, it is time to set up the logical replication. Earlier in the blog we learned about the concept of Postgres logical replication. Now we will actually set up the logical replication in the Postgres DB on Amazon Aurora.
Please note to enable logical replication, it is essential to possess the rds_superuser privileges. To initiate logical replication, ensure that you have configured an Aurora PostgreSQL DB cluster with a customized DB cluster parameter group. Let us explore the process of configuring the DB cluster group and activating logical replication.
Follow the below steps to create an Aurora Postgres DB cluster parameter group to activate the Logical Replication
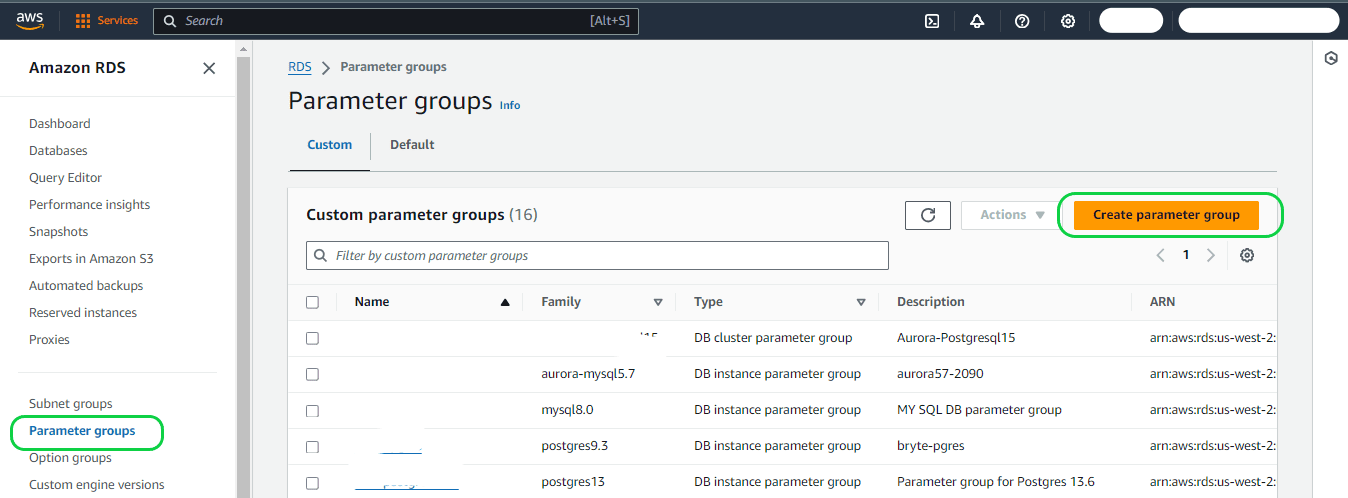
Step 1: Log in to the AWS Management Console and access the Amazon RDS console by navigating to https://console.aws.amazon.com/rds/. Next, click on “Parameter group” in the left-side navigation pane, and subsequently click on the “Create parameter group” button.
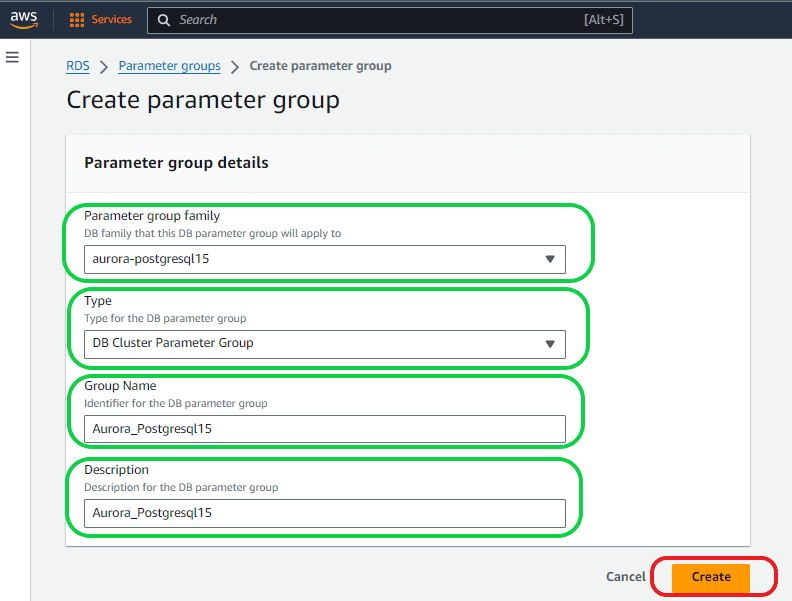
Within the Parameter Group Details section, choose the following options:
- Parameter group family – Choose the DB family or version corresponding to your selected database from the dropdown menu.
- Type– Ensure that you select the DB cluster parameter group from the dropdown menu.
- Group name box – Assign a name of your preference to the new DB cluster parameter group. Adhere to the naming rules, which stipulate that identifiers must start with a letter, exclusively contain ASCII letters, digits, and hyphens, and must not conclude with a hyphen or include consecutive hyphens.
- Description– Provide a description of your choice for the new DB cluster parameter group, following the naming rules outlined: identifiers must commence with a letter, consist solely of ASCII letters, digits, and hyphens, and refrain from ending with a hyphen or containing two consecutive hyphens.
Then select the “Create” button.
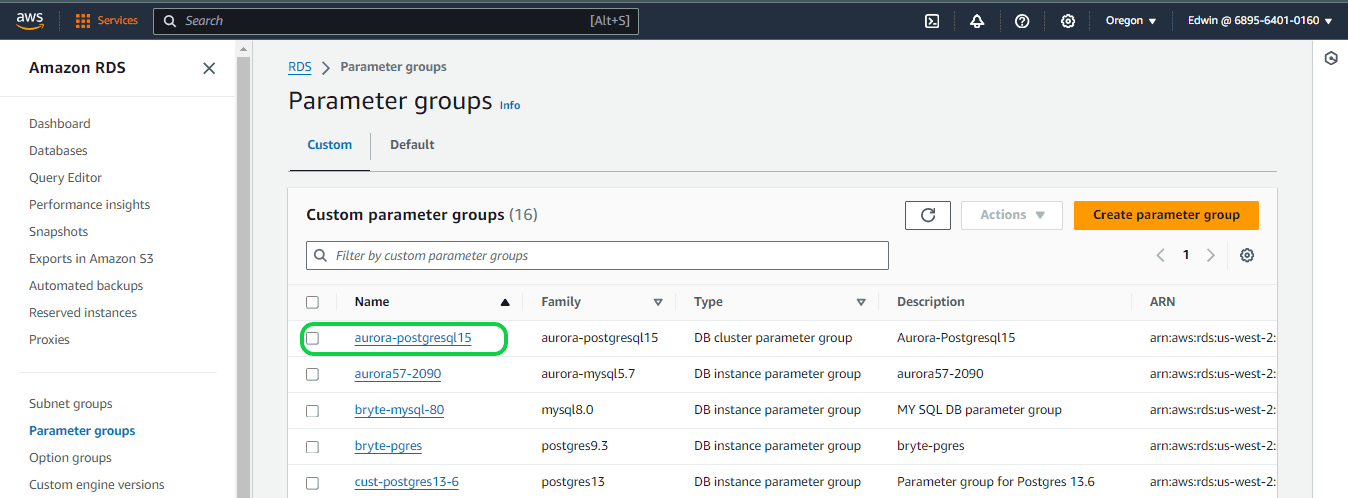
Step 2: You can see the created parameter groups under “Parameter groups”.
Follow below steps to activate PostgreSQL logical replication for an Aurora PostgreSQL Database
Step 1
Log in to the AWS Management Console and access the Amazon RDS console by visiting https://console.aws.amazon.com/rds/.
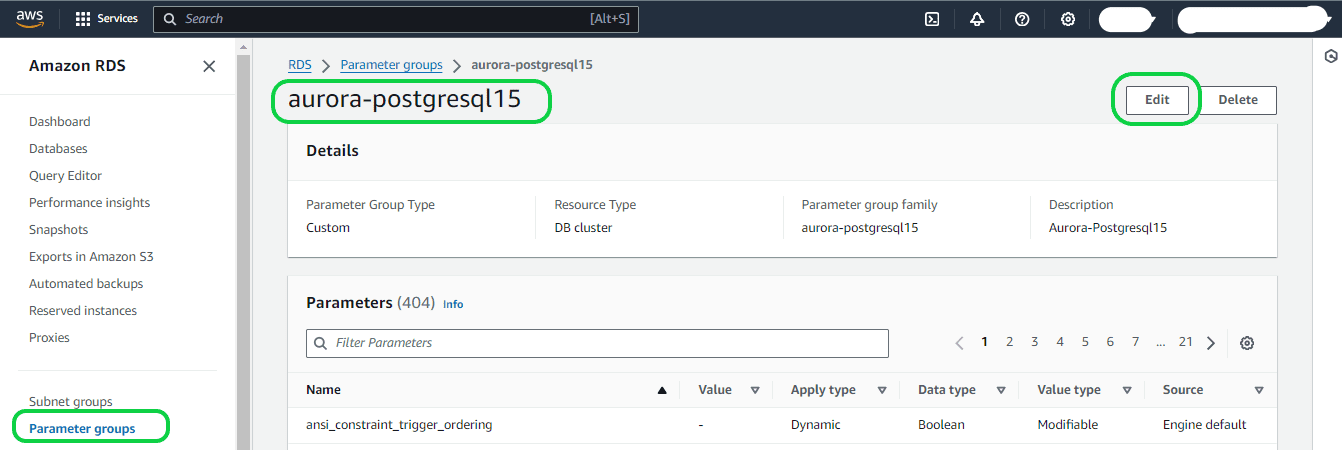
Navigate to the left-hand side of the screen and choose “Parameter groups” from the menu. Locate and select the parameter group created in the previous session. Once on the page for the newly created parameter group, click on the “Edit” button.
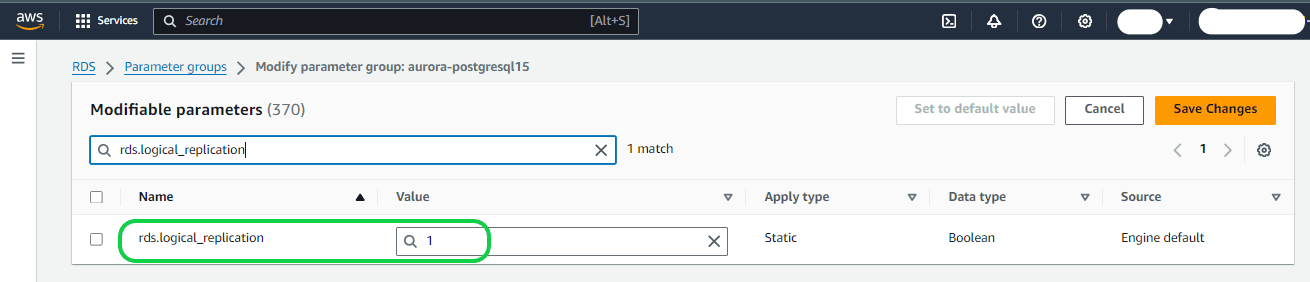
Enter “rds.logical” in the Parameters search field to locate the parameter named rds.logical_replication. By default, its value is set to 0, indicating that the feature is deactivated by default.
Adjust the value to 1 using the selector to activate the feature. Depending on your anticipated usage, you may need to modify the settings for additional parameters. Nevertheless, in numerous instances, the default values are satisfactory.
Step 2
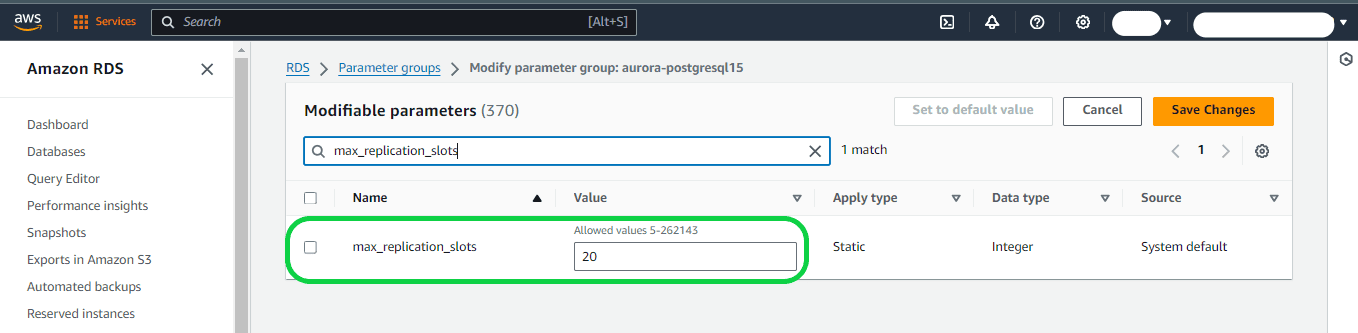
max_replication_slots – Configure this parameter to a value equal to or greater than the planned total number of logical replication publications and subscriptions.
Step 3
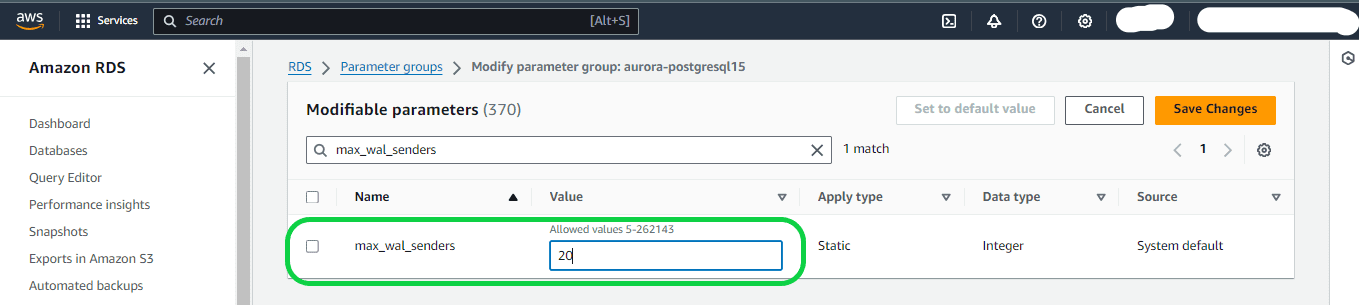
max_wal_senders and max_logical_replication_workers – Adjust these parameters to a value equal to or higher than the number of active logical replication slots. Keeping logical replication slots inactive can hinder the removal of obsolete tuples from tables by the vacuum process. It is advisable to monitor replication slots and remove inactive ones as necessary.
Step 4
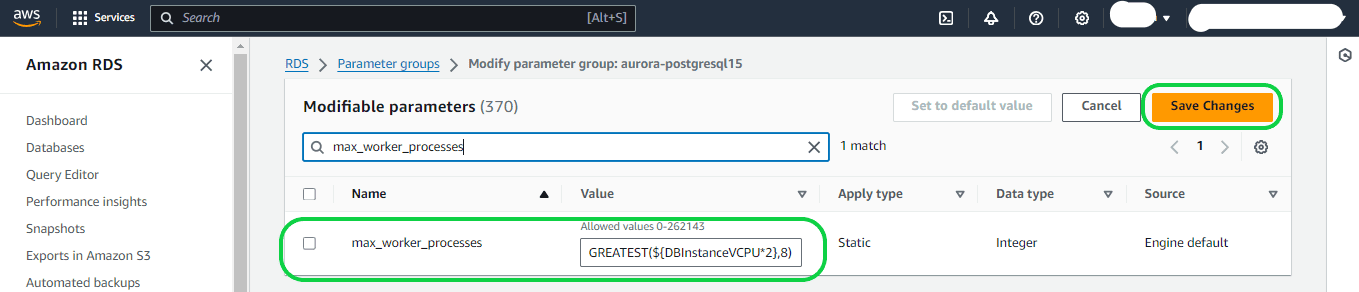
max_worker_processes – Set this parameter to a value that’s at least equal to the total of the max_logical_replication_workers, autovacuum_max_workers, and max_parallel_workers values. On small DB instance classes, background worker processes can affect application workloads, so monitor the performance of your database if you set max_worker_processes higher than the default value. (The default value is the result of GREATEST(${DBInstanceVCPU*2},8}, which means that, by default, this is either 8 or twice the CPU equivalent of the DB instance class, whichever is greater).
Aurora Postgres Logical Replication Limitations
Now that we have set up logical replication in Aurora Postgres you must understand that the Postgres logical replication process currently has the following limitations:
- Logical replication is restricted to base tables only. This means that tables on both the publication and subscription sides must be normal tables, it will not copy views, materialized views, partition root tables, or foreign tables. Debezium CDC Explained, and a Great Alternative CDC Tool
- In the case of partitions, replicating a one-to-one partition hierarchy is possible, but replication to a differently partitioned setup is not supported at this time.
- Starting from PostgreSQL 11, replication of TRUNCATE commands is supported. However, caution is necessary when truncating groups of tables linked by foreign keys. The subscriber replicates the truncate action on the same group of tables as on the publisher, explicitly specified or implicitly collected via CASCADE, excluding tables not part of the subscription. This works well when all affected tables belong to the same subscription, but truncating tables with foreign key links to non-subscribed tables results in failure.
- Sequence data is not replicated seamlessly. Although data in serial or identity columns backed by sequences is replicated with the table, the sequence itself retains the start value on the subscriber. In the event of a failover to the subscriber database, sequences need updating to the latest values, either by copying current data from the publisher (using pg_dump) or determining a sufficiently high value from the tables.
- Large objects, stored as Binary Large Objects (BLOBs) in PostgreSQL, pose a challenge in replication. While BYTEA types (binary strings) are replicated, the OID types (large objects) that provide stream-style access to user data stored in a special large object structure are not replicated.
- The replication process does not automatically handle the database schema and Data Definition Language (DDL) commands like CREATE, ALTER, and DROP. While the initial schema can be manually copied using pg_dump –schema-only, any subsequent schema changes must be synchronized manually.
- If a conflict in replication is not managed quickly, the created replication slot will halt, and the publisher node will begin aggregating Write-Ahead Logs (WALs), due to which the node will finally run out of disk space.
As you can see manual data replication to an Aurora PostgreSQL database is challenging. An efficient, budget-friendly alternative is to employ a third-party, no-code tool for Postgres Change Data Capture (CDC), such as BryteFlow. Our CDC tool ensures continuous data sync and seamless data delivery to various destinations, whether on-premise or in the Cloud, without requiring any manual coding.
Although PostgreSQL’s native replication tools may be suitable at the outset, they can pose scalability challenges when faced with more intricate replication scenarios, stemming from factors like growing data volumes or heightened code complexity. BryteFlow’s PostgreSQL data integration capabilities address these challenges effectively. You will also benefit from BryteFlow’s seamless integration with AWS services for efficient handling of associated replication processes. AWS ETL with BryteFlow
Bryteflow, a Tool for Real-Time, No-Code Postgres Replication
BryteFlow is a no-code tool designed for real-time data replication, allowing users to effortlessly configure and construct their data pipelines without the need for coding. BryteFlow employs automated log-based Change Data Capture (CDC) to replicate data from transactional databases (On-Prem and Cloud) like SAP, Oracle, PostgreSQL, MySQL and SQL Server to Cloud platforms like Amazon S3, Amazon Redshift, Snowflake, Azure Synapse, Azure Data Lake 2, PostgreSQL, Google BigQuery, SQL Server, Teradata, Kafka, and Databricks in real-time. Automated data type conversions enable the delivery of ready-to-use data at the destination. SQL Server to Postgres – A Step-by-Step Migration Journey
Our data replication solution stands out for its automation, user-friendly graphical interface, self-service features, and inherent support for high-volume enterprise data replication, delivering approximately 1,000,000 rows in just 30 seconds. The deployment process offered by BryteFlow is swift, ensuring that you receive your data within two weeks, a big contrast to the extended timelines typically required by our competitors. How BryteFlow Works
BryteFlow CDC Highlights for Aurora Postgres Replication
- BryteFlow uses log-based CDC to replicate data to Aurora PostgreSQL in real-time, with a history of every transaction. BryteFlow is fully compatible with Aurora Postgres and has minimal impact on source systems. Postgres to Snowflake: 2 Easy Methods to Move Data
- BryteFlow XL Ingest performs the first full refresh of data at high speed with parallel, multi-thread loading and partitioning while BryteFlow Ingest captures subsequent deltas, merging them automatically with existing data (automates upserts) syncing data in Aurora Postgres with source continuously (or at a frequency of your choice). Oracle to Postgres Migration (The Whys & Hows)
- BryteFlow Ingest can transfer petabytes of data within minutes, from transactional databases like SAP, Oracle, SQL Server and other sources to Aurora Postgres.
- BryteFlow has seamless integration with AWS services. It uses AWS services intelligently as required and automates integration with Amazon S3, EMR clusters, Amazon Athena, Glue Data Catalog and Amazon Redshift. It also uses IAM, KMS, CloudWatch Logs, Metrics and SNS for security, monitoring etc. How to get your Amazon Athena queries to run 5X faster
- BryteFlow automates the creation of schemas and tables on the destination using industry best practices. It manages schema changes automatically. It can add columns to tables, add new tables if needed, and even change datatypes of columns.
- BryteFlow Blend offers data transformation on your Aurora Postgres database if needed.
- BryteFlow is a completely no-code CDC tool, it automates every step of the process, including data extraction, CDC, data mapping, merges, masking, schema and table creation, and DDL operations.
- It offers a range of out-of-the-box automated data type conversions to provide immediately consumable data for machine learning and analytics.
- BryteFlow provides the option to preserve SCD Type 2 history and data versioning.
- It provides automated data reconciliation using row counts and column checksums.
- BryteFlow ensures high availability and impressive throughput, processing 1,000,000 rows in just 30 seconds—6x faster than GoldenGate.
- It provides automated catch-up mechanisms for network failures, seamlessly resuming operations from the point of interruption, when normal conditions are restored.
- BryteFlow includes a user-friendly dashboard for monitoring data ingestion and transformation instances.
This article discussed the process of establishing a new Aurora Postgres database and activating logical replication. It discussed the benefits of the Aurora DB, the concet of logical replication and its inherent drawbacks. It also presented BryteFlow, as a no-code replication tool that can help you construct Aurora PostgreSQL data pipelines. If you want to learn more on how BryteFlow can enable real-time replication to Aurora PostgreSQL, contact us for a Demo