This blog demonstrates 2 ways to move data from PostgreSQL to Kafka – a manual method and an automated method using BryteFlow as a Postgres Kafka connector to CDC Postgres data to Kafka. It also talks about the Postgres DB, its benefits and Apache Kafka and its strengths. It also lists the reasons why you should consider migrating data from Postgres to Kafka. Postgres CDC (6 Easy Methods to Capture Data Changes)
Quick Links
- About the PostgreSQL Database
- Key Features and Benefits of PostgreSQL
- About Apache Kafka
- Key components in Apache Kafka
- Features and Benefits of Kafka
- Why Migrate Data from PostgreSQL to Kafka?
- PostgreSQL CDC to Kafka – Some Advantages
- How to move data from Kafka to PostgreSQL – 2 Basic Approaches
- BryteFlow as a No-Code CDC Connector for Postgres to Kafka
Key Features of BryteFlow for PostgreSQL CDC to Kafka
About the PostgreSQL Database
PostgreSQL is a powerful, open-source RDBMS
PostgreSQL is an open-source, versatile and powerful object-relational database management system that can handle a wide variety of workloads. It is highly extensible, supporting multiple procedural languages, spatial data, and indexing techniques such as Gin and GIST. PostgreSQL is cross-platform, running on various operating systems including Windows, Solaris, Linux, and FreeBSD. It is widely used in production systems for web, mobile, and analytics applications, serving as a primary data warehouse or store. Postgres to Snowflake: 2 Easy Methods to Move Data
PostgreSQL supports most SQL standards features and is highly reliable
With its strict adherence to SQL standards, reliability, and data integrity, PostgreSQL is trusted by many large-scale applications and services as their preferred database solution. PostgreSQL DB organizes data in traditional tables, with rows and columns, and enables relationships between tables based on keys. This allows for efficient data management, storage, and retrieval. Postgres DB is an ACID (Atomicity, Consistency, Isolation, Durability) compliant DB which is needed for reliable database transactions. ACID properties vouch for reliability and integrity of data by ensuring secure processing of transactions in case of system failures. BryteFlow for PostgreSQL Replication
PostgreSQL has wide extensibility and the support of an active community of developers
PostgreSQL has seen a lot of active development by a strong developer community since its inception in 1996. Its foundation in C programming has led to continuous improvements, regular updates, and a variety of resources for guidance. PostgreSQL is highly extensible, and allows users to create custom data types, functions, and extensions. This enables developers to customize the Postgres database to particular application requirements. It can store extensive data in catalogs, encompassing data types, functions, and access methods. Postgres combines standard SQL for relational data querying with JSON for non-relational data. With robust support across operating systems and advanced features comparable to commercial databases like Oracle and SQL Server, PostgreSQL stands as a powerful enterprise-class solution. Aurora Postgres and How to Set Up Logical Replication
PostgreSQL is frequently employed in the following use cases
- PostgreSQL is used as a geospatial database in geographic information systems (GIS), by integrating the powerful PostGIS extension. This enables myriad functions that can process geometric data in various formats. Postgres to SQL Server with BryteFlow
- It serves as the back-end database in the LAPP stack (Linux, Apache, PostgreSQL, PHP, Python, and Perl), powering up dynamic websites and web applications. Postgres to Oracle with BryteFlow
- Large enterprises and startups use it extensively as a transactional database. PostgreSQL being ACID compliant is suited for OLTP (Online Transaction Processing) workloads and is used extensively by the financial services industry. About Postgres CDC
- PostgreSQL is used in websites that need to process thousands of requests. It supports all modern web programming technologies including Django (Python), node.js (JavaScript), Hibernate (Java), Ruby on rails, PHP, and more. Postgres can also be used as a NoSQL-style data store. SQL Server to Postgres – A Step-by-Step Migration Journey
- A lot of industrial manufacturers use PostgreSQL as a storage backend to innovate and drive growth through customer-focused processes and to improve supply chain performance. Postgres Replication Fundamentals You Need to Know
- Postgres finds use in research and scientific projects due to its great analytical capabilities. Data Integration on Postgres
Key Features and Benefits of PostgreSQL
PostgreSQL has garnered significant popularity as a Database Management System owing to its array of attractive features:
- Data Integrity: PostgreSQL maintains data integrity through mechanisms like primary keys, foreign keys, explicit locks, advisory locks, and exclusion constraints. Postgres to Snowflake: 2 Easy Methods to Move Data
- Fault-Tolerant Write-Ahead Logging (WAL): Its write-ahead-logging (WAL) feature enhances fault tolerance, safeguarding data integrity and system reliability. SQL Server to Postgres – A Step-by-Step Migration Journey
- Geographic Object Support: With robust support for geographic objects, PostgreSQL proves valuable for geographic information systems and location-based services.
- Data Security: PostgreSQL prioritizes data security with multiple layers of authentication and protection, accommodating various authentication methods such as Lightweight Directory Access.
- Joins and Relationships: PostgreSQL supports different types of joins such as INNER JOIN, LEFT JOIN, RIGHT JOIN, and FULL JOIN, making it easy to combine data from multiple tables based on defined relationships.
- Client-Server Network Architecture: PostgreSQL seamlessly integrates with client-server network architecture, ensuring smooth communication between users and the database server. Postgres Replication Fundamentals You Need to Know
- Advanced SQL Support: PostgreSQL provides a wide range of SQL features, with support for complex SQL operations like common table expressions (CTEs), window functions, recursive queries, and other advanced constructs. SQL Server CDC To Kafka (Unbelievably Easy New Connector)
- Diverse Data Types: PostgreSQL supports a broad spectrum of data types encompassing INTEGER, NUMERIC, BOOLEAN, CHAR, VARCHAR, DATE, INTERVAL, TIMESTAMP, and more.
About Apache Kafka
What is Apache Kafka?
Apache Kafka is an open-source distributed system that handles stream processing, real-time data pipelines, and data integration at scale. Starting as a message queue to manage real-time data feeds at LinkedIn, today Kafka is a complete event streaming platform. It can handle an astonishing 1 million messages per second. Streaming data is the data continuously produced by hundreds of data sources, which send in data records concurrently. Kafka as a streaming platform needs to process these continual incoming dataflows and process the data sequentially as well as incrementally.
What is Apache Kafka and Installing Kafka (Step-by-Step)
Objectives of Kafka
Kafka has three major objectives: Publish and subscribe to record streams, process streaming data in real-time, and store streams of records in the sequence they were generated. Kafka is primarily used to build real-time streaming data pipelines and applications. It combines messaging, storage, and stream processing to allow storage and analysis of both historical and real-time data. Kafka combines two messaging models, queuing and publish-subscribe. Kafka CDC Explained and Oracle to Kafka CDC Methods
Kafka is immensely reliable and scalable
Kafka as an event streaming platform ensures security, scalability, and elasticity, making it suitable for various applications. It operates as an open-source message queue and allows for segmentation and storage of messages in Topics. Users can set up real-time streaming data pipelines and applications for transforming and streaming data between sources and targets. The system organizes data records in clusters, spanning multiple servers or data centers, replicating, and partitioning them for concurrent usage by a large number of users.
Kafka’s Log Compaction feature helps in CDC
Kafka’s log compaction feature helps in handling database change events. Log compaction is a feature runs in the background and cleans up logs by removing previous older records that have the same key as newer records. In other words, Apache Kafka will retain the latest version of a record and delete the older versions having the same key. Kafka CDC explained
Key components in Apache Kafka
Apache Kafka is a distributed streaming platform that comprises of several key components. Each has a specific function and role to play in event streaming. Apache Kafka and how to install it
Kafka Cluster
A cluster is a commonly used term in distributed computing. It is a group of computers that have a common objective. Kafka is a distributed system, so the cluster has a group of servers called Brokers. SQL Server CDC To Kafka (Unbelievably Easy New Connector)
Kafka Broker
The Kafka Broker is a server that helps in exchange of messages between a producer and a consumer. In case of a Kafka Producer, it functions as a receiver, and for a Kafka Consumer, it works as a sender. In a Kafka cluster, you can have one or more Kafka Brokers.
Kafka Producer
The data source is called the Producer. It pushes messages to the Kafka Broker without sending messages directly to Kafka Consumers. The messages or data are stored in the Kafka Server or Broker. Multiple producers can send a message to the same Kafka topic or to different Kafka topics.
Kafka Consumer
The Kafka Consumer receives or consumes a message. However, it does not consume or receive a message directly from the Kafka Producer. The Producer’s messages are delivered to the Kafka Server or Broker. The Consumer can request a message from the Kafka Broker. If the Kafka Consumer has the permissions, it gets a message from the Kafka Broker.
Kafka Topics
A stream of messages that come under a feed name or are part of a particular category is called a Kafka topic. Topics help to categorize messages since they serve as a unique identity of the message streams. Topics store messages in an append-only manner and serve as categorized mailboxes, facilitating the exchange of information between different programs. Producers write their data to topics, and consumers read the data from these topics.
Kafka Partitions
Kafka is a distributed system and it is possible to divide the Kafka topic in partitions and distribute the partitions for storage on different machines. Based on the use case and data volume, we can decide the number of partitions for a topic. Partitions enable multiple consumers to read data in parallel from an individual topic.
Partition Offset
Since records in Kafka are assigned to partitions, to define the position of the records within the partition, each record is provided with an offset. This allows a record to be uniquely identified within its partition by referring to the offset value given to it.
Kafka Replicas
Think of Replicas as backups for Kafka partitions. Basically, the copies of the partitions of a Topic are known as Replicas. They mitigate the risk of data loss if there is a network failure or a planned shutdown.
Kafka Leaders and Followers
Every partition in Kafka will have a server that is the leader for that particular partition. The leader performs all the read and write tasks for the partition. Each partition can have zero followers or more. The follower serves to replicate the leader’s data. If the leader for a particular partition fails in the task, a follower node can take its place.
Kafka Zookeeper
ZooKeeper is used in distributed systems for co-ordinating and syncing services and as a naming registry. When working with Apache Kafka, ZooKeeper is mainly used to track the status of nodes in the Kafka cluster and to keep a list of Kafka topics and messages. It also keeps track of Kafka topics, partitions, offsets, etc.
Kafka Message
The fundamental unit of data in Kafka, akin to a row in a database table. It’s represented as an array of bytes.
Schema Registry
Schema Registry is an application that is external to the Kafka cluster. It manages the distribution of schemas to the producer and consumer by keeping a copy of schema in its local cache. This helps consuming applications understand the messages better. The producer, before sending the data to Kafka, connects with the Schema Registry and checks for the availability of the schema. If the schema is not found, it registers and caches it in the schema registry so the consumer can deserialize the message using the same schema.
Kafka Connectors
Kafka Connect is a structure or framework that connects Kafka with external systems such as databases, key-value stores, file systems, and search indexes using components called Kafka Connectors.
Kafka Connectors enable the importing of data from external systems into Kafka topics and exporting of data from Kafka topics into external systems. Users can use existing Kafka connectors to connect to common sources or even build their own. The connectors act as intermediaries, formatting and preparing data to enable seamless exchange between Kafka and other data systems.
Kafka Connectors are of 2 basic types:
Source Connectors: these collect data from sources like databases, streams tables, message brokers and application servers into Kafka topics where data can be accessed for low latency stream processing. Our own BryteFlow serves as a Source Connector and we will see later how BryteFlow works as a Postgres Kafka Connector.
Sink Connectors: These collect data from Kafka topics and send it to external systems, which could be databases, batch-based systems like Hadoop or indexes like Elasticsearch.
Features and Benefits of Kafka
These are some of the features of Kafka that make it a must-have for processing massive volumes of streaming enterprise data.
Kafka has seamless integration with big data tools
Kafka seamlessly integrates with prominent big data tools like Hadoop and Spark, offering an optimal solution for organizations handling extensive data processing tasks. It provides a cohesive data pipeline facilitating real-time ingestion, processing, and analysis. Data Integration on Kafka with BryteFlow
Kafka is known for efficient messaging with high throughput and low latency
Kafka is engineered to facilitate high-throughput, low-latency messaging, making it an optimal solution for organizations requiring real-time data streaming and processing. It can manage millions of messages per second with sub-millisecond latency, ensuring top-notch performance for high-demand applications.
Kafka displays robust fault tolerance
Kafka exhibits high fault tolerance, capable of managing node failures without compromising data integrity. Through its replication mechanism, Kafka guarantees message preservation even in the event of node failures, ensuring uninterrupted data flow and reliability.
Kafka can retain data over extended periods
Kafka excels in storing data over prolonged periods, catering to organizations in need of historical data analysis. Its retention period can be flexibly configured to preserve data for days, weeks, or even months, ensuring comprehensive data access and analytics capabilities.
Kafka is highly scalable
Kafka boasts exceptional scalability, is adept at handling vast data volumes spread across multiple servers. Its distributed architecture allows effortless horizontal scaling, allowing for the addition of new nodes as needed, making it an ideal choice for organizations dealing with substantial data processing requirements.
Why Migrate Data from PostgreSQL to Kafka?
But why replicate data from Postgres to Kafka? There are several compelling reasons. Firstly, it facilitates rapid and distributed data processing, essential for time-sensitive operations like fraud detection in banking or e-commerce. Prompt detection of fraudulent transactions requires immediate processing of data, which necessitates migration from transactional databases to Kafka. Secondly, data replication from Postgres to Kafka serves as a backup mechanism. Given that Apache Kafka is a highly scalable, distributed, and fault-tolerant event streaming tool, it provides large organizations with a reliable means to recover data in the event of system failures, downtime, or disasters. Data Integration on Kafka with CDC
Furthermore, replicating data to Kafka enhances scalability. The decoupled architecture of Apache Kafka enables data distribution across multiple consumers, enabling horizontal scaling across numerous nodes. Despite Kafka’s primary use for transporting high-volume activity events like web server logs and user click events, it is also appropriate for retaining database change events. Kafka’s log compaction feature, specifically designed for this purpose, ensures data persistence without time-based expiry. By associating each message with a key, Kafka retains the latest message indefinitely, akin to new values overwriting old ones in a key-value store. SQL Server CDC To Kafka (Unbelievably Easy New Connector)
PostgreSQL CDC to Kafka – Some Advantages
PostgreSQL CDC to Kafka can enable Advanced Analytics
Integrating Postgres data into Kafka with CDC enables implementation of machine learning models, facilitating predictive analytics, customer segmentation, and other advanced analytical processes.
PostgreSQL to Kafka Replication with CDC provides Data Consolidation
If you’re using multiple other sources along with Postgres, syncing to Kafka allows you to centralize your data for a holistic view of your operations. You can also set up a Change Data Capture process so your data remains synced and consistent. Postgres CDC (6 Easy Methods to Capture Data Changes)
Moving data from Postgres to Kafka enables Historical Data Analysis
Moving data to Kafka helps overcome PostgreSQL limitations on historical data, enables you to retain data long term and analyze historical trends across time. About Kafka CDC
Postgres to Kafka Replication ensures Data Security and Compliance
Kafka provides robust data security features. Moving Postgres data to Kafka enhances data security and secured and enables a high degree of data governance and compliance management.
Moving Postgres to Kafka provides huge scalability
Kafka’s ability to handle substantial data volumes offers scalability to enterprises with growing Postgres data, providing easy scalability without impacting performance.
Loading data from Postgres to Kafka allows for flexibility in Reporting and Visualization
Though Postgres has its native reporting tools, moving data to Kafka allows for use of data visualization tools like Tableau, PowerBI, and Looker (Google Data Studio) that can connect to Kafka easily, enabling access to advanced business intelligence options.
How to move data from Kafka to PostgreSQL – 2 Basic Approaches
There are many methods available to migrate data from PostgreSQL to Kafka including CDC with Debezium. The methods that we are showing here are:
- A Manual method to transfer data from PostgreSQL Database to Kafka.
- An Automated method using BryteFlow as a PostgreSQL Kafka Connector that integrates with Kafka Connect. BryteFlow works as a Postgres Kafka Source Connector. SQL Server CDC To Kafka (Unbelievably Easy New Connector)
1. Postgres to Kafka: A Manual Method
In this tutorial, we illustrate a step-by-step method for linking and transferring data from PostgreSQL to Kafka manually. This process entails creating data in CSV format using DBeaver and then importing it into a Kafka Topic through Kafka Producer. In this trial, both Kafka and PostgreSQL are set up on the local machine.
What is DBeaver?
DBeaver is a versatile database management solution designed for data experts. Functioning as both a SQL client and administration utility, it utilizes JDBC for relational databases and proprietary drivers for NoSQL databases. Boasting features like code completion and syntax highlighting, it presents a plugin architecture allowing customization of database-specific functionalities. Developed in Java on the Eclipse platform, DBeaver provides a no-cost, open-source Community Edition licensed under the Apache License, along with an Enterprise Edition available through a commercial license. Download DBeaver
Here are the primary stages involved in the manual migration of CSV data from PostgreSQL Database to Kafka Topic:
1.1 Extract Oracle data into an interim storage location using DBeaver.
1.2 Import the data into Kafka using the Command Prompt.
1.1 Extract PostgresSQL data into an interim storage location using DBeaver.
Utilize DBeaver to transfer the data to a temporary storage location prior to importing it into the Kafka Topic. Refer to the outlined steps below to initiate the data export process.
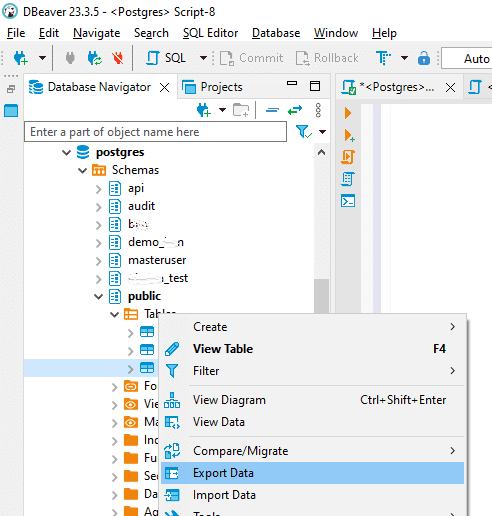
Step 1: Launch DBeaver and establish a connection to the PostgreSQL Database. Then, expand your database schemas, find the target “Table” for migration, and select “Export Data.”
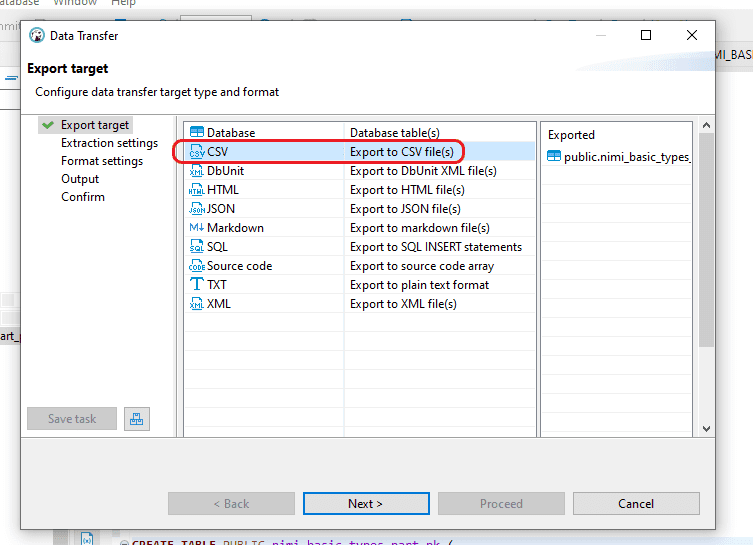
Step 2: In the “Export target” window, select the “CSV” file format option, then proceed by clicking “Next”.
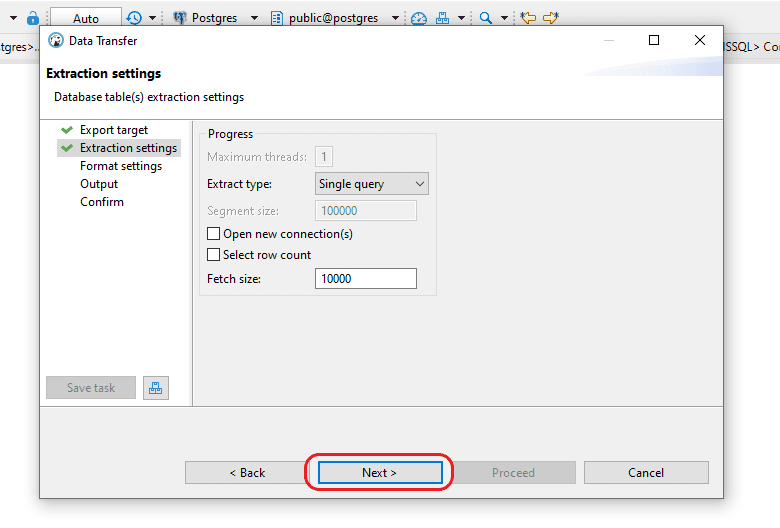
Step 3: In the “Extraction settings” window, keep the existing settings and continue by selecting “Next”.
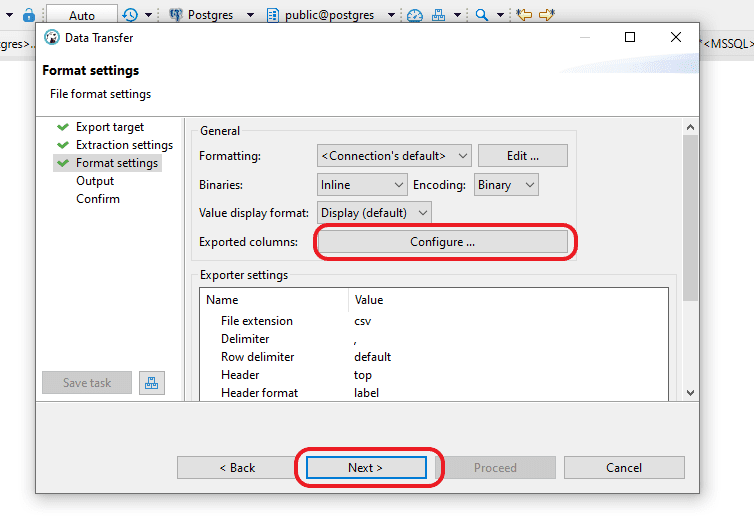
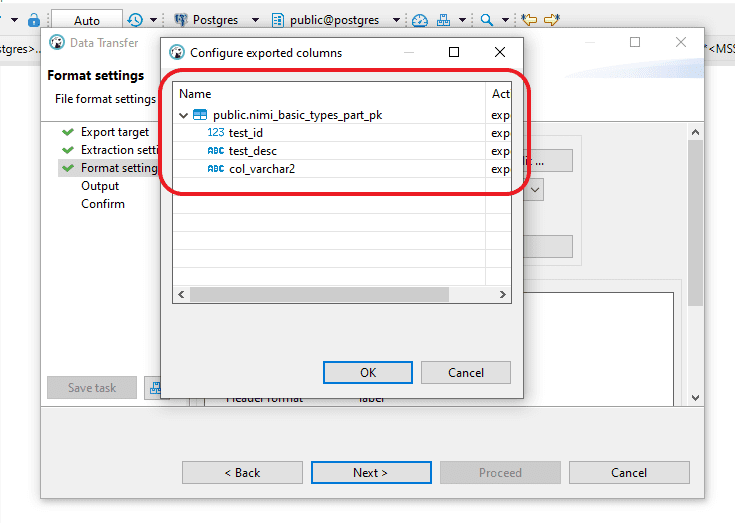
Step 4: In the “Format settings” window, keep the existing configurations and continue by selecting “Next.” If you wish to confirm the exported columns, click on “Configure.”
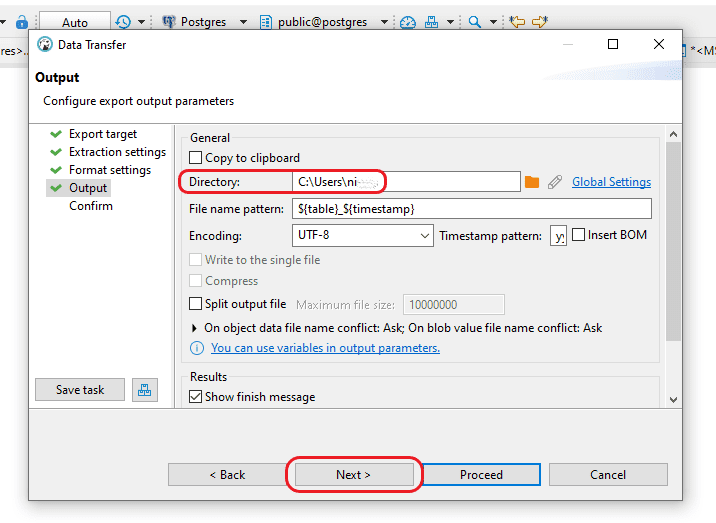
Step 5: In the “Output” window, you have the option to designate the destination for creating the output CSV file. Keep the rest of the settings as they are and continue by selecting “Next.”
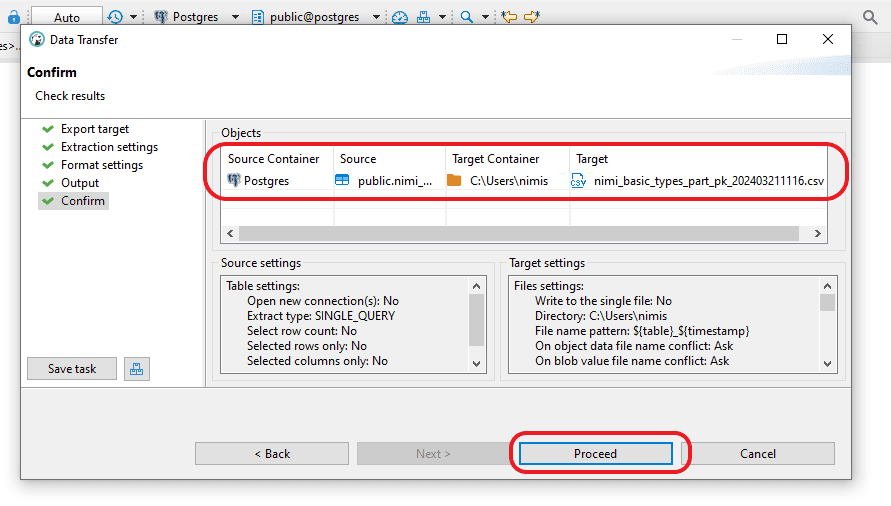
Step 6: In the “Confirm” window, you have the option to check information such as the “Source Container,” “Source” (which includes Schema and Table name), “Target location” where the CSV file will be generated, and “File name and type.” After ensuring all details are accurate, click the “Proceed” button to initiate file generation.
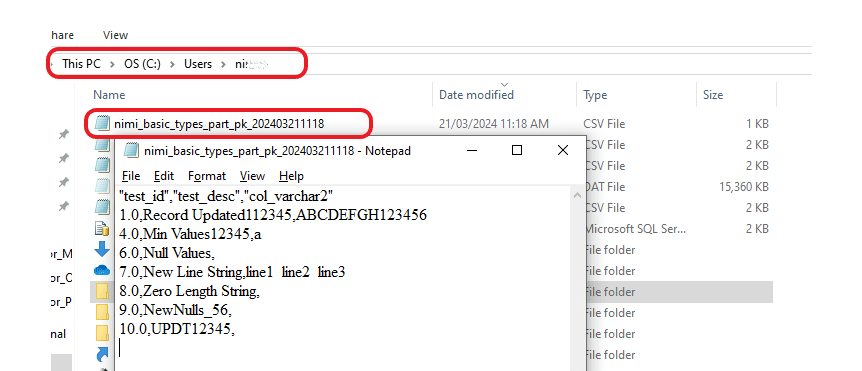
Step 7: Please verify the designated area to ensure that the CSV file has been created.
1.2 Import the data into Kafka using the Command Prompt.
Step 1: Get the most recent version of Kafka from the official Kafka website: https://kafka.apache.org/downloads

Step 2: Extract the TGZ file format of the downloaded file.
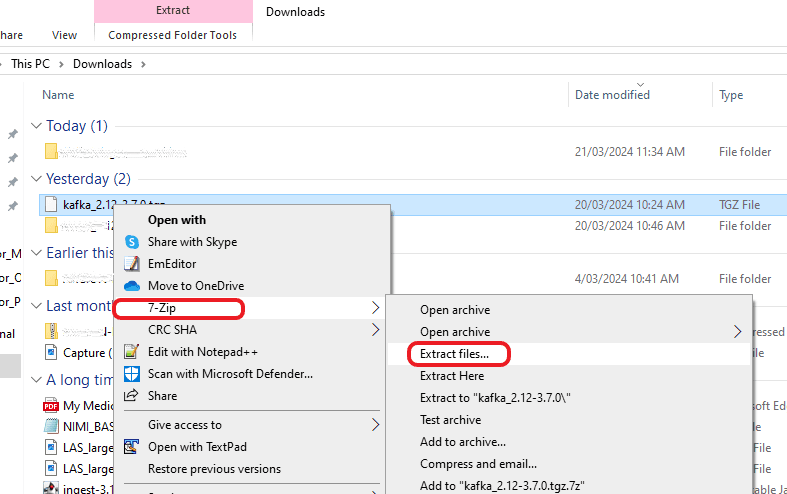
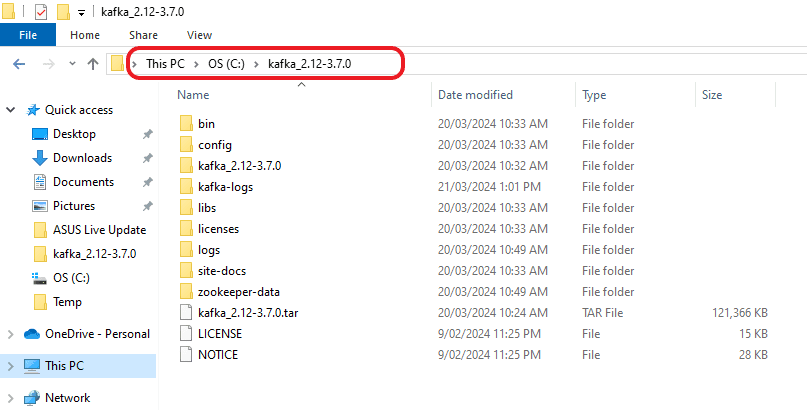
Step 3: Following the initial unzipping process, there might be an occurrence where a TAR file is produced. Should this happen, you may find it necessary to unzip it once more to access the genuine Kafka software.

Step 4: Transfer the folder to the location where you wish to install it.
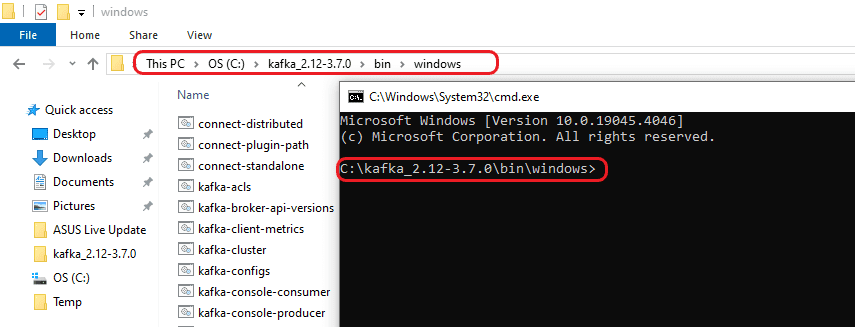
Step 5: Now open a command prompt and go to “C:\kafka_2.12-3.7.0\bin\windows”.
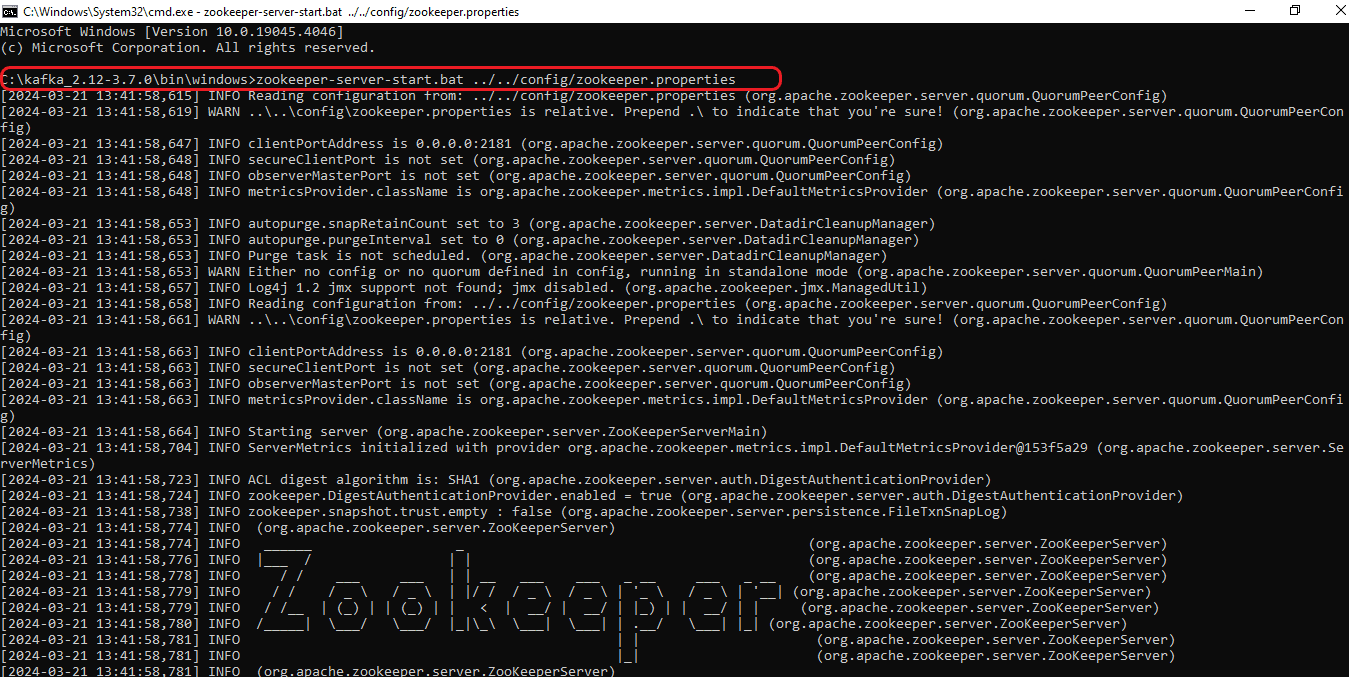
Step 6: To initiate Zookeeper, run the following command: “zookeeper-server-start.bat ../../config/zookeeper.properties”.
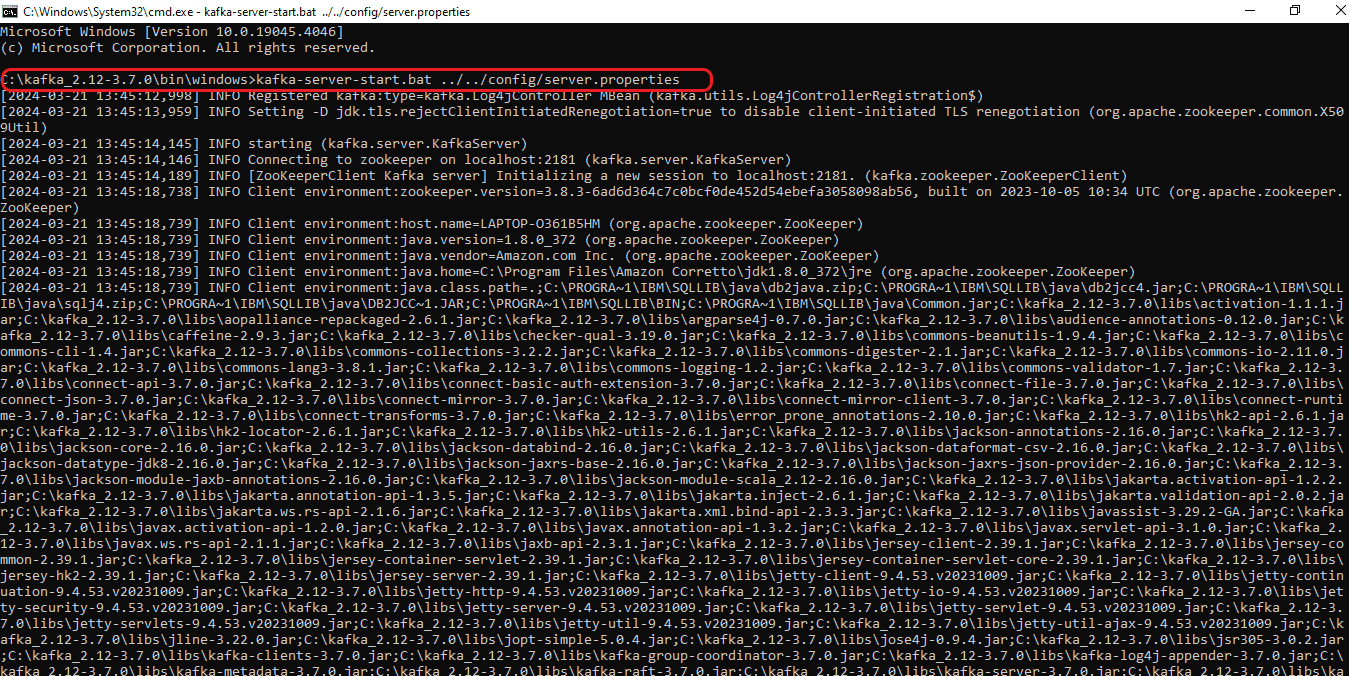
Step 7: Begin by opening a new command prompt and navigate to the directory “C:\kafka_2.12-3.7.0\bin\windows”. Next, run the command “kafka-server-start.bat ../../config/server.properties” to initiate the Kafka Server.
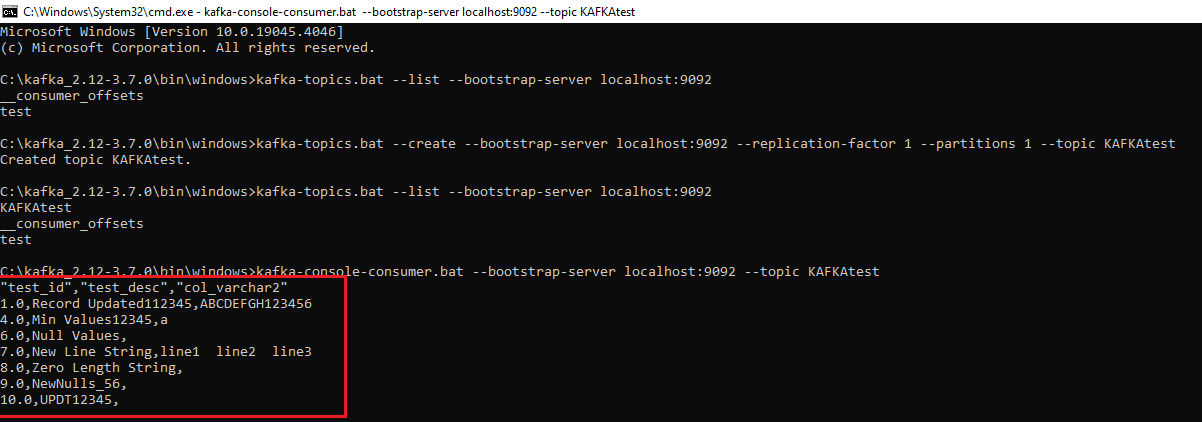
Step 8: Open a new command prompt for the consumer and navigate to the directory “C:\kafka_2.12-3.7.0\bin\windows”. From there, run the command “kafka-topics.bat –list –bootstrap-server localhost:9092” to confirm the list of topics.
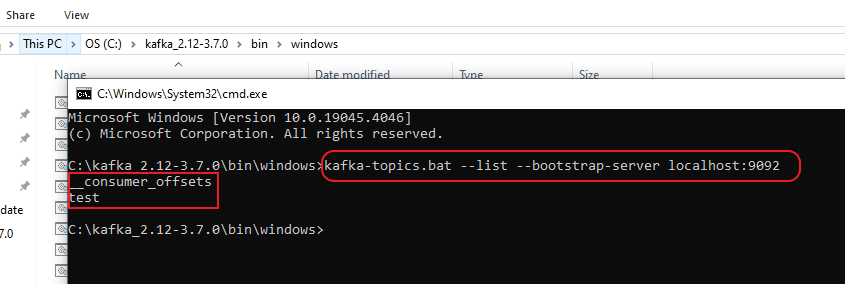
The highlights in the above screenshot are the existing topics. To generate a fresh topic, use the command “kafka-topics.bat –create –bootstrap-server localhost:9092 –replication-factor 1 –partitions 1 –topic <Topic Name>”
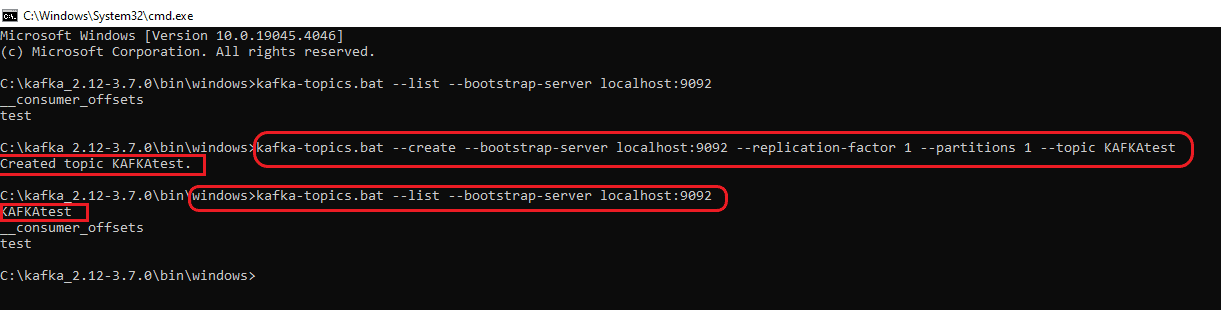
For instance, if the new topic is named “KAFKAtest” the command becomes “kafka-topics.bat –create –bootstrap-server localhost:9092 –replication-factor 1 –partitions 1 –topic KAFKAtest”. The screenshot below illustrates both the creation and verification of the topic through the aforementioned command.
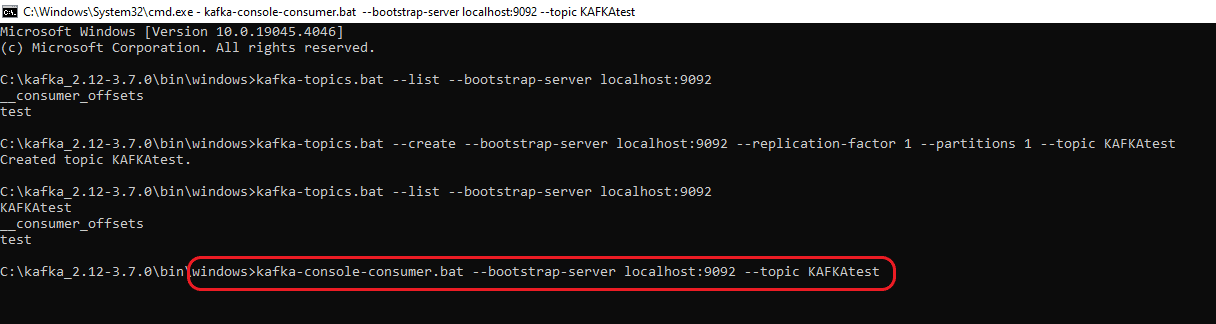
After creating the Topic, run the command “kafka-console-consumer.bat –bootstrap-server localhost:9092 –topic <Topic Name>” to access the Topic’s contents. This command will consistently fetch data from the specified Topic. Consequently, any data transmitted by the Producer will be promptly displayed. For instance, if we are monitoring the Topic named KAFKAtest, modify the command to “kafka-console-consumer.bat –bootstrap-server localhost:9092 –topic KAFKAtest” and execute it in the Consumer.
Step 9: Please open another command prompt for the Producer and navigate to “C:\kafka_2.12-3.7.0\bin\windows”. Then, run the following command: “kafka-console-producer.bat –broker-list localhost:9092 –topic <Topic Name> –producer.config ../../config/producer.properties” to set up the producer for loading data to the Consumer. If you’re loading data to the topic “KAFKAtest”, modify the command as follows: “kafka-console-producer.bat –broker-list localhost:9092 –topic KAFKAtest –producer.config ../../config/producer.properties”.
Step 10: Once the Producer is prepared, manually input the data from the CSV file into it.

The data that has been uploaded will be automatically displayed in the Consumer section as indicated below, corresponding to the Topic specified during the Producer entry, given that the reader command was previously executed in step 8.
Typically, data is ingested into Kafka Topics in JSON format. However, when loading data manually, it may not adhere to the proper JSON structure. Moreover, Kafka stores data in memory logs, rendering them unreadable. Thus, to access this data, one must develop a Kafka consumer program or utilize a tool like Kafka Magic.
How to read the data in Kafka Magic?
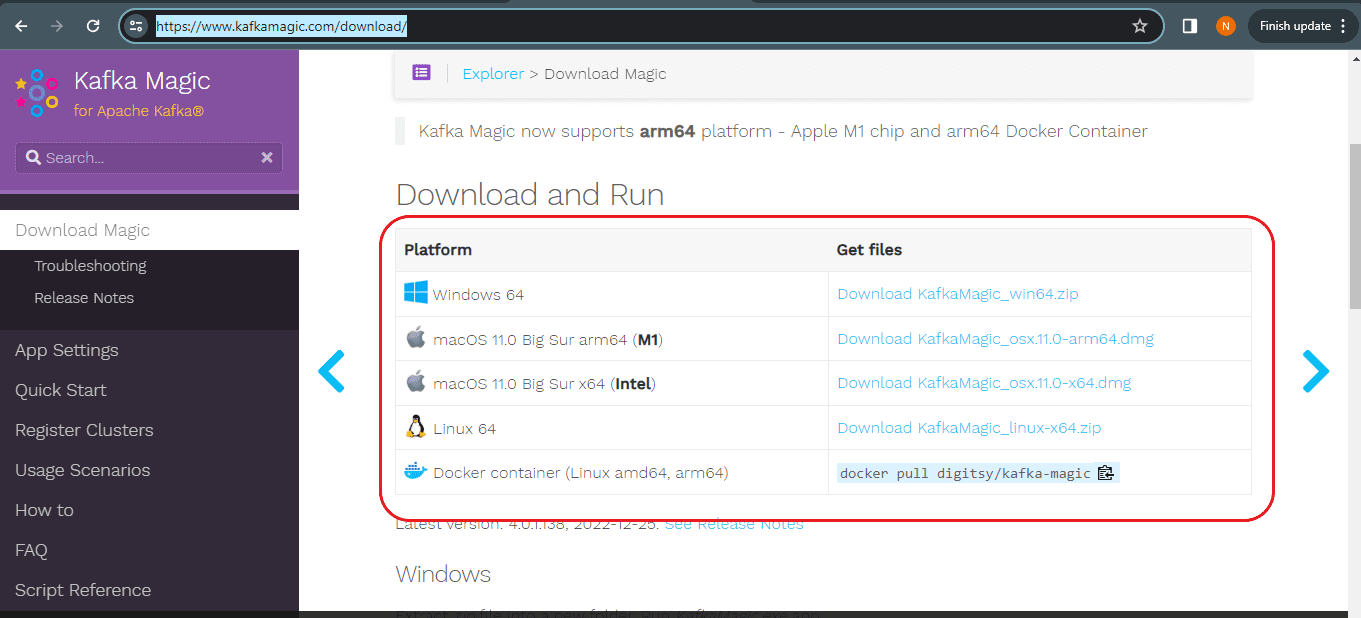
Step 1: Kafka Magic can be downloaded from https://www.kafkamagic.com/download/
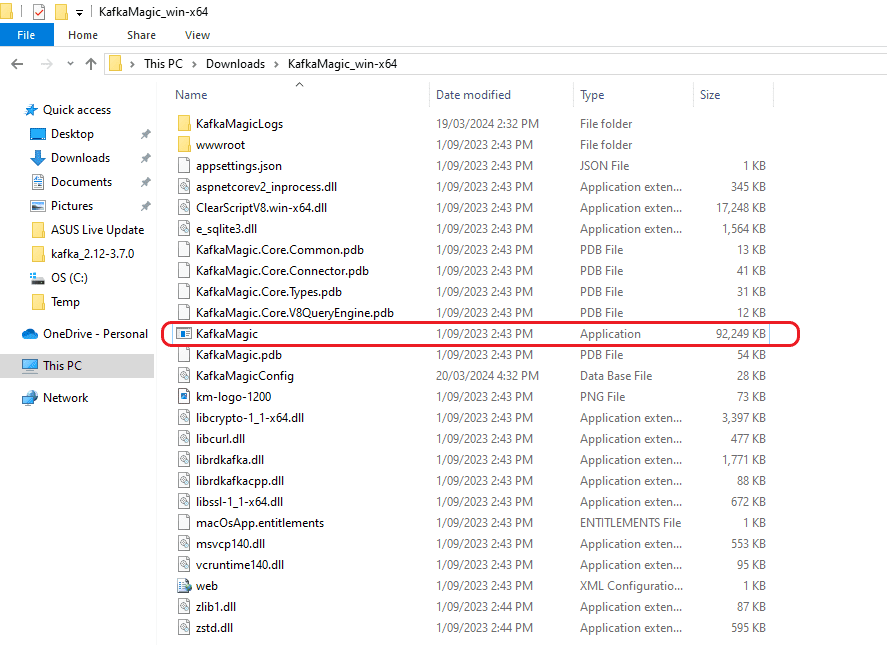
Step 2: After downloading, unzip the file and open Kafka Magic by running the “KafkaMagic” application.
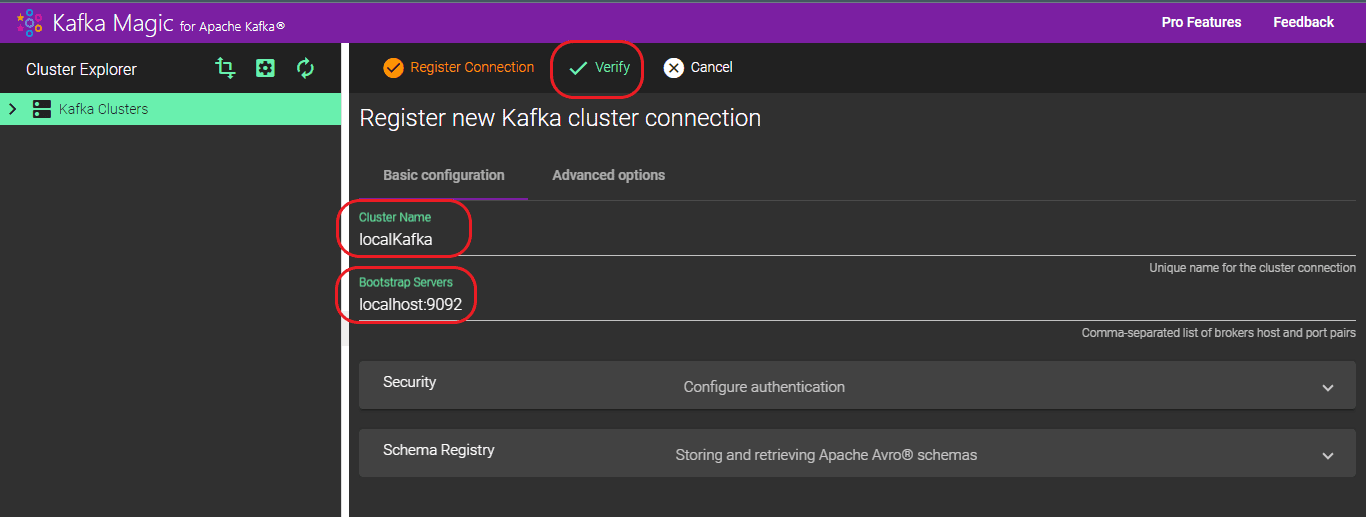
Step 3: After initiating Kafka Magic, select the “Settings” tab on the left side, then choose “Register New” to establish a fresh Cluster.
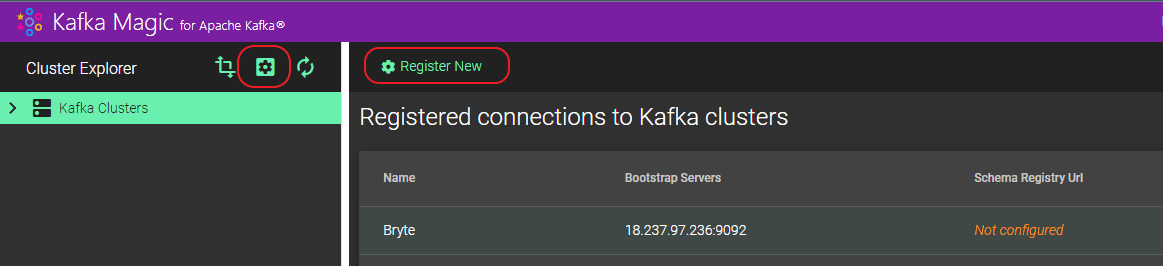
Step 4: Please provide a name for the “Cluster Name” and specify the details for “Bootstrap servers”. The format for “Bootstrap servers” should be “localhost:<port>”, with the port details obtained from the command used to initiate Zookeeper, Kafka servers, etc.
Step 5: After the cluster is established, all generated Topics will be listed automatically.
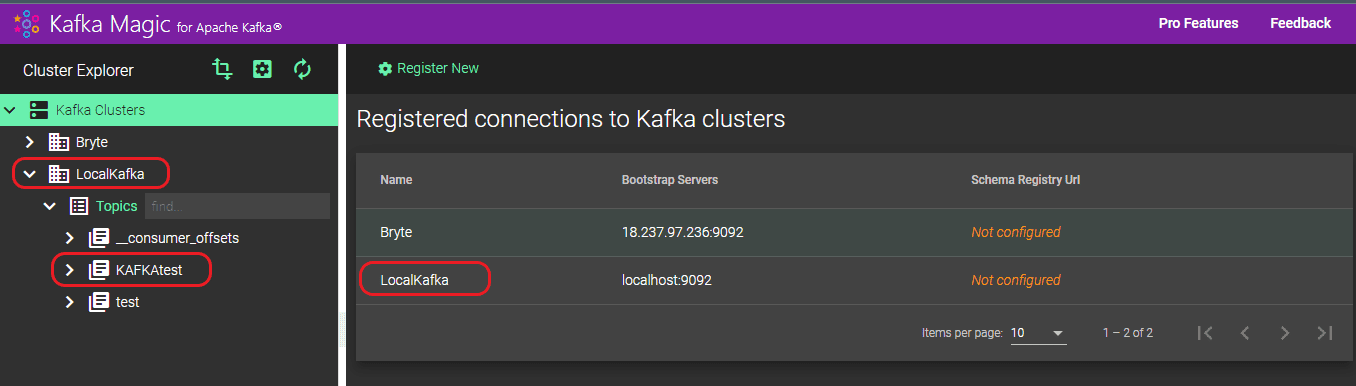
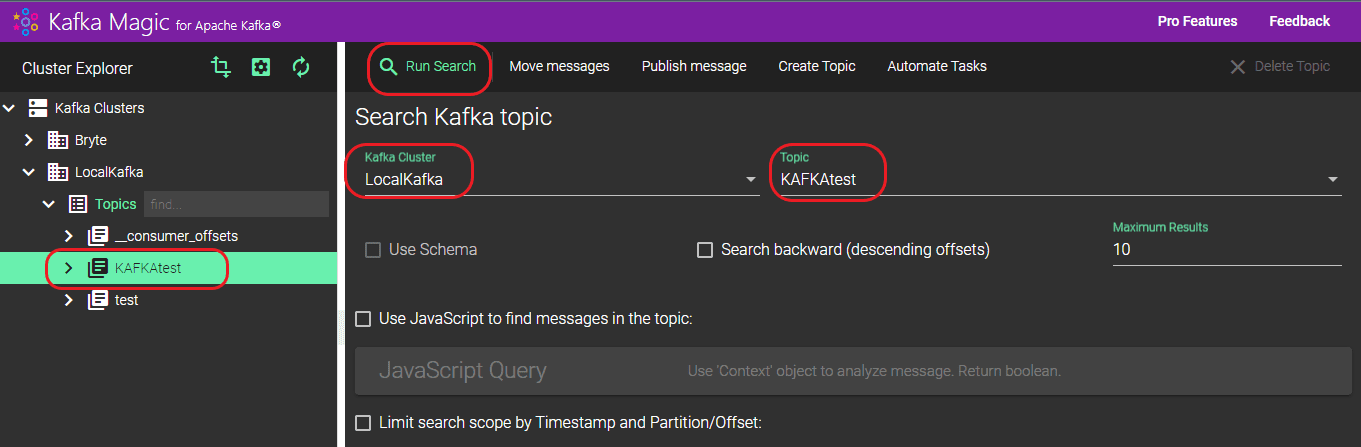
Step 6: Choose your topic here. In our case we choose KAFKAtest. Then, in the right-hand window, select your topic and Kafka cluster under “Topic” and “Kafka Cluster” respectively. Once you’ve made your selections, click on “Run Search.”
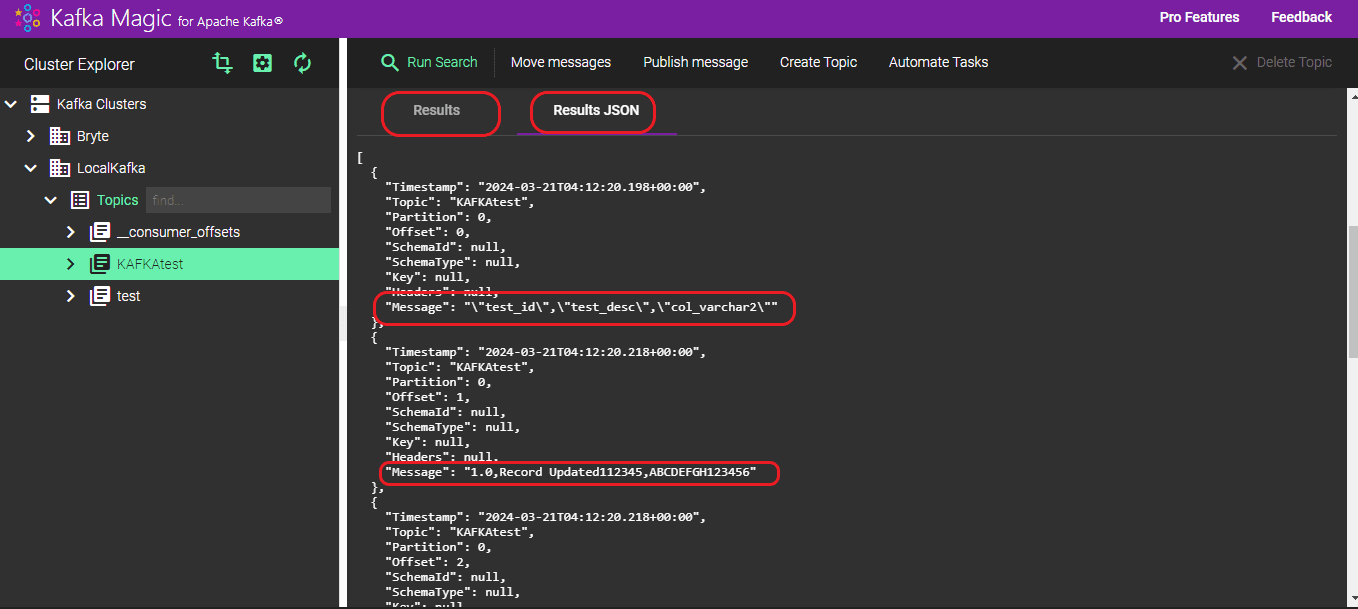
Step 7: You can see the results in both normal format and JSON format.
Disadvantages of Manually Migrating Data from Postgres to Kafka
We have shown you a manual process to migrate data from Postgres to Kafka, however this does pose a lot of challenges. The issues associated with manual migration processes typically include:
Data Validation is not easy: Manually validating the accuracy of intricate data transformations, relationships, and integrations poses significant challenges, making it nearly impossible to ensure data integrity across systems without automation.
Issues due to absence of Automation: Manual methods lack the performance and productivity benefits associated with automation, including speed, precision, and efficiency. Automated systems excel in handling large data volumes, complex calculations, and real-time analysis.
Security Concerns: Manual data processing may pose security risks due to inadequate control over sensitive data access. Automated systems offer robust security features for data protection.
Dependency on Engineers: Manual migration will need large involvement of experts. Absences or departures can disrupt workflow, making collaboration challenging and hindering data sharing among departments. It can also prove more expensive.
Inaccessibility: The data produced from manual migration lacks readability. Kafka saves the imported data in memory logs. To access this data, a new Kafka consumer program needs to be developed.
Streamlining: During manual migration, data is loaded line by line into the Kafka Topic, making it challenging to discern column details from column data. This problem is circumvented when using a third-party tool like BryteFlow for data migration. Below you can view the contrast between JSON-formatted data loaded by BryteFlow versus data produced by the manual method.
Output from the Manual Method: Each row of data is directly loaded into the topic without differentiation.
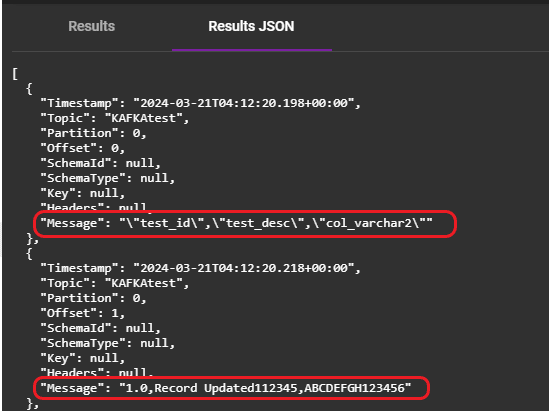
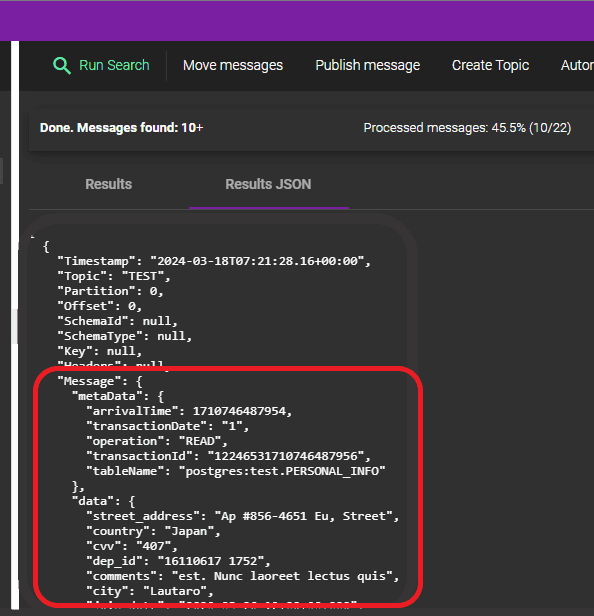
Output generated by BryteFlow: The output produced by BryteFlow delineates each column by its name and corresponding data. Additionally, it provides comprehensive information about tables, including their names, source database, and source schema.
2. Using BryteFlow as a Postgres Kafka Connector to CDC Data
Think of BryteFlow as a PostgreSQL Kafka Connector, facilitating seamless real-time data streaming from PostgreSQL Server to Kafka through Change Data Capture (CDC). This solution streamlines the transfer of PostgreSQL Server data to Kafka without requiring coding, ensuring full automation. With BryteFlow’s CDC functionality, all changes from the PostgreSQL Server database are transmitted to Kafka in real-time while minimizing impact on the source systems.
Setting up the PostgreSQL to Kafka CDC pipeline with BryteFlow Ingest is straightforward. Users can configure the source endpoint, select desired tables for replication, set up the destination endpoint, and specify a replication schedule. The process of establishing a PostgreSQL to Kafka CDC connector is effortlessly accomplished through an intuitive point-and-click interface.
Setting up BryteFlow as a PostgreSQL Kafka Connector
To configure the connection to the source database in PostgreSQL within BryteFlow Ingest, follow these steps:
Step 1. Download and Install BryteFlow Ingest, then proceed with Login and Configure source database.
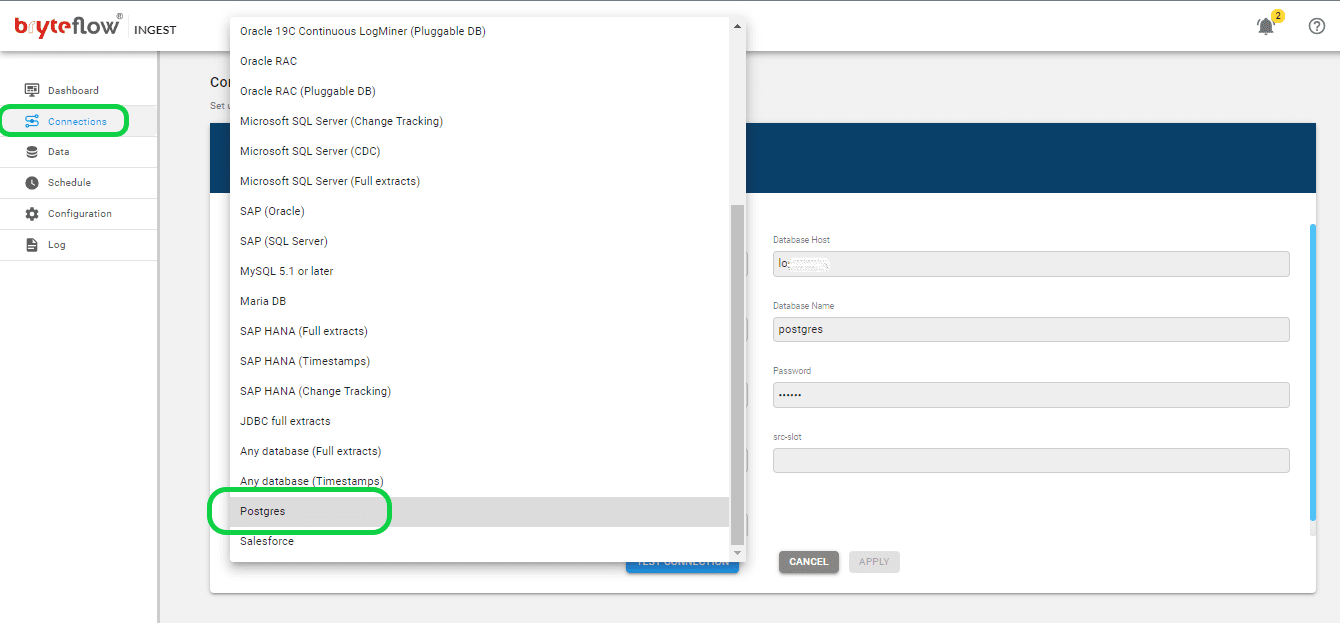
Obtain the software either directly from the BryteFlow team or by download it from the Amazon Marketplace. Once acquired, install the software. Upon completion of installation, log in and access the “Connections” tab on the left-hand side panel. Select the “Source Database” option, then follow the provided steps to configure your source database.
- Select Postgres as the Database Type from the available options.
- Fill in the Postgres Host Details in the Database Host field.
- Specify the Port Details in the Database Port field.
- Enter the Database Details in the Database Name field.
- Input the User Id used for Database connection into the User Id field.
- Provide the User password associated with the User Id for Database connection in the Password field.
Once you’ve entered all the required information, confirm the application’s connection by selecting ‘Test Connection’. A successful test is essential before proceeding with the replication process.
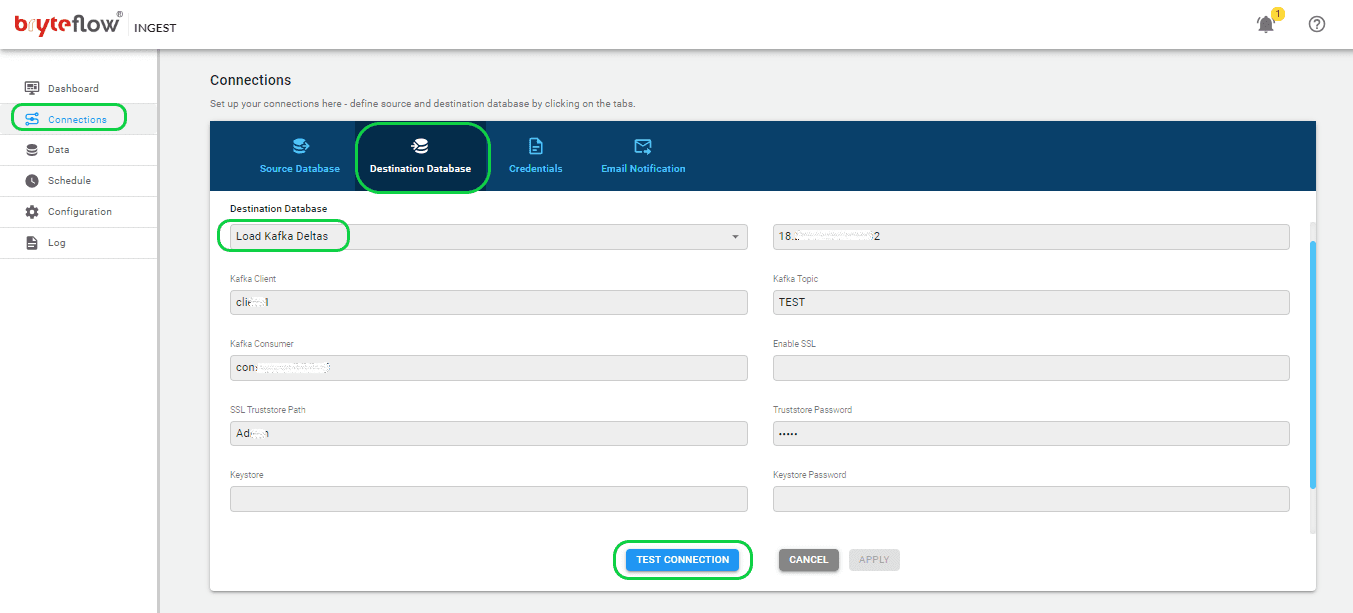
Step 2: Set up the destination Kafka database.
Access the “Connections” menu and select the “Destination Database.” Follow the steps below to establish a connection to your Kafka destination database. BryteFlow supports Kafka Message Keys and Partitioning, allowing for parallel consumption of messages, with each JSON message containing a ‘key’. By default, BryteFlow Ingest places messages into a Kafka Topic in JSON format, ensuring a minimum message size of 4096 bytes.
- Choose “Load to Kafka Deltas” from the dropdown menu in the Database Type section.
- Provide the necessary Kafka Broker information in the designated area.
- Enter the Kafka Client details in the appropriate section.
- Specify the particulars of the Kafka Topic in the dedicated area.
- Fill out the information for your Kafka Consumer in the provided field.
- Adjust the SSL configuration by enabling or disabling the “Enable SSL” option.
- Enter the SSL Truststore path details in the corresponding section.
- Input your password in the designated field labeled “Truststore Password.”
- Include Keystore details under the respective section.
- Enter your password in the designated “Keystore Password” field.
- Provide your password again in the “Key Password” field.
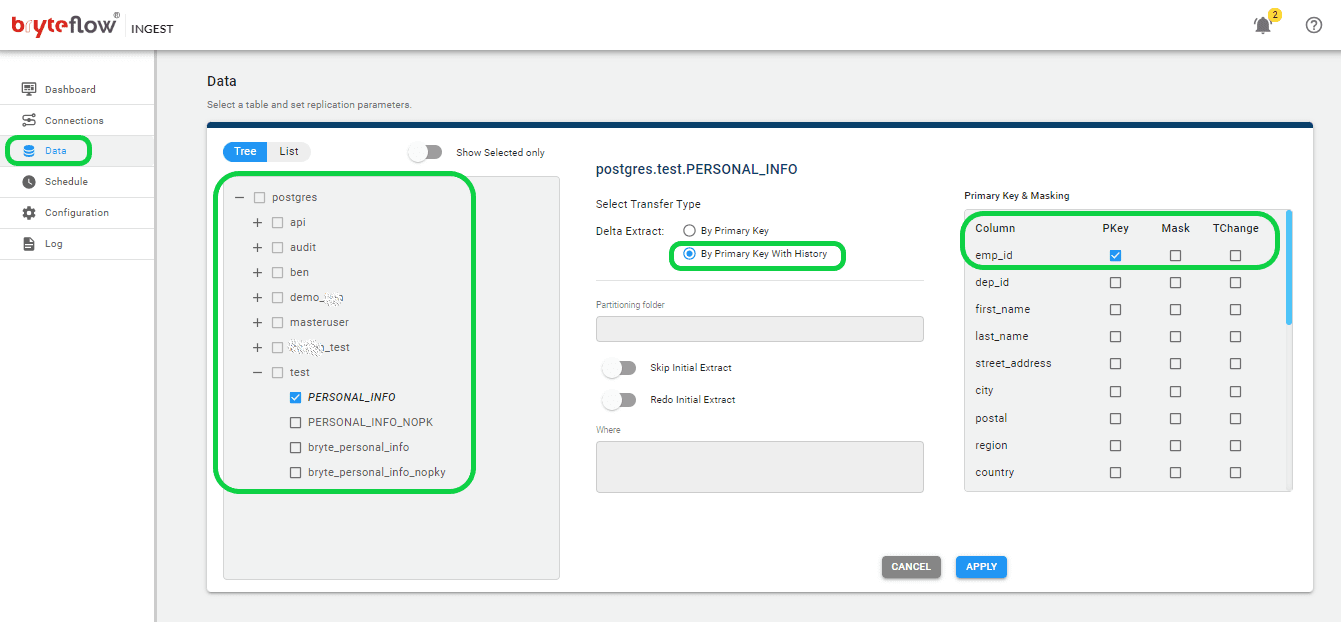
Step 3: Determine the tables to be replicated from Postgres to Kafka.
To select the table(s) for migration to the Kafka destination database, follow these instructions:
- Go to the “Data” tab and expand the database to set up the source table(s) for replication.
- Find and choose the desired table you wish to synchronize.
- Check the box next to the table name and proceed by clicking on the table.
- In the pane on the right-hand side, specify the transfer method for the table, selecting either “By Primary Key” or “By Primary Key with History.” The former duplicates the table exactly to the destination, while the latter captures changes as time series data with SCD Type 2 history, offering a point-in-time perspective.
- Identify the Primary Key column by checking its box next to the column name.
- Optionally, exclude a column from the transfer to the destination by checking its box.
- Specify any necessary data type conversions for columns by checking the ‘TChange’ box against those columns.
- Confirm and save the configuration details by clicking the ‘Apply’ button.
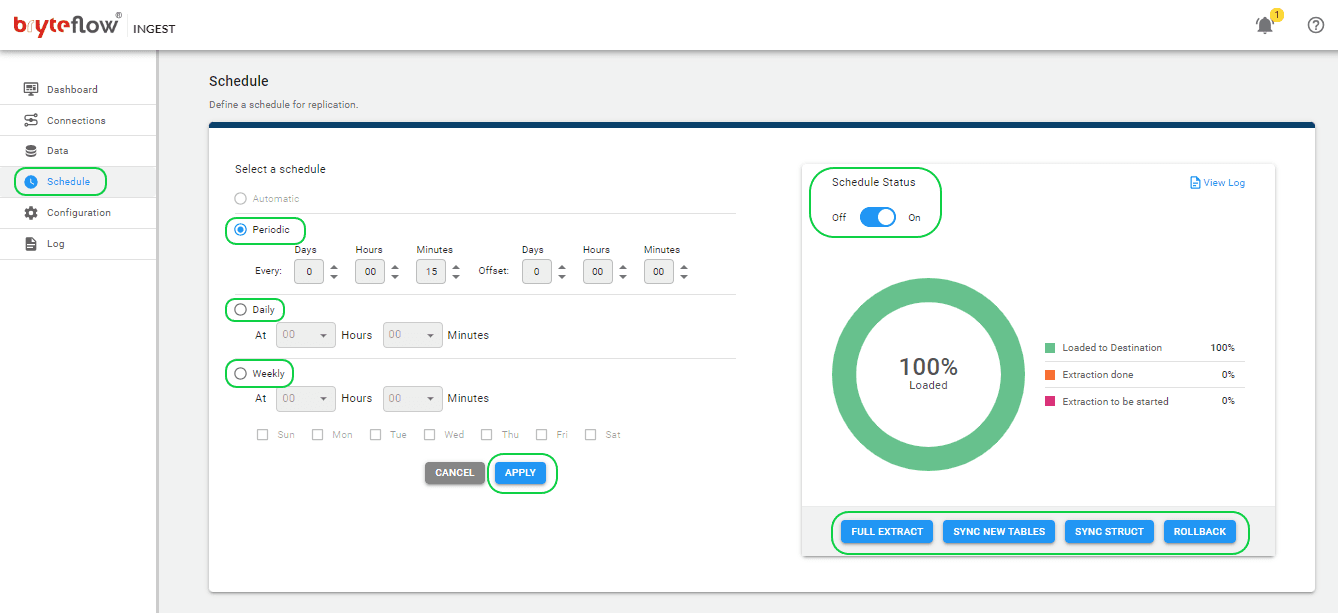
Step 4: Define the Postgres Kafka replication schedule.
Access the scheduling page to guarantee a smooth transfer of your data from the source to the destination with minimal delay. Set up a recurring schedule for the data pipeline by adjusting the interval in the ‘Schedule’ section. This interval can be as brief as a second or you can define daily extraction at specified times, by selecting the desired hour and minute from the drop-down menu. Choose from options such as “Periodic,” “Daily,” and “Weekly.”
When configuring the replication, select “Full Extract” for the initial load, “Sync New Tables” to incorporate new tables after replication activation, “Sync Struct” to replicate structural changes in existing tables, and “Rollback” to revert to a previous successful run, particularly useful in case of replication interruptions due to outages. For example, decide to replicate every 15 minutes after the full extract, ensuring that new data is loaded every 15 minutes. Start the replication process by clicking on “Full Extract” for the initial load.
Step 5: Monitor your Postgres Kafka data replication.
Effortlessly track your tasks with the user-friendly BryteFlow Ingest dashboard. This dashboard provides comprehensive insight into BryteFlow Ingest operations, including information such as the total count of records and loaded tables, live updates on current loading processes, replication frequency, and connection statuses. Moreover, accessing support is made simple with the “HELP” option situated in the top right corner of the dashboard.
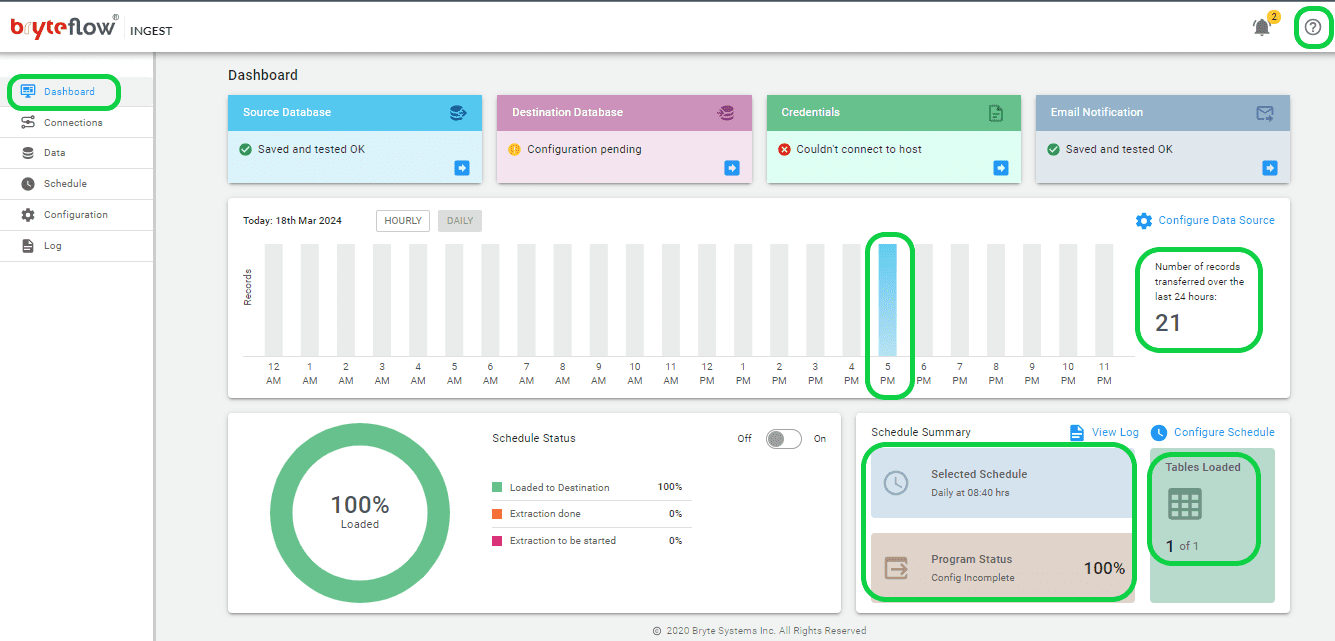
Now you can monitor the progress through the log, which offers up-to-date information on the replication process, such as extraction or loading statuses, the quantity of records loaded, and any errors encountered.
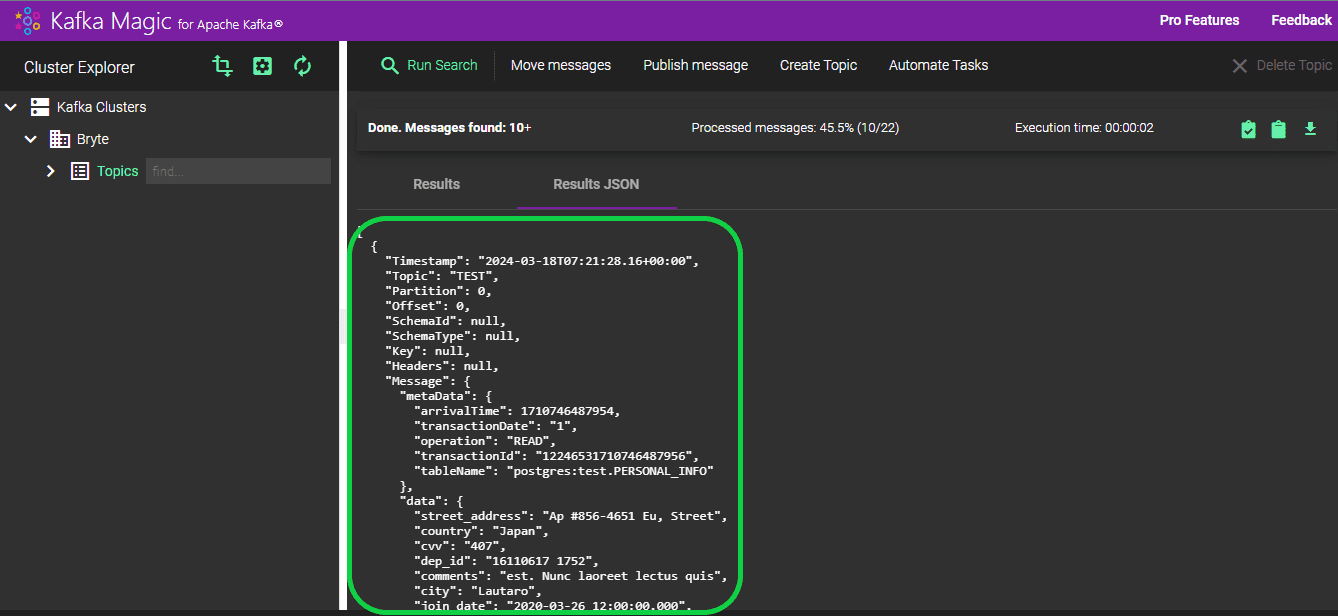
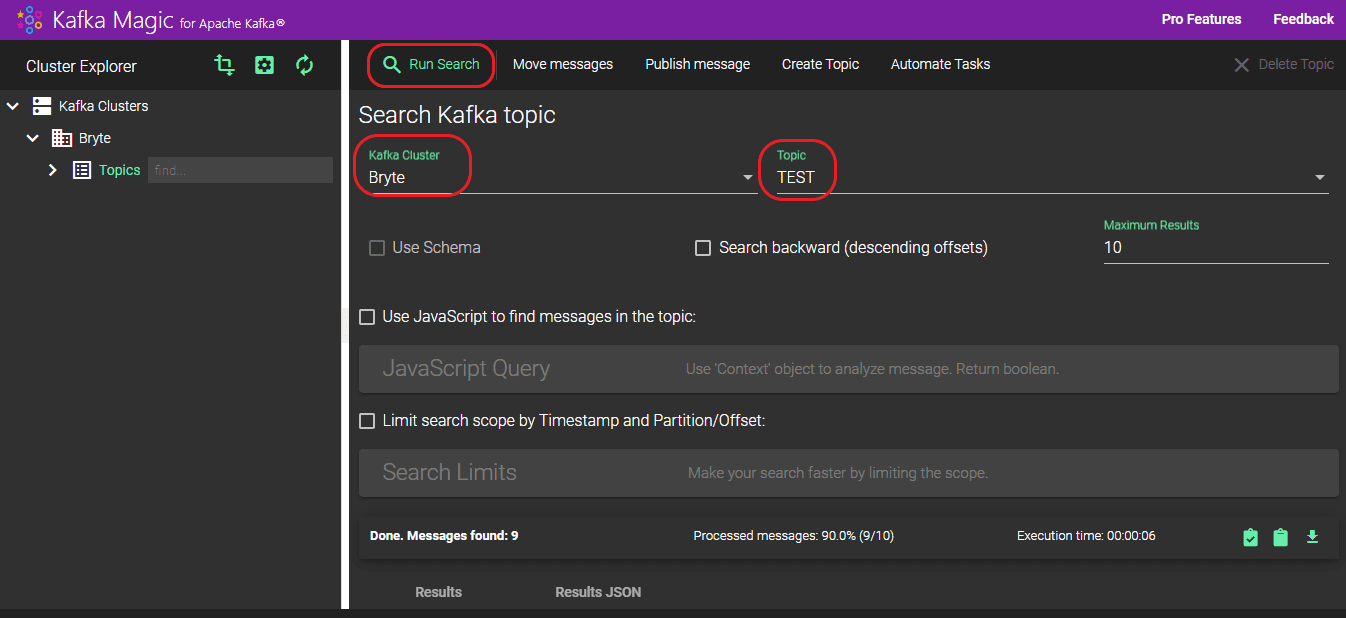
Step 6: Confirm the Data loaded from Postgres DB in Kafka
To ensure the data in Kafka has been successfully loaded, proceed with the following steps:
- Log in to Kafka Magic to access the platform.
- Go to the “Kafka Cluster” section and select your cluster from the dropdown menu.
- Choose your preferred topic from the options available in the “Topic” dropdown.
- Initiate the search process by clicking the “Run Search” button.

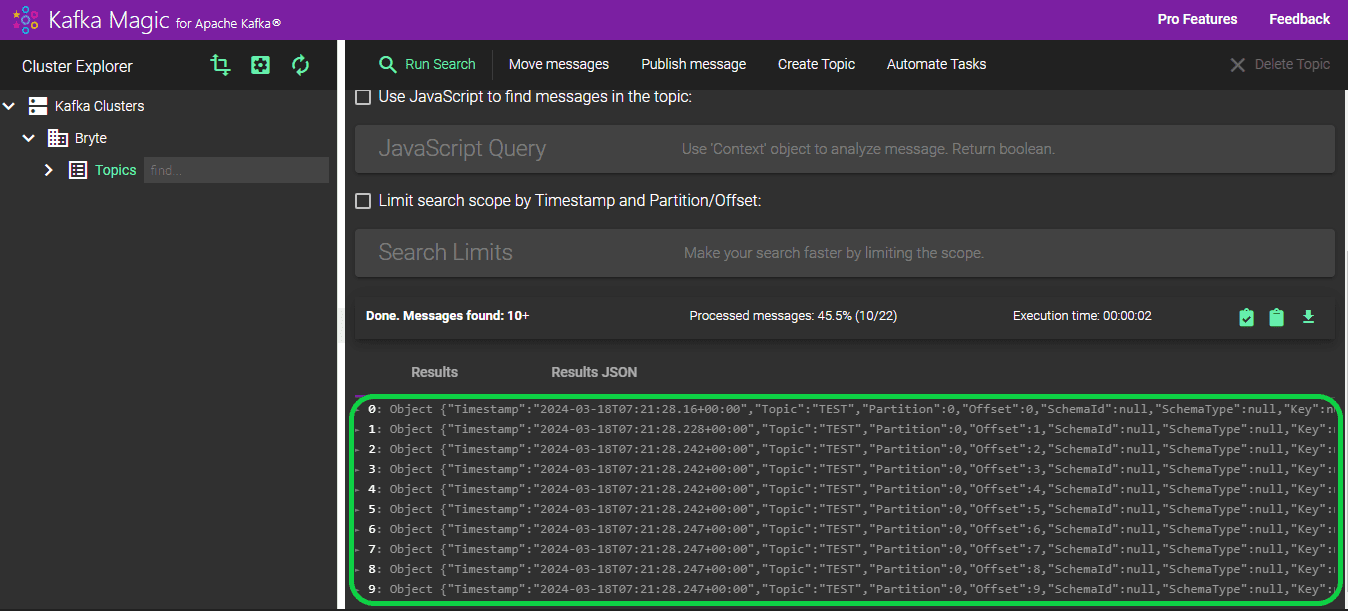
The loaded records are accessible in the “Results” section. In total, 9 records were loaded, and all 9 were successfully transferred to the “TEST” topic.
You can also access the information of the imported data in JSON format by choosing “RESULTS JSON”.
BryteFlow as a No-Code CDC Connector for Postgres to Kafka
BryteFlow is a no-code software designed for real-time data replication to both Cloud and on-premise destinations. It employs automated log-based Change Data Capture (CDC) to replicate data from various transactional databases such as SAP, Oracle, SQL Server, MySQL and PostgreSQL to popular platforms like Amazon S3, Redshift, Azure Data Lake 2, Azure Synapse, SQL Server, BigQuery, PostgreSQL, Snowflake, Teradata, Databricks, SingleStore and Kafka in real-time, providing ready to use data on the destination.
With a user-friendly graphical interface, BryteFlow delivers ready-to-use data at the destination, offering self-service capabilities and seamless support for transferring extensive data volumes. A standout feature of BryteFlow Ingest is its robust enterprise-grade replication, capable of transferring petabytes of data within minutes – 1,000,000 rows in just 30 seconds approximately. You can deploy BryteFlow in just a couple of hours, and it ensures rapid data delivery within 2 weeks, a much shorter timeframe compared to competitors that often take months to accomplish the task. How BryteFlow Works
Key Features of BryteFlow for PostgreSQL CDC to Kafka
- BryteFlow is a no-code CDC replication tool and automates every process including data extraction, Change Data Capture, merging, masking, mapping, schema and table creation, and SCD-Type2 history.
- Effortlessly executes ELT operations on Snowflake, S3, Redshift, and PostgreSQL in real-time, without coding, with seamless data transformation managed by BryteFlow Blend.
- Features an intuitive visual interface and delivers ready-to-use data with out-of-the-box data type conversions (e.g. Parquet-snappy, ORC). Successful Data Ingestion (What You Need to Know)
- BryteFlow XL Ingest efficiently handles massive data volumes for initial full refreshes of heavy datasets with multi-threaded parallel loading, configurable partitioning, and compression.
- BryteFlow Ingest loads incremental data and deltas, merging updates, deletes, and inserts seamlessly with existing data. Besides Postgres, it also delivers data from SAP to Kafka, Oracle to Kafka, and SQL Server to Kafka.
- BryteFlow has very high throughput, (6x faster than GoldenGate), processing approximately 1,000,000 rows in just 30 seconds.
- Delivers pre-processed data on various cloud platforms including Amazon S3, Redshift, Azure Data Lake 2, Azure Synapse, SQL Server, BigQuery, PostgreSQL, Snowflake, Teradata, Databricks, SingleStore and Kafka in real-time following best practices for the destination.
- BryteFlow TruData enables automated data reconciliation for verifying data completeness, enhancing overall data quality.
- Offers high resilience with Automated Network Catch-up in case of power or network outages for uninterrupted operation.
- BryteFlow ControlRoom serves as a centralized monitoring center, providing status updates for each ingest and transform instance.
Conclusion
This blog has discussed Postgres and Kafka, their features, and benefits, and two different methods to replicate data from Postgres to Kafka – a manual method and an automated one with BryteFlow. The drawbacks of the manual approach have also been discussed. The blog also presented BryteFlow’s no-code CDC and other awesome features that help deliver high-volume enterprise data from Postgres to Kafka in real-time.
If you want to see how BryteFlow can enable real-time replication using CDC from Postgres to Kafka, and from other relational databases and sources, contact us for a demo