So, you want to migrate data from Oracle to Redshift? In this blog we discuss why Oracle to Redshift migration might be a good idea, its many benefits and challenges. We also show you 2 methods to move your data – first being a manual method and the second a fully automated one using Change Data Capture with BryteFlow.
Quick Links
- About Oracle Database
- About Amazon Redshift
- Why move data from Oracle to Redshift – Some Benefits
- Oracle to Redshift Migration Challenges
- Data-type mappings between Oracle Source to Amazon Redshift Target
- Oracle to AWS Redshift – Migration Phases
- 2 Different methods to move data from Oracle to Redshift
- BryteFlow as an Oracle to Redshift Migration Tool
About Oracle Database
Oracle DB is one of those databases which seems to have been around forever but keeps reinventing itself with new features frequently. It has a long history of over 35 years of development behind it. Oracle Database is a Relational Database Management System or RDBMS at heart. Its basic premise is to move data into a database, store the data, and retrieve it when required so that applications can use it. Today Oracle DB is a powerful ORDBMS (Object-Relational Database Management System) evolved from the RDBMS model and implements object-oriented features like user-defined types, polymorphism and inheritance, and enables users to store complex business models in a relational database. With these unique features Oracle is a favorite of large enterprises. BryteFlow Replication for Oracle DB
Oracle Database stores data in interlinked tables and columns and maintains relationships between data objects. Besides storing and retrieving data, Oracle DB is used for online transaction processing (OLTP), Data Warehousing (DW) and running mixed database workloads (combination of OLTP and DW). The latest version, Oracle Database 19c, supports multiple data types and workloads with real-time analytics, and you don’t need separate databases for different data forms. It serves as a unified data hub that simplifies data governance, data management, and access. Oracle CDC (Change Data Capture): 13 things to know
Oracle RDBMS can be run on-premise or in the Cloud and is compatible with most operating systems including Windows and macOS. It is available in five editions: Enterprise, Personal, Standard, Express, and Lite. Oracle is based on SQL language, which makes it easy for developers to work with, and its PL/SQL (a procedural extension to Oracle SQL) allows you to work with all Oracle Database SQL statements, functions, and data types. PL/SQL can be used to manage the flow of a SQL program, use variables, and write error-handling procedures. No wonder so many organizations, including most of the Fortune 500 and Global 500 use Oracle DB! Oracle to SQL Server Migration: Reasons, Challenges and Tools
About Amazon Redshift
Amazon Redshift is a fully managed data warehouse owned by AWS (Amazon Web Services). Redshift is known for its ease in crunching petabytes of data for analytics and allows for seamless scaling from hundreds of gigabytes to over a petabyte, using machine learning to analyze queries, delivering valuable business insights fast. The Redshift database is ideal for enterprises that have humongous volumes of data and is a columnar OLAP (Online Analytical Processing) database based on Postgres version 8.0.2. This enables querying on Redshift using simple SQL. Also, Redshift integrates easily with popular business intelligence tools, adding to its usability. Data Integration on Redshift
Amazon Redshift provides lightning-fast querying because of its MPP (Massively Parallel Processing) architecture. MPP enables many computer processors to process data in parallel. Sometimes processors can be found across multiple servers and can work together to deliver results. The fast delivery of queries even on huge databases is what makes Redshift a must-have for large enterprises. For cost-effective storage and staging of data for Amazon Redshift, you can use Amazon S3 (Simple Storage Service). You can query and combine exabytes of data with standard SQL and save the query results to the S3 data lake. Note: With BryteFlow you can query data within your S3 data lake without needing to take it to Redshift, either by using Amazon Athena for ad hoc queries or Redshift Spectrum. Of course BryteFlow can also integrate and combine data from multiple sources and transform it on Redshift, enabling you to have consumption-ready data on target. Why Your DBA Will Love Oracle Autonomous Data Warehouse
Why move data from Oracle to Redshift – Some Benefits
The reasons for moving Oracle to Redshift can be many. Perhaps you would like to pay less for your data storage and retrieval, get new functionalities or use the latest technologies. Possibly you could have outgrown your current platform. We outline here some concrete benefits of moving from Oracle database to Redshift. Also check out Oracle to Postgres Migration (The Whys & Hows)
Redshift is highly scalable unlike Oracle which may be limited by underlying infrastructure
Redshift is a columnar database and has unlimited scaling with a shared-nothing approach -it can handle large data volumes seamlessly. You can add or remove nodes on Redshift easily to cater to changing workloads. Oracle’s scalability, however, could be limited by the hardware capacity it runs on. Oracle DB has horizontal scaling – physical infrastructure needs to be purchased to handle increased workloads. It uses a shared everything approach to scaling. Oracle Replication in Real-Time Step by Step
Redshift may prove a more cost-effective option than Oracle for data warehousing
Amazon Redshift separates compute and storage and can scale up both as required. It has a pay-as-you-go policy where you pay only for the resources you use, in contrast to Oracle which may require users to buy expensive licenses and hardware, making it a more expensive proposition. Amazon Redshift proves even more economically viable when you opt for low-cost storage on Amazon S3 and move only data you need for analytics to Redshift. Compare AWS DMS to BryteFlow for migration
Amazon Redshift delivers better query performance than Oracle
Amazon Redshift with MPP (Massively Parallel Processing) is optimized for executing queries fast and executing data analytics at scale. Oracle database, however, is an RDBMS that runs different workloads including Data Warehousing, Transaction Processing, JSON Database etc. Oracle may find it challenging to handle very large volumes of data and complex queries without necessary optimization and tuning. Data Integration on Redshift
Redshift provides a very high level of security
Redshift prioritizes security, essential for regulatory compliance like GDPR. Its features include encryption, network isolation, and data masking, ensuring data safety and trust. Redshift supports SSL connections for SQL queries. AWS’s scale enables continuous monitoring and security deployment. Redshift’s security features, including IAM, RBAC, encryption, and SSL, complement AWS’s security layers. Redshift holds certifications like HIPAA, SOC2 Type II, FedRAMP, and PCI. SingleStore DB – Real-Time Analytics Made Easy
It’s easier to combine data from multiple sources on Redshift rather than Oracle
If you are running some complicated queries and need to combine data from multiple sources and subject it to analytics, you may find Amazon Redshift a more viable option than Oracle. Integrating data sources with Redshift involves installing SQL client tools, supported by Amazon’s Python, JDBC, and ODBC drivers. You can also choose from a wide range of third-party partners (like BryteFlow) to move and integrate your data, in case you want to avoid the limitations of AWS DMS. BryteFlow uses log-based CDC to keep your data on Redshift in sync with source. Oracle to SQL Server Migration: Reasons, Challenges and Tools
Redshift is good for historical data analysis unlike Oracle DB
You can overcome Oracle DB’s limitations on historical data by using Redshift for long-term data retention and trend analysis over time. Oracle to Snowflake: Everything You Need to Know
Redshift makes for a faster, user-friendly querying experience than Oracle
Amazon Redshift offers a user-friendly querying experience with a language akin to PostgreSQL, making it accessible to those familiar with SQL. You can connect to Redshift clusters via JDBC and ODBC, using your preferred query tools. The Redshift console makes it easy to execute queries and manage data. Also, it is compatible with most popular business intelligence tools. AWS ETL with BryteFlow
Amazon Redshift automates maintenance tasks, Oracle needs expert help
Amazon Redshift simplifies and automates the everyday tasks of data backups, monitoring, software upgrades, failover, tuning, patching etc. so no manual intervention is needed for these tasks, Oracle however may require DBA involvement and manual effort to carry out these routine tasks.
Using Redshift enables new Machine Learning use cases for Analytics data
If you have the need to create, train and apply machine learning models, Amazon Redshift ML makes it simple to do so. Data analysts and engineers can use familiar SQL commands to generate ML models by using Amazon SageMaker within Redshift, without having to learn new languages and tools. The ML models can then be effectively used for predictive analytics, customer segmentation and other advanced data science applications. Amazon SageMaker is a fully managed machine learning service and part of the AWS ecosystem. SingleStore DB – Real-Time Analytics Made Easy
Oracle to Redshift Migration Challenges
Migrating Oracle to Redshift needs to be a carefully thought out and planned process, considering your overall quantum of data, objective of the migration, how you will store your data, and who are the end users. You also need to share information and objectives with all stakeholders, IT team and business users, conduct thorough testing at each stage, collaborate closely with the people involved, and use the right tools and approach to make it a successful migration. Here are some challenges you may encounter while migrating from Oracle to Amazon Redshift.
Oracle and Redshift have differences in syntax and schema
Oracle and Redshift have schema and syntax differences which you need to consider while migrating data. Redshift uses a SQL dialect based on Postgres and this is different from SQL used in Oracle. Schema and queries need to be adapted to work with Redshift syntax which involves additional effort. Oracle Replication in Real Time, Step by Step
Query optimization for Redshift needs different techniques from Oracle
Redshift with its share-nothing columnar database and MPP architecture, needs different query optimization techniques as compared to Oracle which shares storage and stores data in rows. Redshift has been created for query and bulk insert operations, so you can optimize queries by structuring data so that less data is moved between nodes in join operations or less data is read from disk in table scans. Here selecting the right data sortkeys and distkeys is important to optimize performance. Any query should always include both the distribution keys and the sort keys. The inclusion of the keys may seem redundant, but it enables the user to access the tables in an efficient manner. How to Select the Right Data Replication Software
Not all Oracle Database features will be available in Redshift
Some features of Oracle DB are not available in Redshift. These include Tablespaces, Indexes, Partitions, Constraints like Check and Primary, Unique, Foreign Key, Spatial (Locator) functionality, Sequences (an AUTO NUMBER column type is available), MERGE (needs to be coded as UPDATE and INSERT in two steps), In-database PL/SQL-like language (Triggers, User Defined Functions, Procedures), Timestamps (with time zone), XML types, Pseudo columns, Timestamps (with timezone), Multiple SQL functions (for e.g. Regular expressions, Regression functions, SUBSTR, TRANSLATE, ROW_NUMBER, TO_TIMESTAMP Within Redshift you can write custom functions (Python UDFs) but this will take up sizeable effort and time if you were using a lot of functions in Oracle. Learn more
Transaction processing is not Redshift’s game unlike Oracle
If you need to have some element of transaction processing in Redshift, be warned that Redshift is not really up to it. It is an OLAP database and excellent at aggregated queries but cannot handle OLTP loads like Oracle can. Do not plan to host a UI for this on top of Redshift. Oracle to Snowflake: Everything You Need to Know
Training and Skilling could be on the cards when you move from Oracle to Redshift
Oracle and Redshift being two very different beasts, you will need your DBAs and engineers familiar with Oracle, to learn skills and technical knowledge to deal with the migration to Redshift. The two platforms have very different architectures, schema and syntax. This is an investment you will have to make. Why Your DBA Will Love Oracle Autonomous Data Warehouse
Data-type mappings between Oracle Source to Amazon Redshift Target
The table below provides the recommended data type mappings for configuring data replication from an Oracle source to an Amazon Redshift target.
| Oracle Source Datatype | Amazon Redshift Target Data Type |
| BINARY_DOUBLE | NUMERIC(37,15) |
| BINARY_FLOAT | NUMERIC(37,15) |
| CHAR(n) | VARCHAR(n’) n’ = (n + SrcMinCharsetSize – 1) / SrcMinCharsetSize x TgtCharsetSize |
| CLOB | VARCHAR(65000) |
| DATE | TIMESTAMP |
| FLOAT | NUMERIC(37,15) |
| LONG | VARCHAR(65000) |
| NCHAR(n) | VARCHAR(n’) n’ = (n + SrcMinCharsetSize – 1) / SrcMinCharsetSize x TgtCharsetSize |
| NCLOB | VARCHAR(65000) |
| NUMBER(p,s) | NUMERIC Mapping condition: p == -1 and s == -1
NUMERIC(38, 0) Mapping condition: p == -1 and s == 0 SMALLINT Mapping condition: p <= 4 and s == 0 INTEGER Mapping condition: p <= 9 and s == 0 BIGINT Mapping condition: p <= 18 and s == 0 NUMERIC(p,s) Mapping condition: p > 18 and s == 0 NUMERIC(p,s) Mapping condition: p != 0 and s != 0 |
| NVARCHAR(n) | VARCHAR(n’) n’ = (n + SrcMinCharsetSize – 1) / SrcMinCharsetSize x TgtCharsetSize |
| NVARCHAR2(n) | VARCHAR(65000) Mapping condition: ((n + SrcMinCharsetSize – 1) / SrcMinCharsetSize x TgtCharsetSize) > 65000
VARCHAR(n’) n’ = (n + SrcMinCharsetSize – 1) / SrcMinCharsetSize x TgtCharsetSize |
| TIMESTAMP(0) | TIMESTAMP |
| TIMESTAMP(1) | TIMESTAMP |
| TIMESTAMP(2) | TIMESTAMP |
| TIMESTAMP(3) | TIMESTAMP |
| TIMESTAMP(4) | TIMESTAMP |
| TIMESTAMP(5) | TIMESTAMP |
| TIMESTAMP(6) | TIMESTAMP |
| TIMESTAMP(7) | TIMESTAMP |
| TIMESTAMP(8) | TIMESTAMP |
| TIMESTAMP(9) | TIMESTAMP |
| VARCHAR(n) | VARCHAR(n’) n’ = (n + SrcMinCharsetSize – 1) / SrcMinCharsetSize x TgtCharsetSize |
| VARCHAR2(n) | VARCHAR(65000) Mapping condition: ((n + SrcMinCharsetSize – 1) / SrcMinCharsetSize x TgtCharsetSize) > 65000VARCHAR(n’) n’ = (n + SrcMinCharsetSize – 1) / SrcMinCharsetSize x TgtCharsetSize |
Oracle to AWS Redshift – Migration Phases
These are the broad steps for migrating from your Oracle DB to Redshift on AWS. The whole process calls for careful planning and execution to ensure data integrity is preserved, and there is minimal disruption to organizational activities. Here is a high-level overview of the process.
Database Assessment and Planning
- Evaluate your existing Oracle database and its dependencies.
- Determine suitable AWS resources, instance types, and storage for Redshift.
- Plan for data migration downtime or use replication to minimize it.
Prepare Your Environment
- Set up an AWS account.
- Create an S3 bucket and configure the Redshift database.
- Establish IAM roles and permissions for DMS.
Network and Security Configuration
- Configure Virtual Private Cloud (VPC) and networking in AWS.
- Ensure connectivity between the on-premise Oracle database and AWS Redshift.
Set Up Your Migration Tool
- Configure your replication method, whether manual or using a third-party tool.
- Define source (Oracle database) and target (AWS S3 bucket or Redshift) endpoints.
- Select a replication method that meets performance requirements.
Data Migration
- Initiate the migration task to copy data from the Oracle database to AWS.
- Monitor the migration’s progress and health.
Post-Migration Optimization
- Optimize the AWS database for performance, scalability, and cost-efficiency.
- Implement high availability and disaster recovery solutions.
Validation and Testing
- Validate the target database to ensure data integrity.
- Test applications to confirm they function correctly with the AWS database.
Cutover and Downtime
- Plan a cutover window to stop writing to the source database and switch to the AWS database.
- Use data replication tools like BryteFlow Ingest to reduce downtime to almost zero.
Monitoring and Maintenance
- Continuously monitor the AWS-hosted database.
- Conduct regular backups, maintenance, and apply security best practices. S3 Security Best Practices
Documentation and Knowledge Transfer
- Document the migration process and configurations.
- Train your team on managing and maintaining the AWS-hosted database.
2 Different methods to move data from Oracle to Redshift
There are several methods for transferring data to your AWS Redshift. You can manually migrate data from Oracle to Redshift, using S3 for staging or you can use automated third-party solutions like BryteFlow. Here are 2 approaches for migrating Oracle data to Redshift. How to Select the Right Data Replication Software
- A Manual method to load data from Oracle to Redshift using S3 for staging. Why you need Snowflake Staging
- An Automated Method using third-party partner BryteFlow to load data from Oracle to Redshift. How BryteFlow Works
1. A Manual method to load data from Oracle to Redshift using S3 for staging
This manual approach outlines how to connect and transfer data from Oracle to S3 and then to Redshift. It involves exporting data from Oracle in CSV format and then importing the CSV files into S3 and then into Redshift. Any IDE tool can be used for exporting the data. In this case we are using DBeaver for both – exporting the CSV file from Oracle and importing it into Redshift.
These are the main steps for manually migrating CSV data from the Oracle Database to temporary storage
1.1 Extract data from Oracle to temporary storage using DBeaver.
1.2 Transfer the data to S3
1.3 Transfer the data from S3 to Redshift.
1.1 Extract data from Oracle to temporary storage using DBeaver.
Use DBeaver to transfer the data to a temporary storage location prior to importing it into S3 or Redshift. Follow the outlined steps to initiate the data export process:
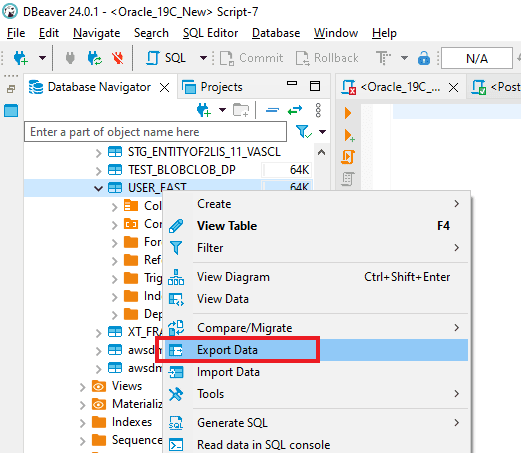
Step 1. Launch DBeaver and establish a connection to the Oracle Database. Expand the database schemas to locate the desired “Table” for migration. Subsequently, initiate the migration process by selecting “Export Data”.
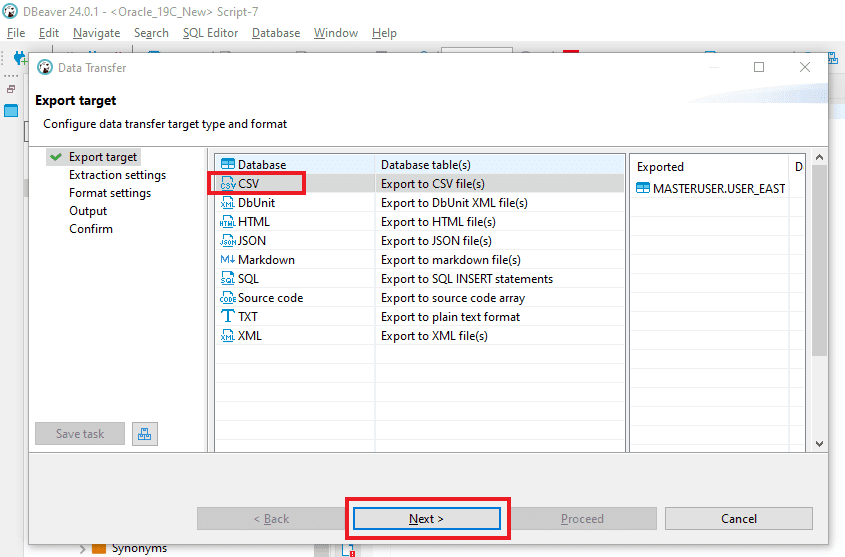
Step 2: Select the “CSV” option from the dropdown menu in the “Export target” window, and then continue by clicking on “Next.”
Step 3: In the “Extraction settings” window, keep the existing configurations unchanged and continue by clicking on “Next.”

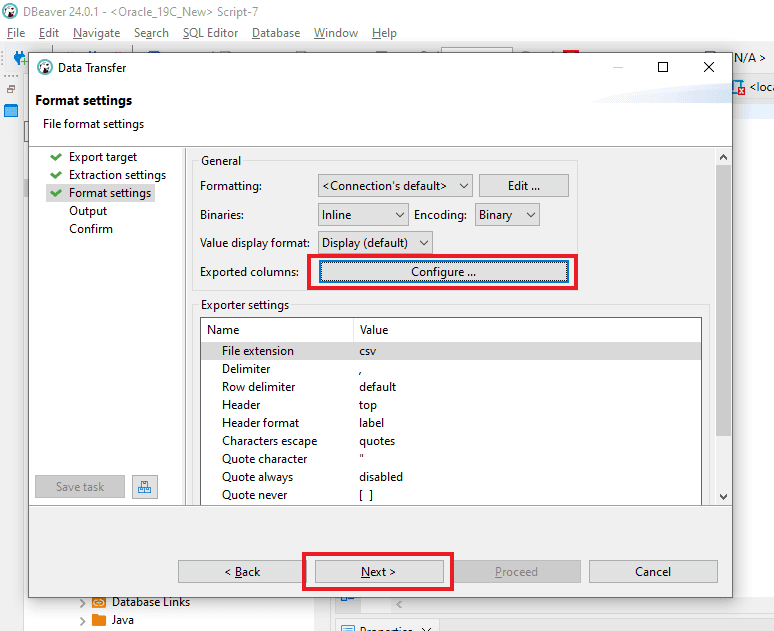
Step 4: In the “Format settings” window, maintain the existing configurations and proceed by clicking on “Next.”
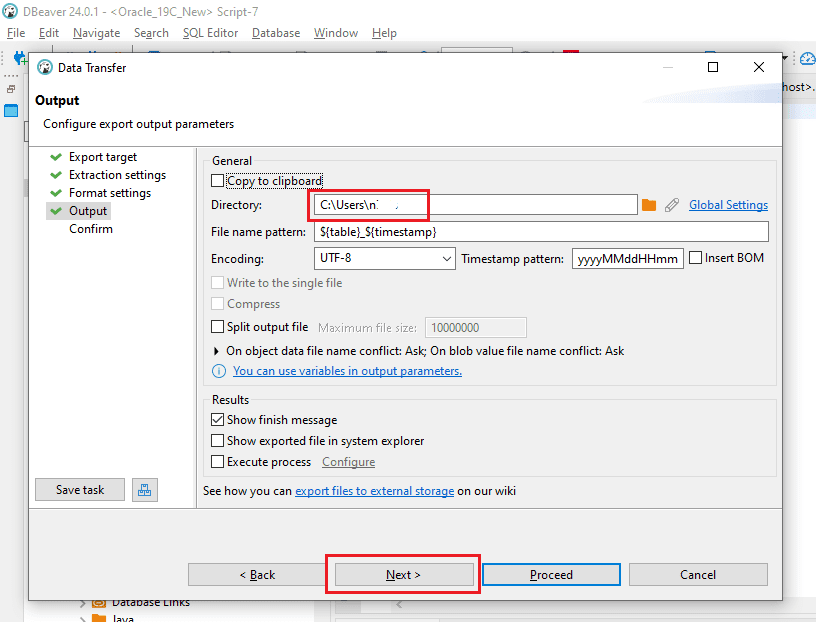
Step 5: In the “Output” segment, indicate the location for the creation of the CSV output file. Maintain the other settings as they are and proceed by selecting “Next.”
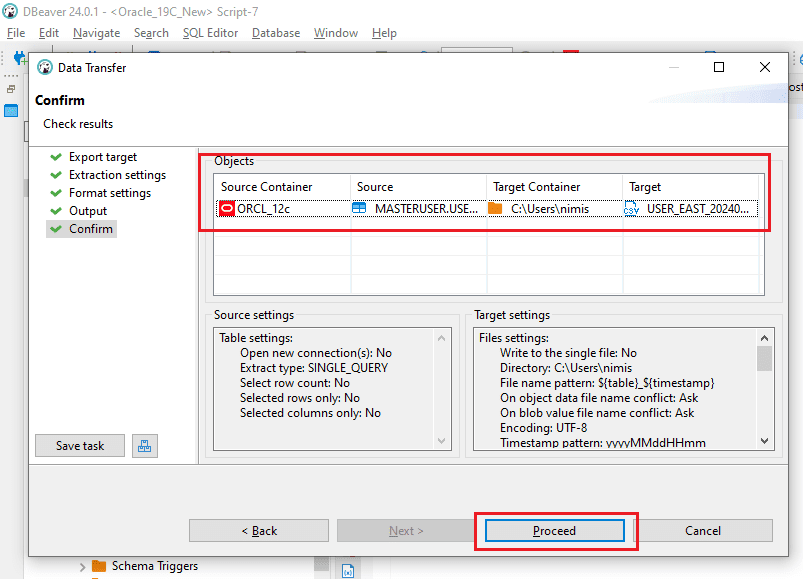
Step 6: In the “Confirmation” window, carefully confirm the details such as the “Source Container,” “Source” (comprising Schema and Table name), “Target location” for CSV file creation, and “File name and type.” Upon verifying all details, select the “Proceed” button to initiate file generation.
Step 7: Check the specified location to ensure the CSV file has been successfully created.

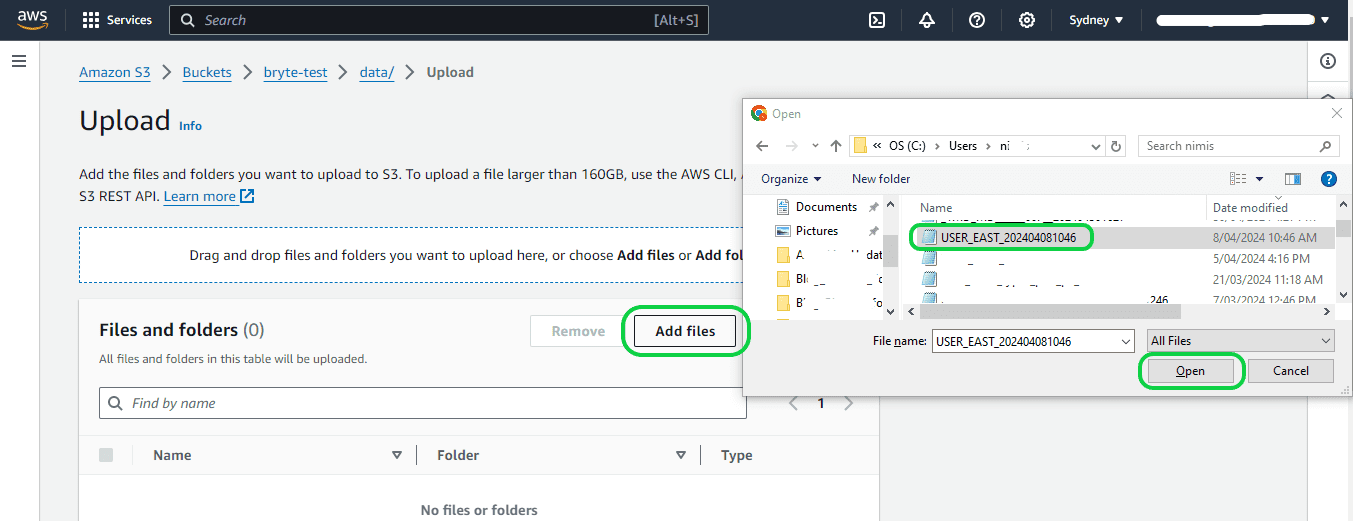
Step 1: Sign in to your AWS account. After logging in, navigate to your S3 bucket. Ensure that you have already created the S3 bucket before proceeding further. To upload the CSV file, access your S3 bucket and select the “Upload” option. This action will direct you to the Upload page, where you can click on “Add files.” Locate the directory where your CSV file is stored and choose the file for upload to the S3 bucket. After selecting the file, select the “Upload” button located in the bottom right corner of the page.
Step 2: The subsequent page will indicate whether the file has been successfully uploaded or not, as follows:

1.3 Transfer the data to Redshift.
Step 1: Launch DBeaver and establish a connection with Redshift. Then, expand your database schemas and select the desired schema by right-clicking. Subsequently, right-click on the schema once more and opt for “Import Data.”

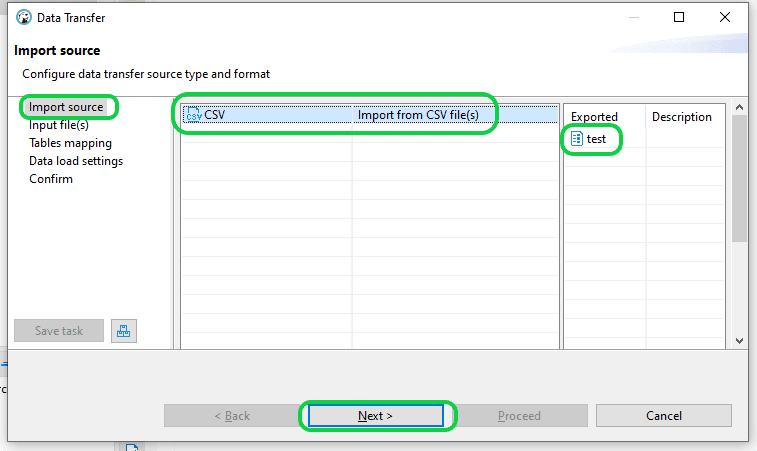
Step 2: Select the “CSV” option from the “Import source” window, then proceed by clicking the “Next” button.
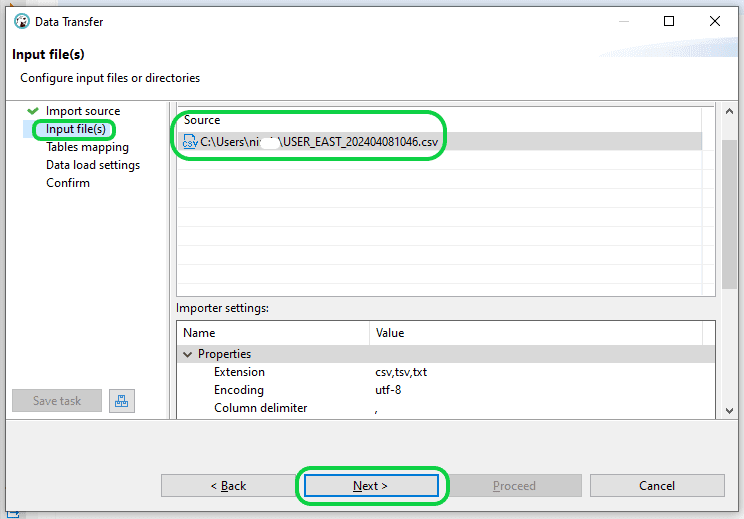
Step 3: In the “Input file(s)” dialogue box, locate the CSV file and select it. Proceed by clicking on “Next”.
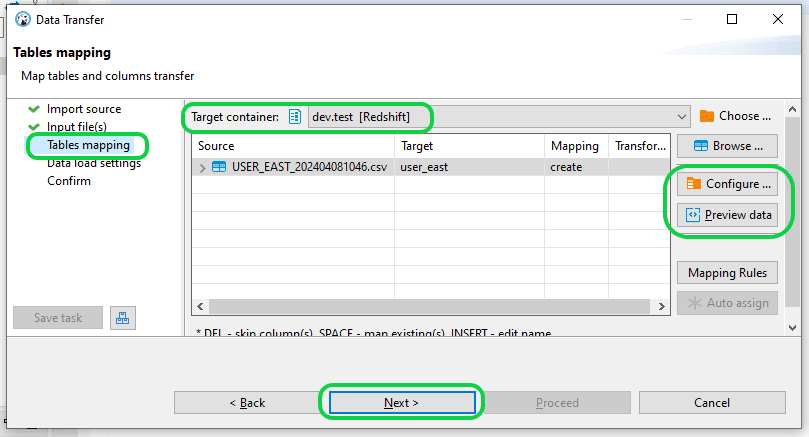
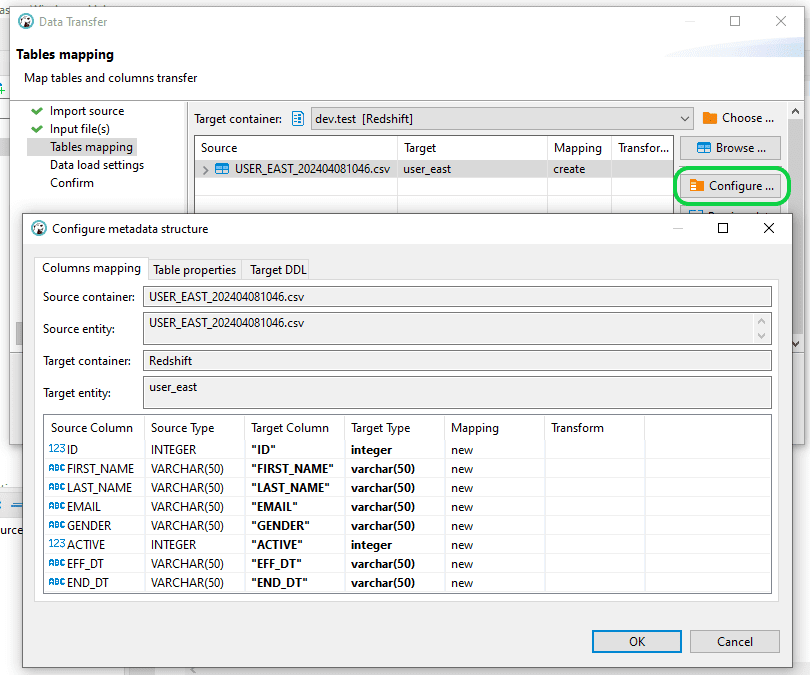
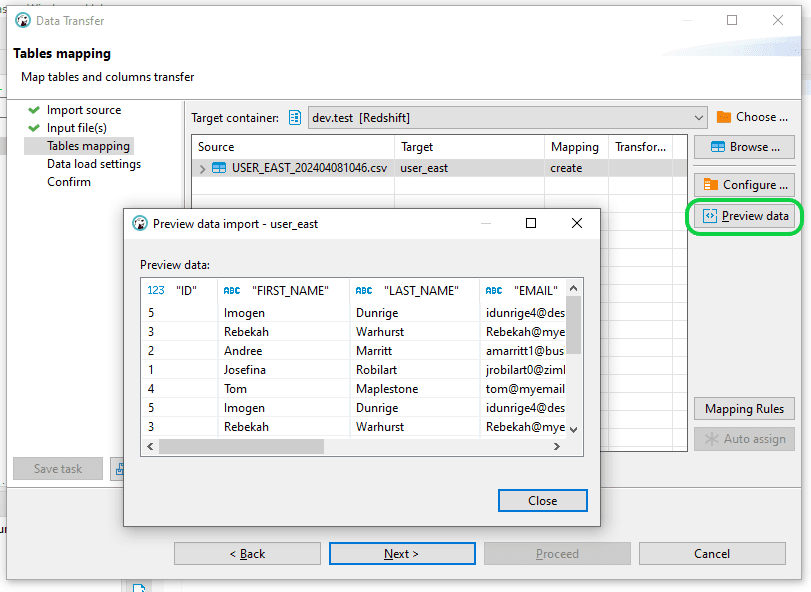
Step 4: In the “Table Mapping” section, you have the option to either “Configure” or “Preview Data” before moving on to the loading phase. When prepared, just click “Next” to continue.
Step 5: Select “Next” in the “Data Load Settings” window. Prior to advancing in the “Confirm” window, double-check the correctness of both the source and source file, along with the target and target table particulars. After confirmation, proceed by selecting “Proceed” to commence the data loading procedure into Redshift.

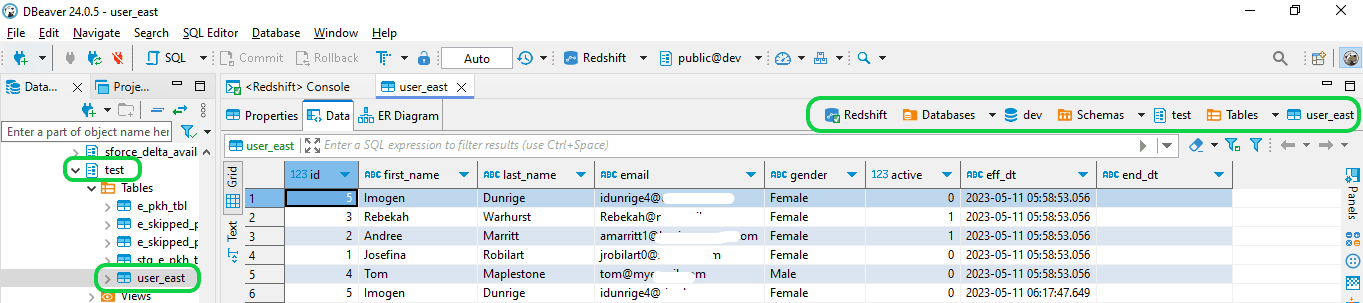
Step 6: Confirm that the data table has been successfully loaded into Redshift.
2. An Automated Method using BryteFlow to load data from Oracle to Redshift using CDC
BryteFlow Ingest has an intuitive interface and simplified process, making data replication from source to target straightforward. With just a few clicks, BryteFlow Ingest automatically manages the tasks involved in moving data with an option to load incremental data and deltas using CDC.
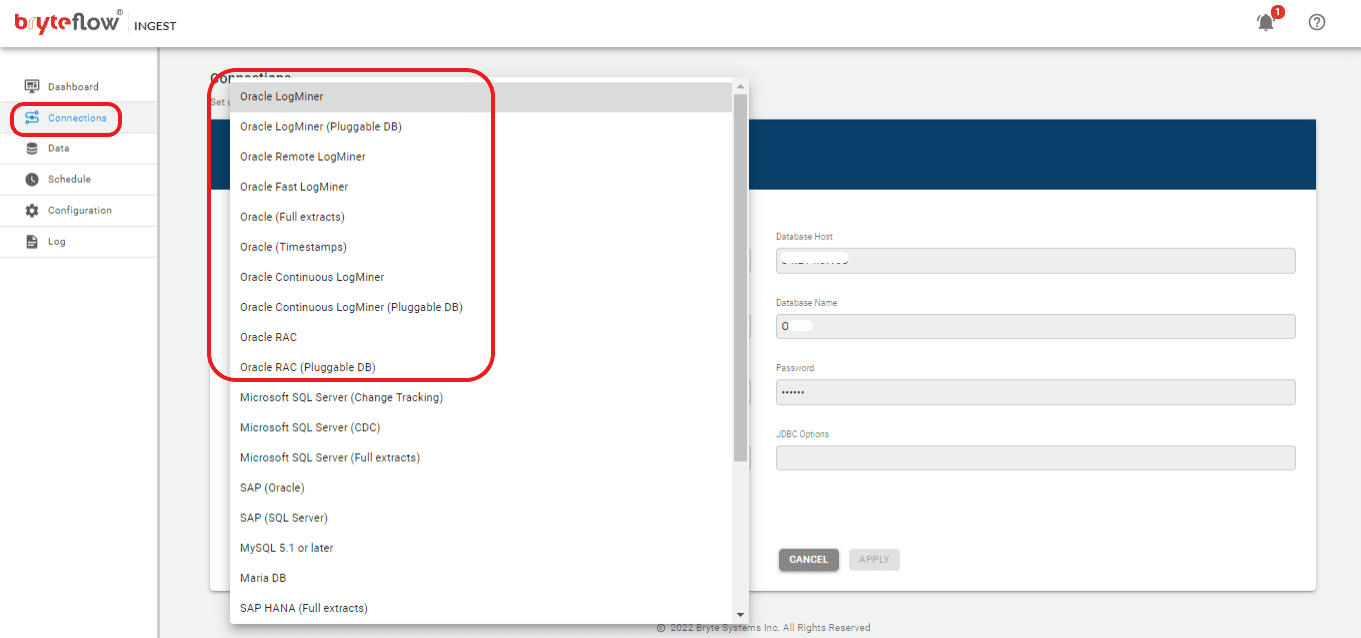
Step 1: Download and Install BryteFlow Ingest. Login and Configure source database.
You have two options for acquiring the software: you can either contact the BryteFlow team or download it from the Amazon Marketplace. Once the software is installed, log in and select the “Connections” tab on the side panel. Select “Source” and follow these steps to configure your source database.
- Select your source data type from the list under “Database Type.”
- Input the Oracle Host Details in the Database Host field.
- Provide the Port Details in the Database Port field.
- Enter the Database Details in the Database Name field.
- Input the User ID used for the Database connection in the User ID field.
- Enter the corresponding User password for the Database connection in the Password field.
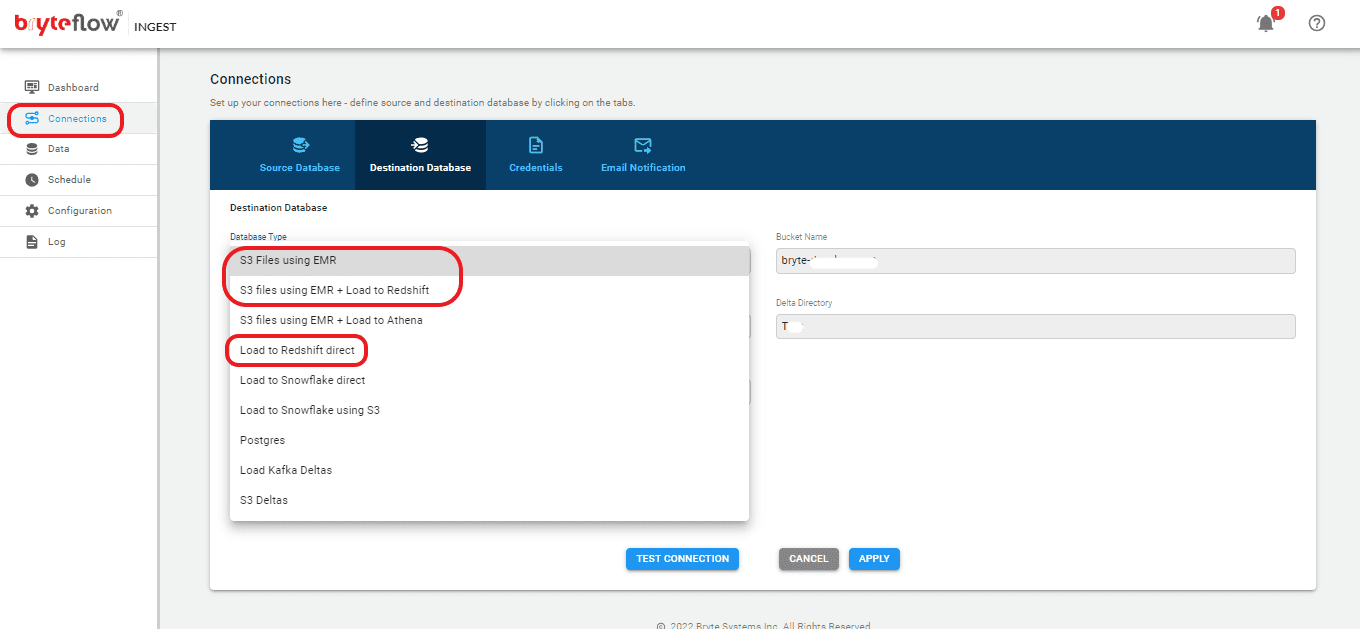
Step 2: Configure destination database.
Follow these steps to establish a connection with your destination database:
- From the “Connections” section, select the “Destination Database” tab.
- Choose your destination database type from the dropdown menu.
- If selecting “Load to Redshift Direct” as the database type, specify the database host details.
- If you need to get data to S3 first, select “S3 Files using EMR” or “S3 Files using EMR + Load to Redshift” as the database type, and input the S3 bucket details.
- Enter the data directory information.
- Provide the database name.
- Input your user ID.
- Enter the corresponding password for the database connection. Note that field requirements may vary depending on the selected source database.
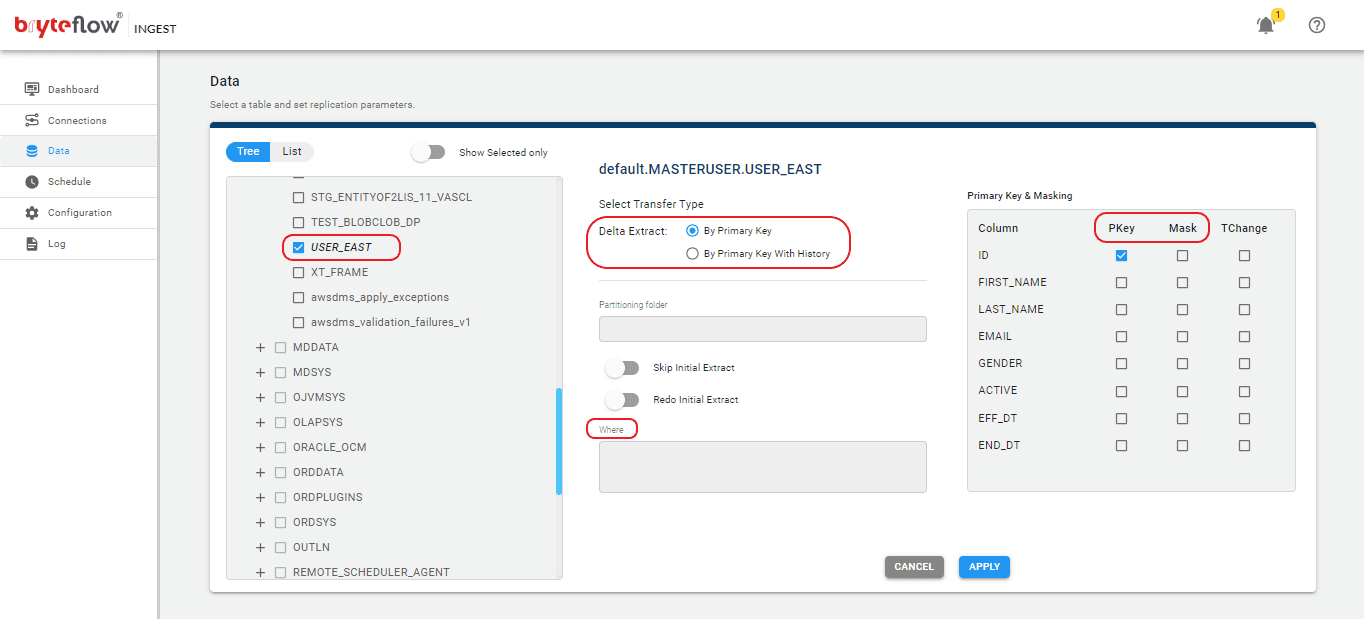
Step 3: Select the tables you want to replicate.
Select the “Data” tab in the left panel to configure the source table(s) for replication. In this section, you will specify the primary key and transfer method for each table. Choosing ‘By Primary Key with History’ will automatically preserve SCD Type2 history. Alternatively, opting for ‘By Primary Key’ will create a duplicate of the source table without historical data. Further, you can use the “Where” functionality to exclude unwanted data, and Byteflow Ingest provides the ability to “mask” sensitive information in columns.
Step 4: Schedule the replication.
Select the “Schedule” tab in the left panel to set up a schedule to load your data. Choose “Full Extract” for the initial load, opt for “Sync New Tables” to integrate new tables after replication activation, select “Sync Struct” to mirror structural modifications in existing tables, and select “Rollback” to revert to a previously successful operation, particularly useful in cases where replication has been interrupted by events like power outages, network failures etc.
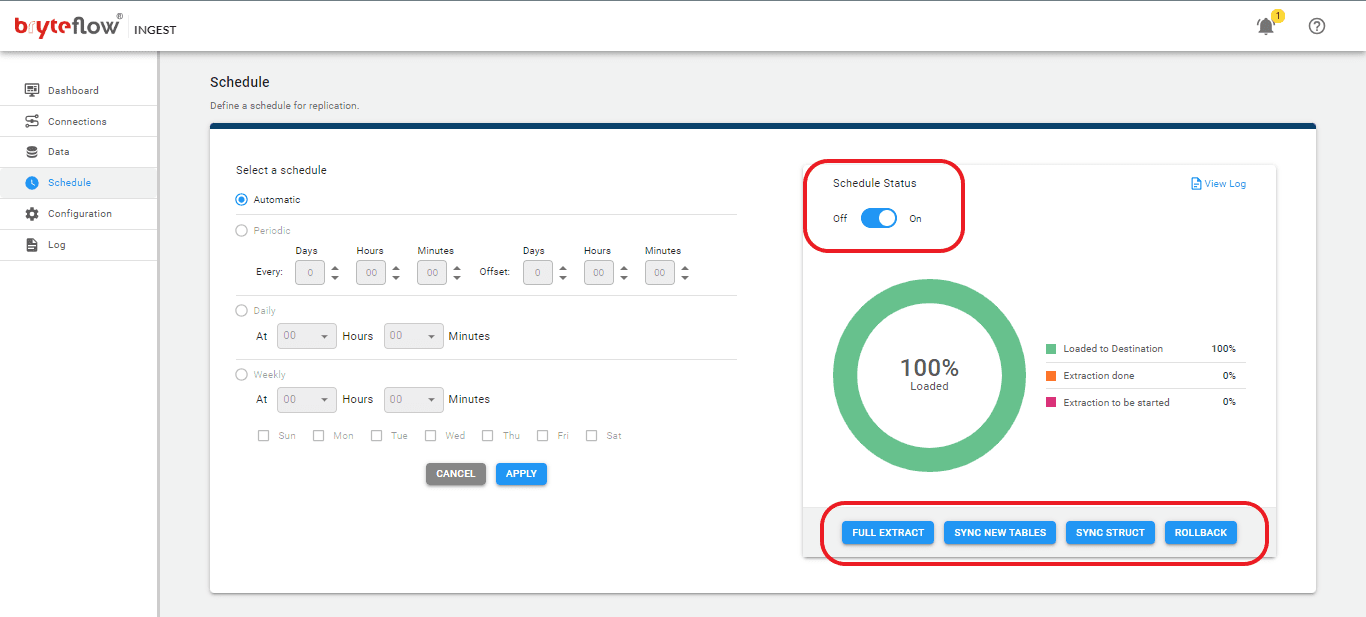
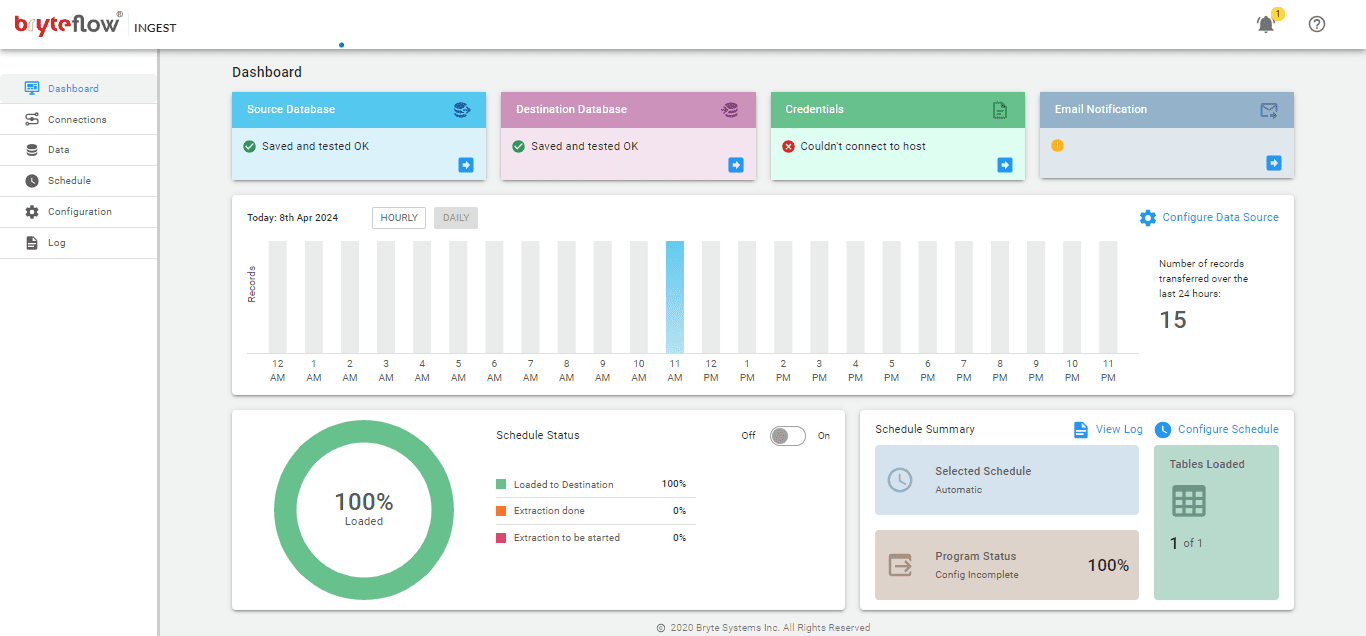
Monitoring these tasks is simple with the BryteFlow Ingest dashboard. The dashboard offers visibility into BryteFlow Ingest activities, including total loaded records and tables, real-time updates on loading operations, replication intervals, and the current connection status.
BryteFlow as an Oracle to Redshift Migration Tool
- BryteFlow replicates data to Redshift using log-based CDC (Change Data Capture) to sync data with changes at source, and provides a history of every transaction, for data versioning.
- Provides support for large volumes of enterprise data with parallel, multi-thread loading, smart configurable partitioning and compression- for initial data and incremental data.
- BryteFlow enjoys seamless integration with AWS services so you can avail of services like Amazon S3, EMR clusters, Amazon Athena, Glue Data Catalog and Amazon SageMaker easily. It also uses IAM, KMS, CloudWatch Logs, Metrics and SNS for efficient operations.
- BryteFlow offers the choice of transforming and retaining data on AWS S3 and pushing it selectively to Redshift for multiple use cases including Analytics and Machine Learning. Or replicating and transforming data directly on AWS Redshift itself. Build an S3 Data Lake in minutes
- BryteFlow enhances performance and economics of Redshift by using S3 to prepare and store data, only pushing data needed for querying to Redshift. This frees up the resources of the Redshift database and eliminates the data-load process from the Amazon Redshift cluster, leading to immediate and direct positive impact on Redshift concurrency. Compare AWS DMS with BryteFlow
- With BryteFlow’s automated out-of-the-box data type conversions, you get ready-to-use data on Redshift. AWS ETL with BryteFlow
- BryteFlow automates every process, including data extraction, merging, data mapping, masking, schema and table creation, DDL, and SCD Type 2 history.
- BryteFlow is optimized for Redshift and creates dist keys and sort keys automatically.
- BryteFlow can load data to S3 and Redshift in parallel in case you have the requirement, it saves a lot of time. Data integration on Amazon S3
- BryteFlow Blend our data transformation tool can merge and transform data from multiple sources, including any database, any flat file or any API for querying on Redshift.
- BryteFlow enables querying of exabytes of data in S3 using Redshift, without needing to load the data into Redshift. This is done through Redshift Spectrum, a feature of Amazon Redshift. Amazon Athena can also be used for ad hoc queries. AWS Athena vs Redshift Spectrum
- In case of interruptions due to power outages or system shutdowns, BryteFlow has an automatic network catch-up mode. It continues from where it halted when normal conditions are restored.
- BryteFlow TruData provides automated data reconciliation using row counts and columns checksum to check for missing or incomplete data and provides relevant notifications.
- BryteFlow provides replication support for all Oracle versions, including Oracle 12c, 19c, 21c and future releases for the long term.
- BryteFlow is an AWS Advanced Technology Partner with certified competencies in Data Analytics, Migration and Public Sector.
This article discussed Oracle to AWS Redshift migration, its benefits and challenges, the basic phases in the process and 2 easy methods -one manual and the other automated using BryteFlow. If you are interested in our data migration solutions, contact us for a demo